
Yes—beginners can build strength, improve mobility, and relax using chair yoga. Chair yoga adapts classic yoga moves to a seated or chair-supported setup, so you get the benefits of stretching, gentle strengthening, posture work, and breath control without getting on the floor.
It’s ideal if you sit a lot, want a low-impact start, or have balance or joint concerns. Below you’ll find what to expect, how to set up safely, and a complete list of 16 beginner exercises with clear, step-by-step cues.
Why Chair Yoga Exercises Matter for Beginners

Chair yoga makes movement safe, simple, and effective — perfect for anyone new to exercise, recovering from injury, or dealing with stiffness and balance issues. It bridges the gap between inactivity and traditional yoga by using a chair for support, allowing you to move confidently and comfortably.
Key benefits for beginners:
- Improves flexibility safely: Seated stretches loosen tight muscles and joints without strain.
- Builds strength and balance: Gentle holds activate the core and legs, supporting daily movement.
- Reduces stress and tension: Controlled breathing calms the mind and body.
- Encourages consistency: Easy to start and maintain, helping you build lasting mobility and confidence.
In short, chair yoga helps beginners move better, feel stronger, and stay active—one safe, supported step at a time.
Quick Start: What You Need

- A stable, non-wheeled chair on a non-slip surface
- Comfortable clothing and flat shoes or bare feet
- Optional: small pillow or folded towel (lumbar support), light band/strap, towel
Session plan (beginner): 10–20 minutes, 2–3×/week. Hold each move for ~30–60 seconds or 8–12 slow breaths. Move slowly; stop if you feel sharp pain.
Safety & Setup
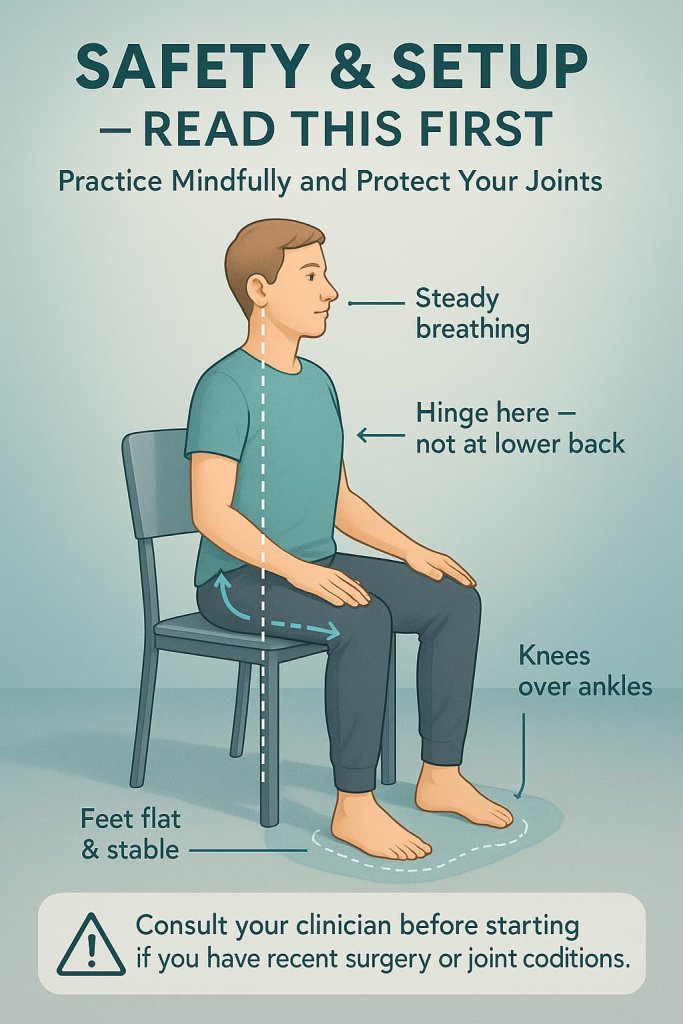
- Keep your feet flat, knees over ankles, and sit tall on your sit-bones.
- Move slowly; avoid bouncing or forcing range.
- Hinge from the hips (not the low back) when folding forward.
- Breathe steadily—never hold your breath.
- If you have recent surgery, unstable joints, severe osteoporosis, or uncontrolled blood pressure, consult a clinician before starting.
The 16 Best Chair Yoga Exercises for Beginners
These 16 beginner-friendly chair yoga exercises combine gentle stretching, strength building, and mindful breathing — helping you move better, feel stronger, and relax with confidence.
Practice them regularly to improve flexibility, posture, and balance while keeping your joints safe and supported.
1) Seated Mountain (Tadasana)
Why it works:
This foundational pose re-establishes proper alignment and awareness of posture. It activates the core, postural back muscles, and deep stabilizers that help you sit and stand taller. Practicing it at the start of every session builds body awareness and sets the tone for balanced movement.
Muscles worked:
Postural erector spinae, deep abdominal stabilizers (transverse abdominis), hip stabilizers, and glute medius/minimus.
How to do it:
- Sit tall with feet flat on the floor, hip-width apart.
- Lengthen your spine as if a string is gently pulling the crown of your head toward the ceiling.
- Keep shoulders relaxed and hands resting on thighs or by your sides.
- Breathe slowly and evenly for 5–8 breaths, maintaining a tall posture throughout.
Trainer Tip:
If your back tends to round, scoot slightly forward on the chair and place a folded towel behind your lower back for gentle lumbar support.
2) Seated Cat–Cow
Why it works:
This gentle spinal mobility drill loosens stiffness from sitting and improves movement between vertebrae. Alternating flexion and extension enhances circulation in spinal discs and prepares your back for deeper stretches.
Muscles worked:
Rectus abdominis, multifidus, erector spinae, and deep spinal stabilizers.
How to do it:
- Sit upright with hands on thighs.
- Inhale: lift the chest and gently arch your back, gazing slightly upward (Cow).
- Exhale: round your back, tuck your chin toward your chest, and draw your belly inward (Cat).
- Continue 6–10 smooth, controlled cycles.
Trainer Tip:
Move with slow, steady breathing—focus on smooth motion rather than large range. Quality control is more important than depth.
3) Seated Forward Fold (Hip Hinge)
Why it works:
Improves flexibility in the hamstrings, glutes, and spine while teaching you to hinge from the hips—essential for safe bending and lifting. It also relieves tension in the back and legs.
Muscles worked:
Hamstrings, gluteus maximus, erector spinae, and hip extensors.
How to do it:
- Sit near the front edge of the chair, feet flat.
- Inhale to lengthen your spine.
- Exhale as you hinge forward from your hips, keeping your back long (avoid rounding).
- Rest hands on thighs, shins, or the floor if reachable.
- Hold for 20–30 seconds and breathe steadily.
Trainer Tip:
If you feel tightness in the back of your legs, keep a soft bend in your knees and prioritize a long spine instead of touching the floor.
4) Seated Chest Opener (Cactus or Eagle Arms)
Why it works:
Counteracts rounded shoulders from desk posture by stretching the chest and strengthening upper-back muscles. It also expands lung capacity and improves breathing mechanics.
Muscles worked:
Rhomboids, middle and lower trapezius (active), pectoralis major/minor (stretch).
How to do it:
- Sit upright.
- Cactus position: Bend elbows 90°, upper arms parallel to the floor, palms forward. Draw elbows slightly back as you lift the chest. Hold 30–40 seconds.
- Eagle arms: Cross right arm under left, bend elbows, and bring forearms together or as close as comfortable. Hold 20–30 seconds each side.
Trainer Tip:
Lift through the chest rather than arching the lower back. Keep your shoulders relaxed away from your ears.
5) Seated Side Bend
Why it works:
Improves side-body flexibility, lengthens tight obliques, and helps the ribs and spine move more freely—essential for balanced posture and overhead reach.
Muscles worked:
Obliques, latissimus dorsi, quadratus lumborum, and intercostal muscles.
How to do it:
- Sit tall, feet flat.
- Raise your right arm overhead; hold the chair with your left hand.
- Exhale and gently lean left, feeling a stretch along your right side.
- Inhale to return upright.
- Repeat 3–5 times each side, holding the final stretch 20–30 seconds.
Trainer Tip:
Keep both sit bones evenly grounded and avoid collapsing forward or twisting.
6) Seated Spinal Twist
Why it works:
Restores gentle spinal rotation, improving flexibility in the torso and easing back tension from prolonged sitting.
Muscles worked:
Obliques, erector spinae (rotation), and deep spinal rotators.
How to do it:
- Sit tall with feet grounded.
- Place your left hand on the outside of your right thigh and your right hand behind you on the chair back.
- Inhale to lengthen; exhale to twist gently to the right from your mid-spine.
- Hold 20–30 seconds, then switch sides.
Trainer Tip:
Rotate from your mid-back (thoracic region), not the lower back. Keep hips square and stable.
7) Seated Figure-4 Hip Stretch
Why it works:
Opens tight hips and glutes, helping reduce pressure in the lower back and improving sitting comfort.
Muscles worked:
Gluteus medius, piriformis, and deep hip rotators.
How to do it:
- Cross your right ankle over your left knee, forming a “4.”
- Keep spine long and chest lifted.
- Gently hinge forward until you feel a stretch in the right hip.
- Hold for 20–30 seconds, then switch sides.
Trainer Tip:
Don’t push down on the top leg; let gravity do the work. Keep your back straight and neck relaxed.
8) Seated Hamstring Stretch (with Strap or Towel)
Why it works:
Lengthens the hamstrings, improves mobility, and helps counteract stiffness from prolonged sitting.
Muscles worked:
Hamstrings and gluteus maximus (stretch).
How to do it:
- Sit near the chair’s edge.
- Extend your right leg, heel on the floor, toes pointed up.
- Loop a strap or towel around the ball of your foot.
- Inhale to lengthen the spine; exhale to hinge forward from the hips.
- Hold for ~30 seconds per side.
Trainer Tip:
Keep the back long—avoid rounding forward. A soft bend at the knee protects your lower back.
9) Seated Knee Extensions & Ankle Pumps
Why it works:
Improves circulation and leg activation while strengthening the quadriceps and lower leg—especially helpful after long sitting periods.
Muscles worked:
Quadriceps, tibialis anterior, and calf muscles.
How to do it:
- Sit upright.
- Extend one leg until straight, flexing your foot (toes toward you). Hold 2–3 seconds, then lower. Repeat 8–10 times per leg.
- Then, alternate lifting toes and heels for ~20 seconds per side.
Trainer Tip:
Avoid rocking your torso; keep posture stable and focus on slow, controlled movement.
10) Seated Marches
Why it works:
Activates hip flexors and lower core, improving coordination, balance, and pelvic stability.
Muscles worked:
Iliopsoas, lower abdominals, and hip stabilizers.
How to do it:
- Sit tall, holding the chair sides lightly.
- Lift one knee toward your chest, pause briefly, then lower.
- Alternate legs for 10–12 reps each.
Trainer Tip:
Maintain upright posture and avoid leaning back. Keep your movements slow and controlled.
11) Chair-Supported Warrior I (Standing)
Why it works:
Builds leg and hip strength while improving balance and stretching the hip flexors. Perfect progression from seated positions to supported standing.
Muscles worked:
Quadriceps, glutes, calves, and hip flexors (rear leg stretch).
How to do it:
- Stand behind a sturdy chair, holding the top of the backrest.
- Step one foot forward, the other back.
- Bend the front knee over the ankle while keeping your back leg straight.
- Raise arms overhead or lightly hold the chair.
- Hold for 20–30 seconds per side.
Trainer Tip:
Keep your front knee aligned above your ankle. Use the chair only for light balance—not as full support.
12) Chair-Supported Warrior II (Standing)
Why it works:
Enhances lower-body strength, hip flexibility, and shoulder endurance while improving posture.
Muscles worked:
Adductors (inner thighs), quadriceps, gluteus medius, and upper-back muscles.
How to do it:
- Stand behind the chair. Step your feet wider than shoulder width, front toes forward, back toes slightly out.
- Face sideways to the chair.
- Extend arms to shoulder height, one forward, one back, gaze over the front hand.
- Hold 20–30 seconds per side.
Trainer Tip:
Keep torso upright and shoulders relaxed. Shorten stance if the back heel won’t stay flat.
13) Chair-Supported Chair Pose (Utkatasana)
Why it works:
Strengthens thighs, glutes, and core while reinforcing safe squat mechanics.
Muscles worked:
Quadriceps, gluteus maximus, hamstrings (isometric), and core stabilizers.
How to do it:
- Stand facing the chair.
- Bend your knees and push hips back as if sitting into an invisible chair.
- Keep spine long and chest open.
- Hold for 20–30 seconds.
Trainer Tip:
If knees feel strained, reduce the depth or widen your stance slightly. Keep your heels grounded.
14) Seated Sun-Salutation Flow (Mini)
Why it works:
Combines gentle stretching, coordination, and breath-linked flow to energize the body and mind.
Muscles worked:
Full-body engagement—shoulders, spine, hips, and core.
How to do it:
- Inhale arms up → exhale hinge forward → inhale rise → exhale twist right → inhale center → exhale twist left → inhale arms up → exhale hands to thighs.
- Perform 2–3 slow, mindful rounds.
Trainer Tip:
Pair each motion with your breath, maintaining calm, rhythmic flow.
15) Seated Shoulder Rolls & Scapular Retractions
Why it works:
Relieves neck and shoulder tension while strengthening postural muscles that counteract slouching.
Muscles worked:
Middle and lower trapezius, rhomboids, and posterior deltoids.
How to do it:
- Roll shoulders up, back, and down for 8–10 reps.
- Then, extend arms forward at chest height, palms down.
- Squeeze shoulder blades together for 2–3 seconds, release.
- Repeat 8 times.
Trainer Tip:
Keep your chin tucked slightly and spine tall—avoid shrugging shoulders toward your ears.
16) Seated Box Breathing (4-4-4-4)
Why it works:
Regulates the nervous system, reduces stress, and encourages mental focus at the end of practice.
Muscles worked:
Diaphragm and respiratory stabilizers (neuromuscular control).
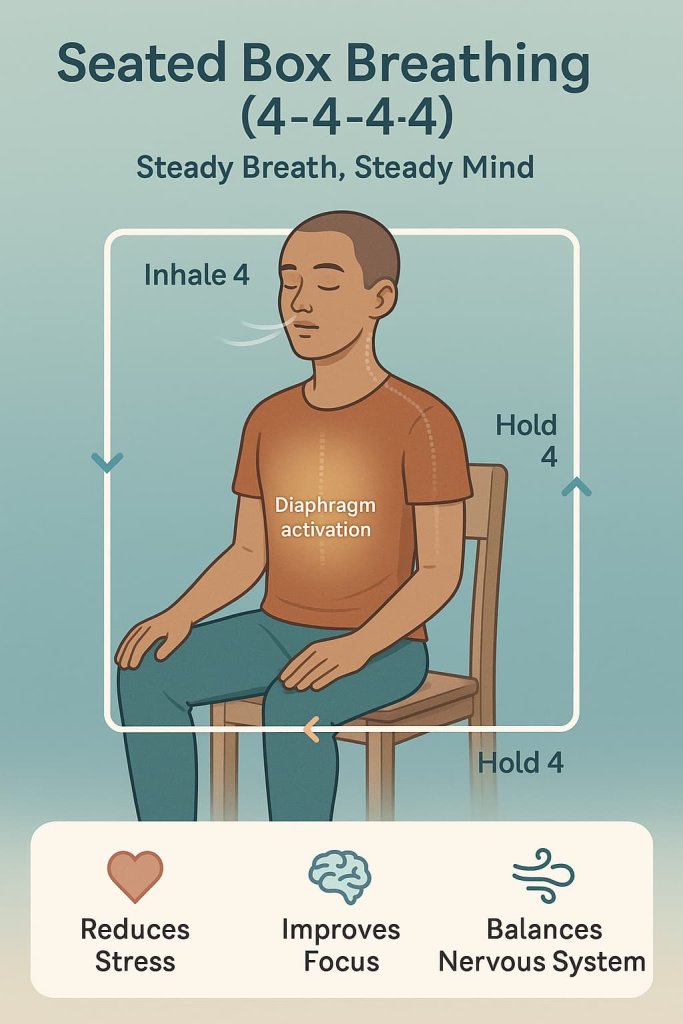
How to do it:
- Sit comfortably, hands resting on thighs.
- Inhale for 4 counts, hold for 4, exhale for 4, hold for 4.
- Repeat for 5–8 cycles (2–3 minutes).
Trainer Tip:
If 4-count holds feel uncomfortable, start with 3-3-3-3 breathing and progress gradually.
Beginner Routine (20 Minutes)
- Warm-Up (2 min): Seated Mountain; Shoulder Rolls
- Mobility (8 min): Cat–Cow → Forward Fold → Side Bend → Twist → Chest Opener
- Strength/Activation (6 min): Knee Extensions/Ankle Pumps → Marches → Chair-Supported Chair Pose → Warrior I
- Stretch (2 min): Figure-4 → Hamstring Stretch
- Flow & Calm (2 min): Mini Sun-Salutation → Box Breathing
Common Mistakes to Avoid
- Rounding the low back when folding—hinge at the hips instead.
- Holding the breath during effort—keep breathing.
- Leaning heavily on the chair—use it for balance, not to offload all your weight (unless medically necessary).
- Rushing through reps—slow, controlled movement is safer and more effective.
Programming Tips & Progression
- Start with 10–20 minutes; add time or an extra set when it feels easy.
- Progress by increasing holds to 45–60 seconds, or adding a light band for leg/hip work.
- When ready, include more standing variations (still chair-supported) to challenge balance.
- Aim for 2–3 sessions per week, then move toward most days if you enjoy it.
Who This Is For (and When to Seek Guidance)
- Great for beginners, office workers, and those with balance concerns.
- Check with a clinician first if you’ve had recent surgery, have unstable joints, severe osteoporosis, or uncontrolled cardiovascular issues.
FAQ
1) Do I need prior yoga experience?
No. Chair yoga is designed to be approachable and scalable.
2) Can I do chair yoga daily?
Yes—short daily sessions work well. Listen to your body and rotate lighter/easier days with slightly longer ones.
3) What if my knees or hips feel stiff?
Reduce range, add a pillow under the thighs for support, keep movements pain-free, and focus on slow breathing.
4) Will this help my posture?
Yes. The combination of postural cues, upper-back activation, and hip mobility supports healthier alignment.
5) How soon will I feel benefits?
Many beginners notice less stiffness and better mood within a week or two of consistent practice; strength and mobility typically build over several weeks.
6) Can I do this at my desk?
Absolutely. Most of the seated sequence can be done in brief “movement snacks” between tasks.
Conclusion
Chair yoga is a smart, accessible way to move, build confidence, and feel better—no mat required. Start with the routine above this week, capture a quick “before/after” note on your stiffness and mood, and aim for 2–3 sessions next week. Consistency is the secret.
References
- National Institute on Aging (NIA) — Exercise & Physical Activity: Getting Started Safely
https://www.nia.nih.gov/health/exercise-physical-activity - NHS (UK) — Sitting Exercises (Step-by-Step Chair Routine & Safety Tips)
https://www.nhs.uk/live-well/exercise/sitting-exercises/ - Randomized Controlled Trial — Chair Yoga for Osteoarthritis in Older Adults (Full Text, PMC)
https://www.ncbi.nlm.nih.gov/pmc/articles/PMC5357158/ - U.S. HHS — Physical Activity Guidelines for Americans, 2nd Edition (Foundational Recommendations) https://health.gov/our-work/nutrition-physical-activity/physical-activity-guidelines