
Starting your Peloton journey can feel intimidating—especially if you’ve never used clip-in cycling shoes before. The good news is that learning how to put on Peloton shoes and clip into the pedals is easier than it looks, and once you get the hang of it, it becomes second nature.
This beginner’s guide combines real-world experience from Peloton riders with up-to-date expert recommendations to help you feel confident before your very first ride.
Using practical tips and common rider mistakes to avoid, this guide will walk you through:
- How to attach cleats to Peloton shoes correctly
- How to put on Peloton cycling shoes the right way
- How to clip in and unclip from Peloton pedals safely
- What to do if Peloton shoes won’t clip in or out (easy fixes)
- Additional setup tips to improve comfort, safety, and performance
By the end of this guide, you’ll be able to clip in smoothly, ride comfortably, and focus on enjoying your Peloton workouts instead of worrying about your shoes.
Attaching Cleats to the Peloton Shoes
Before putting on your shoes, make sure your cleats (most often Look Delta) are attached. In 2025, all Peloton shoes—including Standard, Altos, and the new Summit model—use Look Delta cleats for a seamless fit and easy setup. The process is the same for each model.
In that case, how do you attach the cleats to the Peloton shoes?
- First off, position the cleat on the bottom of the shoe, with each cleat hole matching the shoe cleat plate design.
- Then, set the washers into the cleat recesses, followed by the screws.
- Next, tighten the screws into place simultaneously, a little at a time for each. This will give the cleat a level fitting.
- The cleats should face forward and in line with the large toe area. Also, the central part should be at the ball of the shoe.
- Next, use a 4mm hex key to tighten the screws. Again, tighten the screws at a simultaneous rate to protect the leveling.
- Only tighten the cleats until you feel the resistance. More tightening could break them, while less tightening causes the cleats to stick on the pedals and fail to clip out.
- Repeat the process with the other shoe, and you will be ready in a few minutes.
- Tip for 2025: Check cleat screws every few weeks—new Peloton shoes come with easy-to-see alignment markers for better positioning.
How to Put on Peloton Shoes
Peloton now offers three main cycling shoe models:
- Standard Peloton cycling shoes (leather, three velcro straps and a buckle)
- Altos cycling shoes (breathable jacquard mesh, one zigzag velcro strap)
- Summit cycling shoes (NEW for 2025, dial closure system, advanced breathability and fit)
What is the difference between the Peloton shoes? Essentially, both shoes are three-hole Look Delta cycling shoes.
The Summit shoes, released in 2025, offer a micro-adjustable dial fit system, making it quicker and easier to get a custom fit.
The Altos Peloton shoes are made of jacquard mesh, which is breathable and lightweight. Moreover, the closure consists of one velcro strap across the shoe, which is easy to put on and off.
However, the standard Peloton shoes have a dominant leather top material. Here, the closure consists of three velcro straps, with a buckle for the top closure.
How to Put On Peloton Summit Shoes (2025):
– Turn the dial to loosen the shoe and open the upper.
– Slip your foot in.
– Turn the dial clockwise for a snug, precise fit.
– Adjust as needed during your ride.
How to Put On Standard Peloton Cycling Shoes
Basically, Peloton shoes have a stiff fiberglass outsole, and the cleats protrude at the bottom. Therefore, you have to sit while wearing them to maintain your balance.
So, ready to put on the Peloton shoes for riding? Then, let’s get down to it!
- Loosen the top velcro strap by pressing on the buckle at the outer side of the shoe.
- Then, put on the shoe, just as you would with other shoes.
- Next, push the velcro through the buckle to a snug fit and snap the buckle back on.
- If the shoe feels tight, click on the buckle button again and slightly pull the velcro strap. On the other hand, click on the buckle and push the strap through the buckle if it feels loose.
- The Peloton shoes have two other straps. If you feel that the shoe is too tight in the front area, you can loosen the straps.
How to Put On Peloton Altos Cycling Shoes
- Get the hook of the velcro strap out of the loop, and put it on the shoe.
- Next, put the strap back onto the loop.
- What if the shoe feels too tight or too loose? The Altos have only one velcro strap, zigzagged across the shoe closure. Therefore, you will only need to adjust the velcro strap to adjust the shoe. The best part about the alto shoe is that there is no buckle for the strap. Instead, you attach the strap onto a loop.
Tip: Always sit down when putting on cycling shoes; the stiff sole and protruding cleats make it hard to balance while standing.
How to clip in Peloton Shoes to The Peloton Pedals
Regardless of whether you use the standard cycling shoes, the new Altos, or other Peloton-compatible cycling shoes, the process of clipping in is the same.
Let’s dig into the procedure;
- Start by standing across the bike, each foot on its pedal side.
- Then, using your dominant foot (right for the right-handed and left for the left-handed), bring the pedal on your dominant side to the six o’clock position.
- As the pedal faces up, bring the front of your foot down to fit the cleats into the open clipless pedal platform.
- Next, push down through the heel until you hear a clicking sound, which indicates a successful clipping in.
- Finally, wiggle the shoe from side to side to secure the cleat onto the pedal.
- Repeat the process for the other foot, and get onto your pedaling adventure!
- On 2025 models, you may notice an easier step-in feel thanks to improved pedal tension design.
I Can’t Clip Into Peloton pedals
Peloton shoes won’t clip in? Commonly there have two reasons to difficult to clip into peloton pedals.
- Pedal tension is too tight
- Installed your cleats incorrectly
If your Peloton shoes fail or are too difficult to clip in, the pedal tension has to do with it. It means that the pedal tension is too tight, and you need to loosen it slightly for easy clipping in. This will loosen the pressure on the pedals. However, ensure that you don’t over loosen because this will also have a negative effect on your pedaling experience.
loosen the pedal tension is very easy:
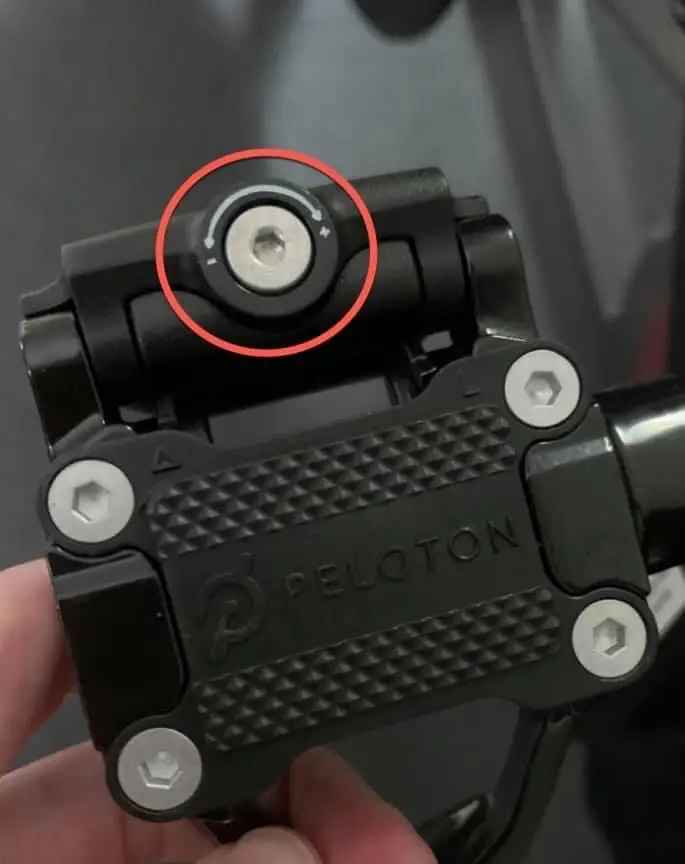
You will use the 3mm Allen wrench to turn the tension screw towards the negative (-) sign (counterclockwise).
On the latest Peloton bikes, look for a tension dial with a clear visual indicator for easier adjustment.
I already wrote an article about this you can read: How to Loosen and Tighten the Peloton Pedal Tension
Reason 2: Installed your cleats incorrectly
You may have installed your cleats incorrectly in addition to the Peloton pedal tension. Therefore, check on the cleats as well to ensure that they match the Peloton pedals.
There are two types of Peloton cleats that you can get from Peloton; one has a rectangular black rubber band, and another has a circular black rubber band. Both work on the Peloton shoes.
However, there is a difference;
The rectangular rubber cleat is suitable for larger shoe sizes. However, for smaller shoe sizes, tightening the screws get the rubber band protruding. It bumps onto the Peloton pedal cleat surface when it protrudes, interfering with the clipping in. Therefore, you will have to return the cleats to Peloton for a new pair. They will most likely send the circular rubber cleat the second time.
More irregular but possible is the fact that you could be using the wrong type of cycling cleats. Some users made the mistake of ordering Look Keo cleats instead of look delta cleats, not realizing that the two different types are almost the same. Look Delta cleats, which the Peloton bike uses, are wider, while Look Keo, the other option, is narrower.
So, check that you have the right type of cycling cleats for your shoes; they should be either Look Delta for the Peloton default pedals.
If you have the wrong type of cycling cleats for Peloton, consider ordering these BV Bike Cleats.
2025 Update:
– Only Look Delta cleats are compatible with stock Peloton pedals.
– Peloton now officially supports several third-party Look Delta cleats and shoes, giving riders more choice.
– Always re-check your cleat tightness every few weeks—loose cleats are the most common cause of issues.
How to Clip Out of the Peloton Pedals
It is exciting to finally get on the Peloton bike and ride the first class for the first time. However, it becomes a nightmare when you are unable to clip out of the bike.
So, how do you clip out of the Peloton bike?
- Kick the heel outwards with some force, and clip out of the pedal.
- Once you clip out with one foot, please put it on the floor and clip out the other foot. The second foot is always easier.
- Tip: If your cleat feels stuck, rock your foot side-to-side gently and check pedal tension before applying more force.
Tips to Consider When Putting On Peloton Shoes
- The cleats should be correctly set in place for proper clipping in with the bike pedals.
- Moreover, the cleats need to be tight so that when clipping out, the resistance will be minimal. If you don’t tighten the cleats, there is a likelihood that the cleats will get stuck on the pedals, which will prevent clipping out. In this case, you may be forced to unscrew the pedals, which will be more tasking and time-consuming.
- When cleaning your peloton shoes, hand-wash is more preferred to machine-wash. The machine wash could cause damage to the shoe bottom and the cleats; hence not recommended.
- The new Peloton Summit and Altos shoes feature breathable uppers and removable, washable insoles for easier care.
FAQs
Will the Stiff Cycling Shoes make a Difference?
Yes, they will. Stiff cycling shoes, usually made in carbon outsoles, give you better power transfer from your feet to the pedals. Power transfer prevents fatigue and allows you to cycle faster and over a long time compared to when you cycle without sufficient power transfer.
Can You Use SPD Cleats on Peloton Shoes?
No, you cannot. SPD cleats are for 2-hole shoes, and Peloton pedals only accept Look Delta 3-hole cleats (not SPD-SL, despite the similar bolt pattern). Always choose Look Delta for compatibility.
Does it get easier to clip in and out of the Peloton?
No, it doesn’t. Clipping out means a complete detachment of the cleats from the pedal platform, where they were locked. However, the locking makes it safe to ride on clipless pedals.
However, if it is too hard and you have to loosen the tension, then yes, it gets easier after the adjustment.
Why is it so hard to clip out of Peloton?
It is hard to clip out of the Peloton bike because you try to unlock the cleats from the pedals. However, it shouldn’t be too hard to manage with the regular unclipping procedure. If it is, then you should consider a mitigation process.
2025 Update: Newer pedals have a smoother release and clearer tension indicators to reduce accidental sticking or over-tightness.
Wrapping Up
Putting on the Peloton shoes and clipping in successfully gets you through a stress-free Peloton experience. However, knowing how to clip out makes it even better.
With 2025’s new shoes and pedals, the process is more comfortable, more user-friendly, and compatible with more options than ever before.
The good news is that you don’t require extra tools to wear the shoes or clip them in and out. And where you need wrenches and hex keys for installing the cleats and adjusting the pedals and the tension.
So, now you can confidently remove the toe cages on the pedals for a more exhilarating clipless pedal experience on your Peloton bike.
Read Also: