
The glute bridge is one of the most effective exercises to build stronger, rounder, and more lifted glutes — all without gym equipment.
It strengthens your glutes, core, and hamstrings while improving posture and stability. Whether you’re training for performance, physique, or pain prevention, mastering glute bridge variations helps you activate and sculpt your lower body efficiently.
Understanding and practicing these exercises can improve hip strength, reduce back pain, and enhance athletic performance. Below, you’ll find the 12 best glute bridge workouts with clear instructions, benefits, and safety tips.
What Is a Glute Bridge?
A glute bridge is a bodyweight exercise performed lying on your back, where you lift your hips off the ground by contracting your glutes and core.
According to a Strength & Conditioning Journal review and ACE exercise guidance, the glute bridge primarily targets the gluteus maximus, with assistance from the hamstrings and core stabilizers, and—when performed with a neutral spine—builds strength and mobility without excessive lumbar strain.
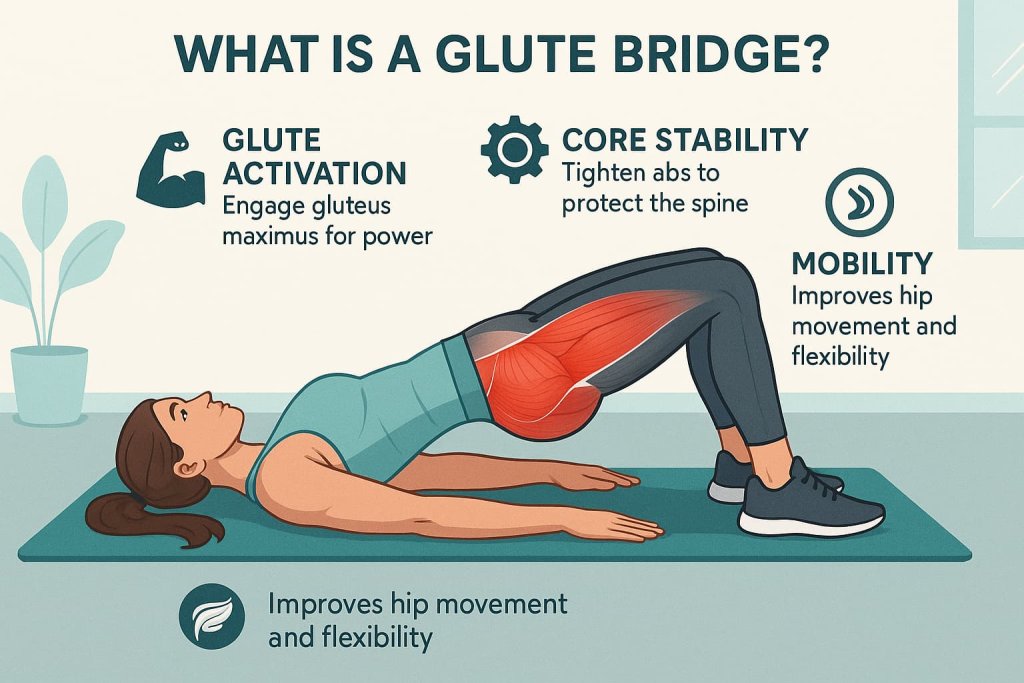
Benefits:
- Builds and tones glutes
- Improves hip and lower-back stability
- Enhances posture and athletic performance
- Supports core strength and balance
- Requires no equipment
How to Do a Basic Glute Bridge
Step-by-step:
- Lie on your back, knees bent, and feet hip-width apart.
- Keep arms flat by your sides, palms facing down.
- Engage your core, then squeeze your glutes to lift your hips toward the ceiling.
- Hold for 2 seconds, then slowly lower back down.
- Perform 3 sets of 12–15 reps.
Trainer Tip: Don’t overarch your back — focus on squeezing the glutes at the top for maximum activation.
12 Best Glute Bridge Workouts
Each variation targets the glutes from slightly different angles to maximize activation and results.
1. Standard Glute Bridge
Why it works:
The foundation of all glute bridge variations, this move strengthens the gluteus maximus, hamstrings, and core stabilizers. It improves hip mobility, posture, and overall lower-body strength, making it a must-have for beginners and advanced lifters alike.
Muscles worked: Gluteus maximus, hamstrings, erector spinae, and abdominals.
How to do it:
- Lie on your back with knees bent and feet hip-width apart.
- Keep your arms at your sides, palms down.
- Engage your core and press through your heels to lift your hips until your body forms a straight line from shoulders to knees.
- Pause briefly, then lower your hips slowly back to the floor.
- Perform 3 sets of 12–15 reps.
Trainer Tip:
Hold the top position for 3–5 seconds each rep to maximize glute contraction and control the descent to increase muscle engagement.
2. Single-Leg Glute Bridge
Why it works:
Unilateral training builds balance, coordination, and corrects muscle imbalances between legs. It also increases glute activation on the working side.
Muscles worked: Gluteus maximus (one side), hamstrings, hip flexors, and core.
How to do it:
- Lie flat with one knee bent and the other leg extended straight.
- Drive through the heel of your bent leg to lift your hips.
- Keep hips level and core tight throughout.
- Lower slowly and repeat, then switch sides.
Trainer Tip:
Place your hands lightly on your hips to ensure they stay square — avoid twisting or rotating.
3. Banded Glute Bridge
Why it works:
The resistance band increases tension on the glute medius and minimus, helping shape and lift the outer glutes while improving hip stability.
Muscles worked: Gluteus maximus, gluteus medius, hamstrings, and core.
How to do it:
- Place a resistance band just above your knees.
- Perform a standard glute bridge while pressing your knees outward against the band.
- Maintain outward tension throughout the movement.
Trainer Tip:
Avoid letting your knees cave inward — constant band tension ensures deeper glute activation.
4. Elevated Glute Bridge
Why it works:
Lifting your feet on a bench or step increases range of motion and time under tension, enhancing glute and hamstring strength.
Muscles worked: Glutes, hamstrings, core, and calves.
How to do it:
- Lie on your back and place your feet on a bench, knees bent at 90°.
- Drive through your heels to lift your hips upward.
- Squeeze your glutes at the top, then slowly lower down.
Trainer Tip:
Keep knees in line with hips and don’t push from your toes — heels should stay grounded.
5. Weighted Glute Bridge
Why it works:
Adding load increases muscle recruitment and stimulates hypertrophy, helping build strength and shape faster.
Muscles worked: Gluteus maximus, hamstrings, erector spinae, and core.
How to do it:
- Place a dumbbell or barbell across your hips.
- Perform the bridge, holding the weight steady throughout.
- Focus on controlled lifting and lowering.
Trainer Tip:
Use a soft pad or towel under the weight for comfort, and never overarch your back — lead with your hips.
6. Marching Glute Bridge
Why it works:
Combines glute activation with core stabilization, making it ideal for athletes and beginners working on pelvic control.
Muscles worked: Glutes, hamstrings, hip flexors, and core.
How to do it:
- Lift into a bridge position.
- Keeping hips steady, raise one knee toward your chest.
- Lower and repeat with the opposite leg.
Trainer Tip:
Move slowly and deliberately — your goal is to keep hips perfectly level, not to march quickly.
7. Glute Bridge Hold
Why it works:
Isometric holds improve muscular endurance and strengthen glutes through sustained contraction, increasing tone and control.
Muscles worked: Gluteus maximus, hamstrings, and core stabilizers.
How to do it:
- Lift your hips into the bridge position.
- Hold at the top for 20–30 seconds.
- Lower and rest, then repeat.
Trainer Tip:
Focus on squeezing glutes continuously during the hold; do not relax your muscles.
8. Hip Thrust (Bench Variation)
Why it works:
Offers a deeper range of motion and stronger contraction than the floor bridge — one of the best moves for glute hypertrophy.
Muscles worked: Gluteus maximus, hamstrings, and core.
How to do it:
- Sit with your upper back resting on a bench.
- Place feet flat on the floor and a barbell or dumbbell across your hips.
- Drive through your heels to lift hips until they align with your shoulders and knees.
- Lower slowly.
Trainer Tip:
Keep your chin tucked and torso tight — don’t overextend your spine at the top.
9. Frog Pump Glute Bridge
Why it works:
Targets both glutes and inner thighs while minimizing hamstring dominance, great for shaping the lower glute area.
Muscles worked: Gluteus maximus, adductors, and core.
How to do it:
- Lie on your back, soles of feet together, knees open wide.
- Drive through your feet and lift hips while squeezing glutes.
- Perform small, controlled reps.
Trainer Tip:
Focus on squeezing your glutes, not pushing from your legs — smaller movements are more effective here.
10. Stability Ball Glute Bridge
Why it works:
Adds instability, forcing your core and stabilizer muscles to work harder while maintaining balance.
Muscles worked: Glutes, hamstrings, core, and calves.
How to do it:
- Lie on your back and place your heels on a stability ball.
- Lift hips by pressing into the ball and engaging your glutes.
- Lower with control.
Trainer Tip:
Keep your abs tight — avoid letting the ball roll or wobble during the lift.
11. Glute Bridge with Pulse
Why it works:
Pulsing keeps the glutes under tension longer, enhancing endurance and toning the muscle fibers.
Muscles worked: Glutes, hamstrings, and core.
How to do it:
- Perform a standard bridge and pause at the top.
- Pulse your hips up and down a few inches for 15–20 seconds.
- Return to start position.
Trainer Tip:
Combine this with a banded bridge for even greater burn and muscle activation.
12. Resistance Band Hip Thrust
Why it works:
Merges the benefits of resistance and dynamic hip extension, promoting maximum glute growth and power.
Muscles worked: Gluteus maximus, hamstrings, and hip stabilizers.
How to do it:
- Sit with your upper back on a bench, knees bent, and a resistance band over your hips.
- Anchor the band under your hands or a stable surface.
- Drive through your heels to lift hips powerfully, then lower under control.
Trainer Tip:
Engage your core and push your knees slightly outward to maintain tension throughout the movement.
How Often Should You Do Glute Bridge Workouts?
For best results, perform 2–3 sessions per week with at least one rest day in between.
Alternate between bodyweight and resistance variations for balanced development.
According to Trainer, consistent glute activation improves hip function and posture within 4–6 weeks.
Common Mistakes to Avoid
- Overarching your lower back instead of engaging glutes
- Pushing from your toes instead of your heels
- Rushing through reps
- Neglecting progressive overload (weight or resistance)
Safety and Form Tips
- Always warm up your hips, glutes, and core (5–10 minutes).
- Start with bodyweight before adding resistance.
- Focus on muscle control, not speed.
- Stop immediately if you feel back or knee pain.
FAQs About Glute Bridge Workouts
1. Are glute bridges good for lower back pain?
Yes. Strengthening the glutes helps stabilize the pelvis and reduce stress on the lower back.
2. Can I do glute bridges every day?
Light activation drills can be daily, but for full workouts, 2–3 times per week allows proper recovery.
3. Do glute bridges make your butt bigger?
When combined with progressive overload and proper nutrition, yes — they build glute muscle mass.
4. What’s better: glute bridge or hip thrust?
Hip thrusts engage a wider range of motion and allow heavier loading, making them better for muscle growth, while bridges are great for beginners and activation.
5. Should I feel glute bridges in my hamstrings?
A little is normal, but if you feel it more in your hamstrings than glutes, drive through your heels and tighten your core.
6. Can I add weights at home?
Yes. Use a dumbbell, resistance band, or even a backpack for progressive resistance.
7. How long until I see results?
With consistent training 2–3 times a week, noticeable improvements in strength and tone usually appear within 4–8 weeks.
Conclusion
The glute bridge workout is a simple yet powerful way to build strength, tone your glutes, and improve posture — no gym required.
By mastering these 12 variations, you’ll activate every part of your glutes and develop a stronger, more stable lower body.
Start today, stay consistent, and focus on form — your results will speak for themselves.
References
- Journal of Strength & Conditioning Research (2021) — Glute Max Activation in Hip Thrust vs. Squat/Split Squat
https://journals.lww.com/nsca-jscr/fulltext/2021/01000/activation_of_the_gluteus_maximus_during.3.aspx - Peer-Reviewed (2025) — Acute Effects of Hip Thrust and Glute Bridge on Sprint Performance
https://pmc.ncbi.nlm.nih.gov/articles/PMC11745155/ - Systematic Review (2019) — Barbell Hip Thrust: Muscular Activation & Performance
https://pmc.ncbi.nlm.nih.gov/articles/PMC6544005/ - ACSM Position Stand — Progression Models in Resistance Training for Healthy Adults
https://pubmed.ncbi.nlm.nih.gov/19204579/