
Pelvic floor exercises for women are the best way to strengthen, support, and restore core health — especially after childbirth, menopause, or with age. These targeted exercises train the muscles that support a woman’s bladder, uterus, and bowel, helping improve control, stability, posture, and everyday confidence.

Understanding the pelvic floor is essential for women’s health, as weak muscles can lead to urinary leakage, pelvic organ prolapse, or lower back pain — conditions that affect millions of women worldwide. Fortunately, consistent pelvic floor training can naturally strengthen these muscles, prevent complications, and enhance quality of life.
This guide explains how pelvic floor exercises for women work, how to perform them correctly, and highlights the 10 best physiotherapist-recommended movements supported by current research.
Why Pelvic Floor Exercise Matters for Women
A strong pelvic floor is essential for every woman — it supports the bladder, uterus, and bowel, stabilizes the core, and enhances everyday confidence. When these muscles weaken, women may experience bladder leaks, pelvic pressure, or even organ prolapse, especially after childbirth or during menopause.
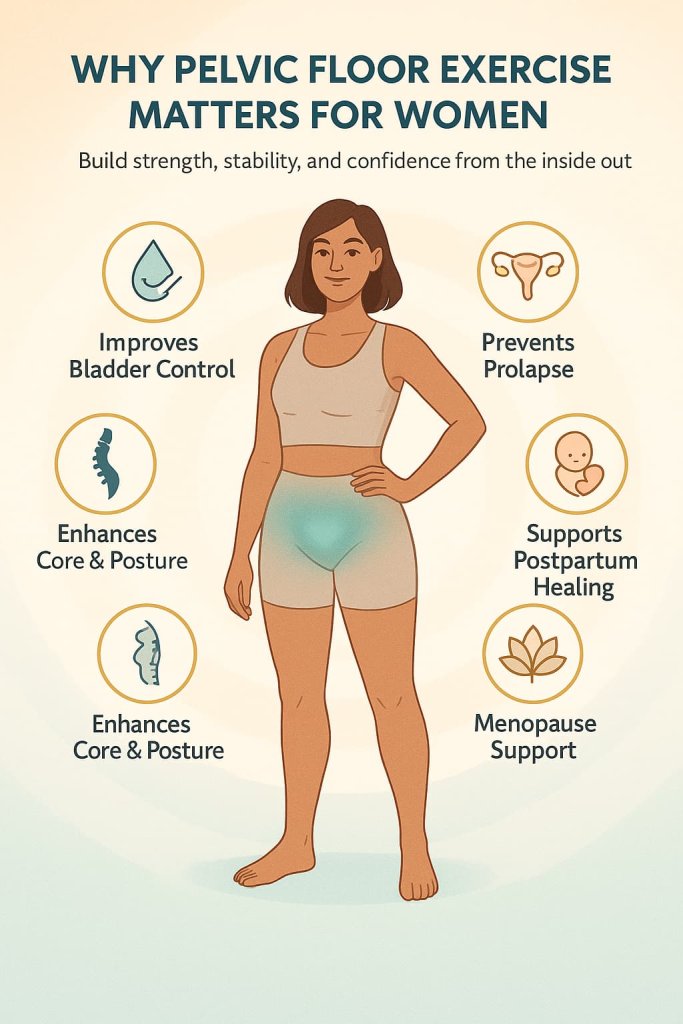
Regular pelvic floor exercises for women help:
- Improve bladder control: Reduce or prevent urinary leakage and stress incontinence.
- Support pelvic organs: Strengthen the “hammock” of muscles that hold the uterus, bowel, and bladder in place.
- Ease recovery after childbirth: Promote faster postpartum healing and stability.
- Enhance sexual wellness: Improve muscle tone and circulation, contributing to increased comfort and sensation.
- Protect spinal alignment: Work synergistically with the core to reduce back pain and improve posture.
- Prevent prolapse progression: Reinforce tissue support as estrogen levels drop during menopause.
According to NHS (2024) and Cochrane Review (2024), pelvic floor muscle training (PFMT) remains the first-line, evidence-based approach for treating and preventing urinary incontinence in women. Studies show that consistent PFMT can improve muscle strength and quality of life by up to 50–70% within three months of regular practice.
How to Activate Your Pelvic Floor Muscles
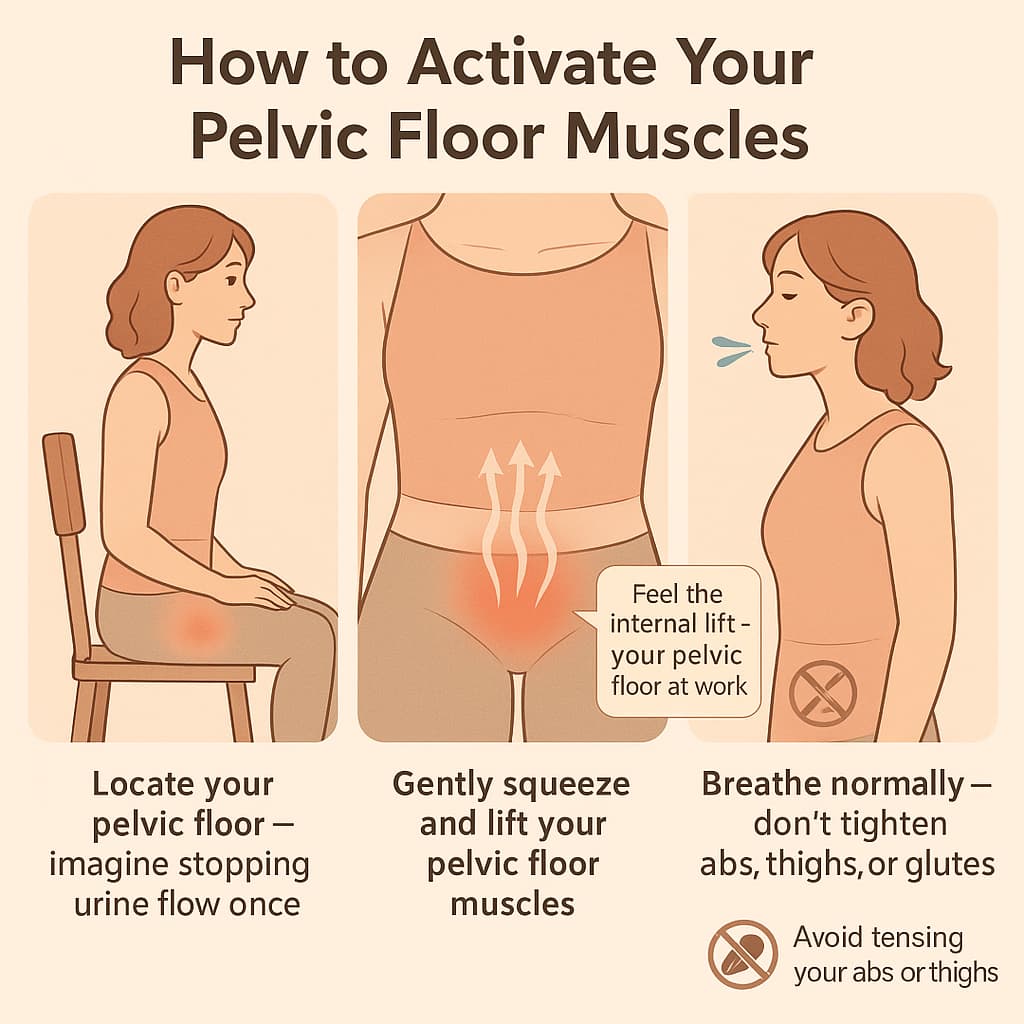
Before starting, identify the correct muscles:
- While urinating, try to stop the flow mid-stream (do this only once for identification).
- Feel the internal “lift” — that’s your pelvic floor.
- Avoid tightening your abs, buttocks, or thighs.
- Once identified, practice contracting those muscles while breathing normally.
10 Best Pelvic Floor Exercises for Women
Each move below enhances pelvic stability, bladder control, and overall strength.
1. Basic Kegel Contraction
Why it works:
This foundational move isolates the deep pelvic floor muscles, improving bladder control, pelvic organ support, and core stability. It’s the base for all other pelvic training and essential for postpartum recovery or menopausal muscle maintenance.
Muscles worked:
Pelvic floor (levator ani, coccygeus), deep core stabilizers.
How to do it:
- Sit or lie in a relaxed position.
- Inhale deeply, then as you exhale, gently squeeze and lift your pelvic floor muscles.
- Hold the contraction for 5–10 seconds, then slowly release for the same length of time.
- Repeat 10 times, completing 3 sessions daily.
Trainer Tip:
Visualize stopping the flow of urine or lifting a marble inside your pelvis — this mental cue ensures correct engagement without tensing your abs or thighs.
2. Quick Flicks (Pulse Kegels)
Why it works:
Trains the fast-twitch muscle fibers that prevent urine leakage during sudden movements like sneezing, coughing, or jumping. Builds speed and responsiveness in your pelvic floor.
Muscles worked:
Pelvic floor (fast-twitch fibers), lower abdominals.
How to do it:
- Contract your pelvic floor quickly for 1 second, then release.
- Perform 10–15 rapid squeezes per set.
- Complete 2–3 sets per day.
Trainer Tip:
Try doing quick flicks before lifting heavy objects or laughing — this teaches your body to reflexively protect your bladder.
3. Bridge Pose
Why it works:
Combines glute and pelvic floor engagement to enhance hip stability, core control, and pelvic organ support. A staple move in both physiotherapy and yoga-based pelvic health programs.
Muscles worked:
Gluteus maximus, hamstrings, pelvic floor, lower back.
How to do it:
- Lie on your back with knees bent and feet hip-width apart.
- Press through your heels, lift your hips, and engage your pelvic floor.
- Hold for 5 seconds, then slowly lower.
- Perform 10–12 reps, 2–3 sets.
Trainer Tip:
Focus on exhaling during the lift — it helps activate deep core muscles and prevents breath-holding strain.
4. Bird-Dog
Why it works:
Improves spinal alignment and deep core endurance, essential for posture and back health. Engaging the pelvic floor while balancing promotes coordination and stability.
Muscles worked:
Erector spinae, abdominals, glutes, pelvic floor, shoulders.
How to do it:
- Start on all fours.
- Extend your right arm forward and left leg back, keeping hips level.
- Engage your pelvic floor and core.
- Hold for 5 seconds, then switch sides.
- Perform 10 reps per side.
Trainer Tip:
Avoid arching your lower back — maintain a neutral spine and steady breathing throughout.
5. Squats
Why it works:
Activates the pelvic floor through natural pressure control while strengthening glutes and hips. Functional and effective for everyday activities like lifting or standing.
Muscles worked:
Glutes, quadriceps, pelvic floor, hamstrings.
How to do it:
- Stand with feet shoulder-width apart.
- Lower hips as if sitting into a chair.
- Engage your pelvic floor as you rise to stand.
- Perform 10–15 reps, 2–3 sets.
Trainer Tip:
Exhale during the upward phase and focus on lifting your pelvic floor as you stand — avoid letting knees cave in.
6. Pelvic Tilt
Why it works:
Strengthens the connection between lower abs and pelvic floor muscles, improving coordination and posture. Ideal for beginners or postnatal recovery.
Muscles worked:
Lower abdominals, pelvic floor, lumbar stabilizers.
How to do it:
- Lie on your back, knees bent.
- Flatten your lower back against the mat by gently tilting your pelvis upward.
- Engage your pelvic floor during the tilt.
- Hold for 5 seconds, relax, and repeat 10–15 times.
Trainer Tip:
Keep movements small and controlled — focus on feeling your lower abs and pelvic floor working together.
7. Happy Baby Pose
Why it works:
Opens the hips and stretches the pelvic muscles, promoting flexibility and tension relief. Especially beneficial for women with tight or overactive pelvic floors.
Muscles worked:
Inner thighs, lower back, pelvic floor.
How to do it:
- Lie on your back and hold the inside of your feet.
- Pull knees toward armpits while relaxing your pelvic floor.
- Breathe deeply for 30–60 seconds.
Trainer Tip:
Avoid straining — focus on gentle breathing and pelvic relaxation to release tightness.
8. Tabletop Leg Lifts
Why it works:
Strengthens the core and pelvic floor simultaneously, teaching coordination under gentle load.
Muscles worked:
Transverse abdominis, pelvic floor, hip flexors.
How to do it:
- Lie on your back, lift knees so hips and knees form 90° angles.
- Engage your pelvic floor and slowly lower one foot toward the ground.
- Return and switch sides.
- Perform 10 reps per leg.
Trainer Tip:
Keep your spine neutral — don’t arch your back as you lower your leg.
9. Side-Lying Clamshells
Why it works:
Targets the glute medius and pelvic stabilizers to improve hip alignment, gait, and pelvic symmetry.
Muscles worked:
Glute medius, glute minimus, pelvic floor.
How to do it:
- Lie on your side with knees bent and feet together.
- Keep feet touching while lifting the top knee.
- Squeeze your glutes and pelvic floor together.
- Perform 12–15 reps per side.
Trainer Tip:
Avoid rolling your hips backward — keep the motion small and controlled.
10. Wall Sit with Pelvic Lift
Why it works:
Develops pelvic floor endurance and integrates core control under sustained tension. Excellent for improving posture and lower-body stability.
Muscles worked:
Quadriceps, glutes, pelvic floor, core.
How to do it:
- Stand with your back against a wall and slide down until knees are bent at 90°.
- Engage your pelvic floor and core.
- Hold for 10–20 seconds, rest, then repeat 5 times.
Trainer Tip:
Stay mindful of even breathing — exhale softly as you maintain pelvic engagement for maximum endurance.
Related:
Common Mistakes to Avoid
- Holding your breath (increases abdominal pressure).
- Squeezing buttocks or thighs instead of pelvic floor.
- Skipping relaxation between contractions.
- Expecting instant results — improvement takes 4–12 weeks.
Safety and Precautions
- Avoid over-tightening — your pelvic floor needs to contract and relax.
- Don’t hold your breath during exercises; breathe steadily.
- Stop if you feel pain or pelvic pressure.
- Consult a pelvic health physiotherapist if you experience urinary leakage, pelvic heaviness, or are post-partum or post-surgery.
- Consistency matters: Aim for 5–10 minutes daily.
(Sources: NHS Inform 2024)
FAQ
1. How often should I do pelvic floor exercises?
At least once daily, 5–10 minutes per session.
2. When will I see results?
Typically within 4–6 weeks, with significant improvement by 3 months.
3. Can I do them during pregnancy?
Yes — with your doctor’s approval. Pelvic floor work helps support the uterus and eases recovery after childbirth.
4. Are Kegels enough?
They’re a foundation, but adding core and glute exercises improves overall pelvic stability.
5. What if I feel pain or pressure?
Stop and consult a pelvic health physiotherapist — you may need personalized guidance.
6. Can these exercises improve intimacy?
Yes, stronger pelvic muscles can enhance sensation and control.
7. Should older women still do them?
Absolutely. Pelvic floor training helps counteract hormonal weakening after menopause.
Conclusion
Strengthening your pelvic floor is one of the simplest yet most impactful steps toward long-term core health. These 10 exercises help you restore control, stability, and confidence — naturally and safely.
Start today with just a few minutes, stay consistent, and track your progress over 4–6 weeks.
Remember: It’s never too late to rebuild from within.
This content is for informational purposes only and not medical advice.
References
- NICE Guideline NG123 (2019–current): Urinary incontinence and pelvic organ prolapse in women — management — UK national guideline recommending PFMT as first-line care.
NICE - ACOG Committee Opinion (2020): Physical Activity and Exercise During Pregnancy & Postpartum — Confirms PFMT can begin in the immediate postpartum period.
ACOG - NHS Inform (2023): Women’s pelvic floor muscles — Clear, step-by-step activation guidance and progression cues.
NHS Inform - MedlinePlus (2024): Pelvic floor muscle training exercises — US National Library of Medicine overview with dosing and timelines.
MedlinePlus - RCOG Position Statement: Pelvic floor health — Policy-level guidance emphasizing lifelong PFMT education and access.
rcog.org.uk - PubMed (2025): Systematic review/meta-analysis — PFMT with feedback/biofeedback for urinary incontinence in women — Evaluates added benefit of feedback modalities.
PubMed