
The best way to relieve sacroiliac (SI) joint pain is through targeted exercises that improve pelvic stability, flexibility, and core control.
The SI joint connects your spine to your pelvis, acting as a shock absorber during movement. When this joint becomes too stiff or too loose, it can trigger lower back or buttock pain, often mistaken for sciatica.
Understanding how to strengthen and mobilize the SI joint is essential for maintaining balance, posture, and pain-free movement. This guide covers 11 evidence-based exercises—recommended by physical therapists and supported by research—that help reduce pain, restore function, and stabilize your pelvis safely.
Why SI Joint Exercises Matter
The sacroiliac joint (SIJ) plays a crucial role in transferring forces between the upper body and legs. Dysfunction can arise from prolonged sitting, pregnancy, injury, or muscle imbalance.

According to The Journal of Family Practice (2022), the most effective conservative management for SI joint dysfunction includes exercise therapy and joint mobilization. When performed correctly, these exercises can:
- Strengthen deep stabilizers around the pelvis and lower spine.
- Release tight hip and lower back muscles.
- Improve load transfer and posture.
- Reduce recurring pain and instability.
Research published in Frontiers in Pain Research (2024) found that manual therapy combined with stabilization exercises significantly improved disability and movement control compared to manual therapy alone.
Warm-Up Before You Begin
Spend 5–7 minutes preparing your muscles and joints before doing SI joint exercises. This enhances circulation, mobility, and safety.
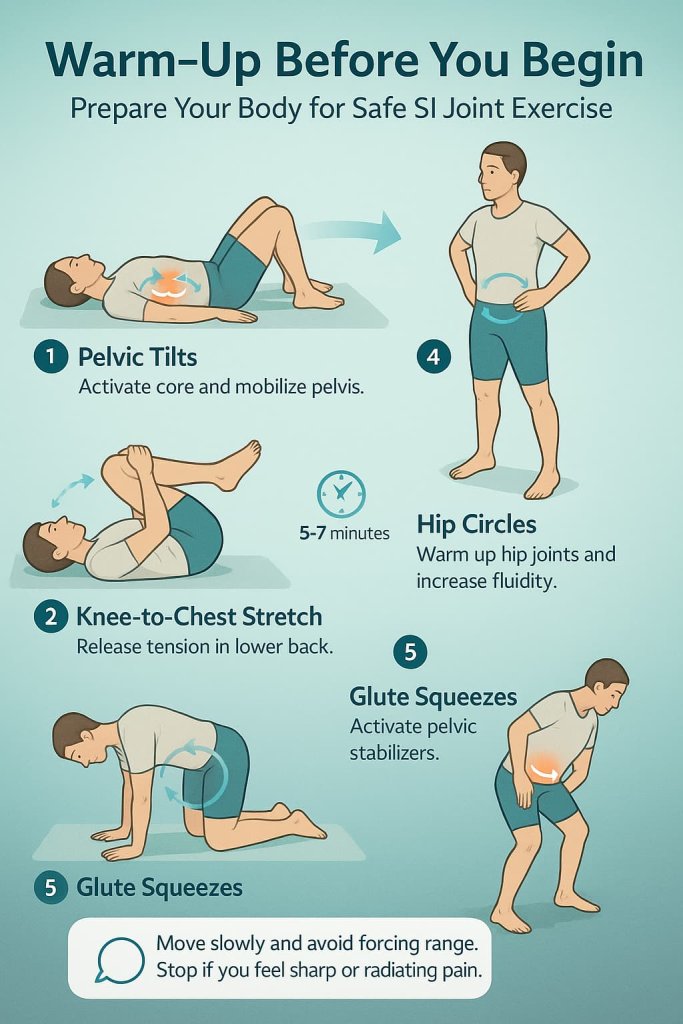
Quick Warm-Up Routine:
- Pelvic tilts – 10 slow reps
- Knee-to-chest stretch – 5 reps each side
- Cat–Cow – 8–10 gentle cycles
- Hip circles – 10 each way
- Glute squeezes – 10 reps
Trainer Tip: Move slowly and avoid forcing range of motion. Stop if you feel sharp or radiating pain.
11 Best SI Joint Exercises
These exercises combine gentle mobility work and targeted strengthening to support the pelvis, relieve pressure on the lower back, and restore natural movement. Perform them slowly, focus on control, and stop if you feel any sharp or radiating pain.
1. Pelvic Tilt (Supine)
Why it works:
This foundational move gently activates the deep abdominal and pelvic stabilizers, improving control of the lower spine and SI joint alignment. It helps restore coordination between your lumbar spine and pelvis—essential for reducing stiffness and discomfort in the sacroiliac region.
Muscles worked:
- Transverse abdominis
- Rectus abdominis
- Multifidus
- Pelvic floor stabilizers
How to do it:
- Lie on your back with knees bent, feet hip-width apart.
- Flatten your lower back against the floor by tightening your abs and tilting your pelvis upward slightly.
- Hold for 3–5 seconds, then relax slowly.
- Repeat 10–15 slow reps.
Trainer Tip:
Breathe out as you tilt your pelvis—this enhances core engagement and prevents overuse of the hip flexors.
2. Bridge Hold
Why it works:
Strengthens the glutes, hamstrings, and core muscles that stabilize the pelvis. It also re-educates the body to distribute load evenly through the hips and SI joint instead of the lower back.
Muscles worked:
- Gluteus maximus
- Hamstrings
- Erector spinae
- Core stabilizers
How to do it:
- Lie on your back with knees bent and feet flat, hip-width apart.
- Press through your heels to lift your hips until your shoulders, hips, and knees form a straight line.
- Squeeze your glutes at the top and hold for 5–10 seconds.
- Lower slowly to the mat.
- Perform 10–12 reps.
Trainer Tip:
Avoid overarching your back—focus on lifting with your glutes and tightening your abs to protect the spine.
3. Knee-to-Chest Stretch
Why it works:
Lengthens tight lower back and gluteal muscles while reducing tension around the SI ligaments. Promotes gentle decompression of the lower spine.
Muscles worked:
- Gluteus maximus
- Lower back extensors
- Hamstrings (mild stretch)
How to do it:
- Lie on your back with knees bent.
- Bring one knee toward your chest, holding behind the thigh or shin.
- Keep the opposite leg relaxed on the floor.
- Hold 20–30 seconds, then switch sides.
- Repeat 2–3 times per leg.
Trainer Tip:
Keep your head and shoulders relaxed; avoid pulling too forcefully on the leg.
4. Piriformis Stretch
Why it works:
Releases the piriformis—a deep hip muscle that can irritate or compress the SI joint when tight. Improves hip rotation and relieves pressure on the lower back and sacrum.
Muscles worked:
- Piriformis
- Gluteus medius
- Hip rotators
How to do it:
- Lie on your back, cross one ankle over the opposite knee.
- Grasp the back of your lower thigh and gently pull both legs toward your chest.
- Hold for 30 seconds, repeat on the other side.
Trainer Tip:
Keep your spine neutral—avoid rounding your back to prevent added SI joint strain.
5. Cat–Cow
Why it works:
Encourages mobility of the lumbar spine and pelvis through rhythmic flexion and extension. Enhances joint lubrication and reduces stiffness in the sacral area.
Muscles worked:
- Spinal erectors
- Abdominals
- Multifidus
- Pelvic stabilizers
How to do it:
- Begin on hands and knees, shoulders over wrists, hips over knees.
- Inhale and arch your back (Cow), lifting your tailbone and chest.
- Exhale and round your spine (Cat), tucking your chin and pelvis.
- Continue for 8–10 smooth cycles.
Trainer Tip:
Focus on slow, fluid movement; let your breath guide the motion for gentle spinal decompression.
6. Clamshells
Why it works:
Targets the gluteus medius and hip abductors—key muscles for pelvic stability and SI joint control. Prevents excessive inward collapse of the knees during movement.
Muscles worked:
- Gluteus medius and minimus
- Tensor fasciae latae (TFL)
- Hip external rotators
How to do it:
- Lie on one side with hips and knees bent 90°, feet together.
- Keep feet touching and open your top knee toward the ceiling.
- Pause 2 seconds, then lower slowly.
- Perform 12–15 reps each side.
Trainer Tip:
Don’t roll your hips backward—maintain alignment to isolate the glutes effectively. Add a mini resistance band for more challenge.
7. Supine Hip Rotations
Why it works:
Promotes controlled motion in the hips and pelvis, easing stiffness that can irritate the SI joint. Encourages symmetrical mobility on both sides of the body.
Muscles worked:
- Hip rotators
- Lower back stabilizers
- Core
How to do it:
- Lie on your back with knees bent and feet flat.
- Gently drop both knees together to one side while keeping shoulders grounded.
- Return to center, then repeat to the other side.
- Complete 10–12 rotations in total.
Trainer Tip:
Move within a comfortable range—avoid twisting through your lower spine.
8. Side-Lying Leg Lifts
Why it works:
Strengthens the lateral hip and gluteal muscles that stabilize the pelvis during walking and standing. Reduces asymmetry and imbalance across the SI joint.
Muscles worked:
- Gluteus medius and minimus
- Hip abductors
- Oblique stabilizers
How to do it:
- Lie on your side, legs straight, head supported by your lower arm.
- Flex your foot and lift the top leg to hip height.
- Hold 2–3 seconds, then lower with control.
- Perform 10–15 reps per side.
Trainer Tip:
Avoid swinging the leg—keep movements slow to maintain tension on the glute muscles.
9. Child’s Pose Stretch
Why it works:
Gently stretches the spine, hips, and lower back to relieve tension in the sacral and lumbar regions. Promotes relaxation and deep breathing.
Muscles worked:
- Erector spinae
- Latissimus dorsi
- Glutes
- Hip flexors (mild stretch)
How to do it:
- Kneel with toes together and knees apart.
- Sit back onto your heels and extend arms forward on the mat.
- Rest your forehead on the floor and breathe deeply.
- Hold 30–45 seconds.
Trainer Tip:
If you have knee discomfort, place a pillow between your calves and thighs for support.
10. Bird Dog
Why it works:
Improves core strength, spinal alignment, and SI joint stability through coordinated limb extension. Reinforces neuromuscular control and posture.
Muscles worked:
- Erector spinae
- Multifidus
- Gluteus maximus
- Deltoids
- Core stabilizers
How to do it:
- Start on hands and knees, wrists under shoulders, knees under hips.
- Engage your core and extend opposite arm and leg until parallel to the floor.
- Hold 3–5 seconds, then return and switch sides.
- Perform 8–10 reps each side.
Trainer Tip:
Keep your hips level—avoid tilting or arching your back. Focus on slow, controlled balance.
11. Seated Figure-4 Stretch
Why it works:
Releases tightness in the glutes and hips that often contribute to SI joint irritation. Enhances external hip rotation and sacral mobility.
Muscles worked:
- Piriformis
- Gluteus maximus
- Hip rotators
How to do it:
- Sit tall on a chair with feet flat.
- Cross one ankle over the opposite knee, forming a “4” shape.
- Lean forward gently until you feel a stretch in the glute area.
- Hold for 30 seconds, then switch sides.
Trainer Tip:
Maintain a straight spine—lean from your hips, not your shoulders, to target the correct muscle group.
Safety Tips and Precautions
- Avoid high-impact movements or twisting through the lower back.
- Perform exercises slowly and with control—never force motion.
- Use a yoga mat or soft surface for comfort.
- Stop immediately if pain radiates down your leg or worsens with activity.
- If symptoms persist beyond 2 weeks, consult a physical therapist or clinician.
FAQ
1. Can I do SI joint exercises every day?
Yes—gentle mobility and stabilization drills can be done daily. Strength exercises are best 3–4 times a week with rest in between.
2. How long does it take to see results?
Many people feel relief within 2–4 weeks of consistent exercise, depending on the severity of dysfunction.
3. Should I avoid stretching if my SI joint is inflamed?
Avoid aggressive stretching during acute inflammation. Start with light movements and isometric holds.
4. Are these exercises safe during pregnancy?
Yes, with modifications—focus on gentle core engagement, glute work, and avoid deep backbends. Use a pelvic belt if advised by your doctor.
5. When should I see a doctor?
Seek medical help if you experience numbness, severe pain, or pain after trauma.
6. Can sitting too long worsen SI joint pain?
Yes, prolonged sitting can increase joint compression. Take breaks every 30–45 minutes to stand and move.
7. Do I need special equipment?
Most exercises require only a mat and optional resistance band.
Conclusion
SI joint dysfunction can be frustrating—but the right exercises can restore comfort and control. Strengthening your glutes, core, and hips while improving mobility around the pelvis creates a stable foundation for pain-free movement.
Start gently, stay consistent, and progress as your strength and stability improve. For persistent or chronic symptoms, work with a physical therapist to personalize your program.
Disclaimer: This content is for informational purposes only and not medical advice. Always consult a healthcare professional before starting or changing any exercise program.
References
- Mayo Clinic — Sacroiliitis: Diagnosis & Treatment (Feb 22, 2024) Mayo Clinic
- Cleveland Clinic — Sacroiliitis: Causes, Symptoms & Treatment (2023 update) Cleveland Clinic
- AAFP — Sacroiliac Joint Dysfunction: Diagnosis and Treatment (Mar 2022) AAFP
- Frontiers in Physiology (2024) — Core Stability + Mulligan Mobilization RCT for SIJD Frontiers
- PubMed (2024) — Systematic Review: Manual Therapy for SIJ Pain Syndrome PubMed
- MDedge / Federal Practitioner (Review) — SIJ Dysfunction in Patients With Low Back Pain (2019) MD Edge
- PubMed (2019) — Exercise vs. Manipulation Effectiveness in SIJ Dysfunction PubMed
- AAFP Patient Education — SI Joint Dysfunction & Back Pain (Companion Resource) AAFP