
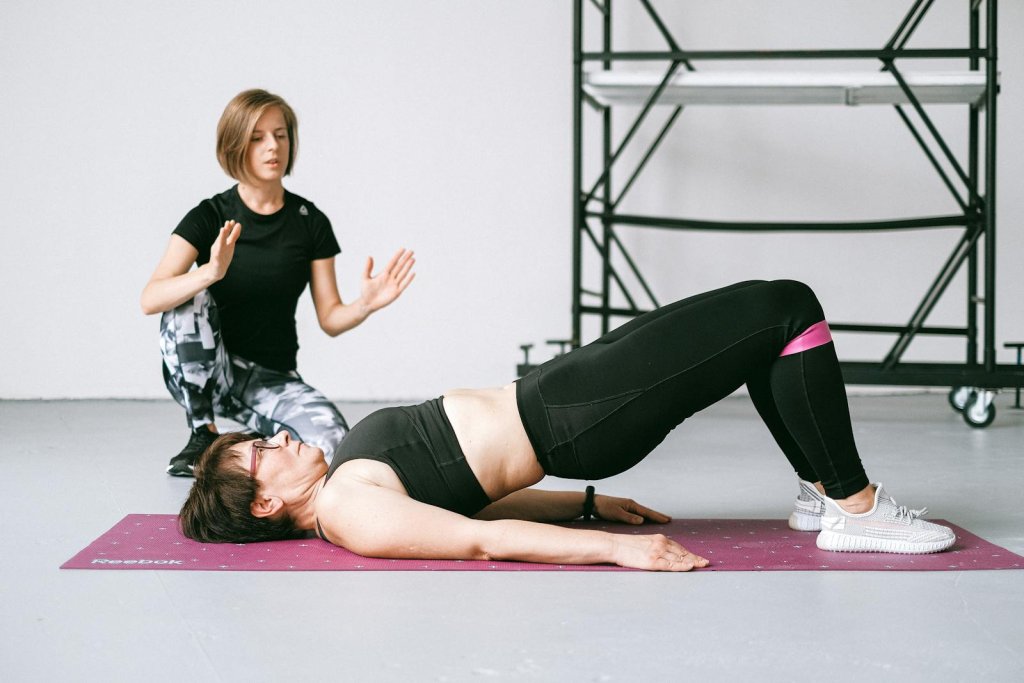
The glute bridge is one of the most effective bodyweight exercises to strengthen, lift, and sculpt your glutes — no equipment required. It activates the gluteus maximus, hamstrings, and core stabilizers to build strength, improve posture, and reduce back pain.
Understanding how to perform and progress the glute bridge is essential for anyone looking to improve lower-body strength, athletic performance, or functional mobility — whether you’re a beginner, athlete, or senior. This guide covers benefits, muscle mechanics, variations, and research-backed programming to help you master it safely and effectively.
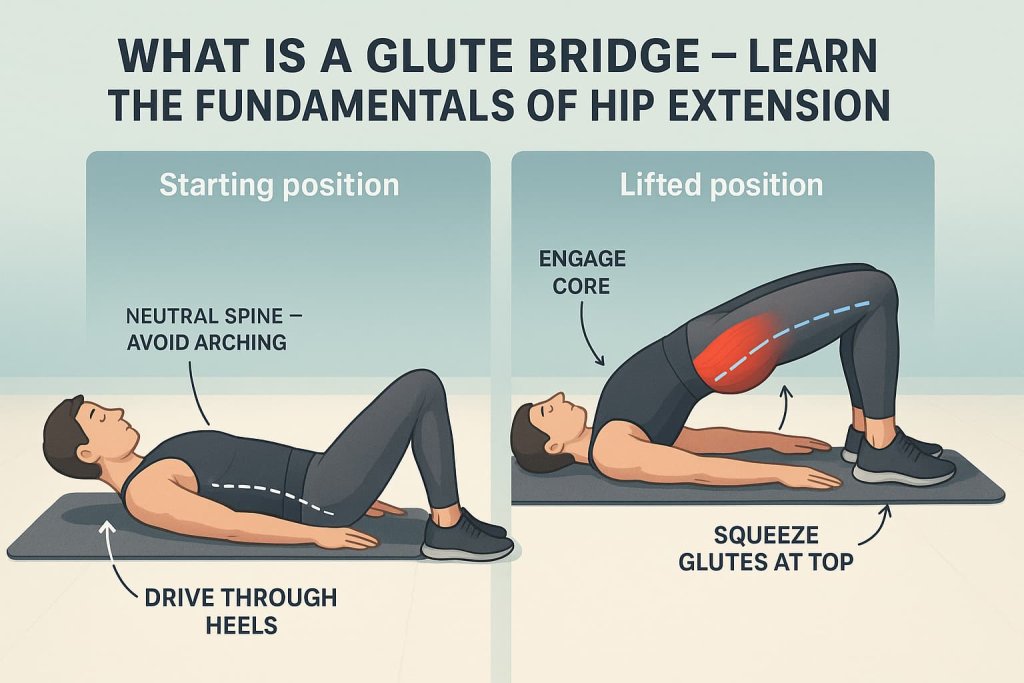
What Is a Glute Bridge?
A glute bridge is a hip-extension exercise performed by lifting your hips off the ground while keeping your upper back and feet planted. It trains the posterior chain — the glutes, hamstrings, and spinal stabilizers — through controlled movement and tension.
Compared to heavy lifts like squats or deadlifts, the glute bridge delivers strong muscle activation with minimal spinal load, making it ideal for beginners, home workouts, and rehabilitation programs.
How to Do the Basic Glute Bridge
Step-by-Step:
- Lie on your back with knees bent, feet hip-width apart.
- Flatten your lower back slightly by engaging your core.
- Drive through your heels to lift your hips until your body forms a straight line from shoulders to knees.
- Squeeze your glutes at the top for 1–2 seconds.
- Lower slowly to the floor and repeat.
Trainer Tip:
Don’t overarch your back — think of “tucking your pelvis” slightly to engage your glutes fully. Focus on squeezing your buttocks at the top, not pushing from your lower back.
Muscles Worked
| Primary Muscles | Supporting Muscles | Stabilizers |
|---|---|---|
| Gluteus Maximus | Hamstrings (Biceps Femoris, Semitendinosus, Semimembranosus) | Erector Spinae |
| Gluteus Medius & Minimus | Adductors | Rectus Abdominis |
| Obliques, Transverse Abdominis |
Variations of Glute Bridge Exercise
1. Bodyweight Glute Bridge
Why it works:
This foundational version isolates your glutes and hamstrings while teaching core stability and proper hip extension. It’s ideal for beginners to build strength and motor control before adding resistance.
Muscles worked:
Gluteus maximus, hamstrings, erector spinae, core stabilizers.
How to do it:
- Lie on your back with knees bent and feet flat, hip-width apart.
- Engage your core and press through your heels to lift hips until your body forms a straight line from shoulders to knees.
- Pause for 1–2 seconds at the top, squeezing your glutes.
- Slowly lower back down without letting your back arch.
Trainer Tip:
Keep your ribs down and pelvis slightly tucked to avoid lumbar overextension. Focus on slow, controlled reps rather than speed.
2. Banded Glute Bridge
Why it works:
Adding a resistance band above your knees increases lateral tension, activating the gluteus medius and minimus for hip stability and balance.
Muscles worked:
Gluteus maximus, gluteus medius, gluteus minimus, hamstrings, core.
How to do it:
- Place a loop band just above your knees and set up as for a basic bridge.
- As you lift your hips, gently press your knees outward against the band to maintain tension.
- Hold for 1–2 seconds at the top before lowering under control.
Trainer Tip:
Keep constant tension on the band — don’t let your knees collapse inward. This enhances outer-glute activation and hip control.
3. Feet-Elevated Glute Bridge
Why it works:
Raising your feet on a step or bench increases hip extension range and boosts hamstring and glute engagement, enhancing strength through a longer range of motion.
Muscles worked:
Gluteus maximus, hamstrings, erector spinae, core.
How to do it:
- Lie on your back with heels resting on a 12–18 inch elevated surface.
- Drive through your heels to lift hips until your thighs align with your torso.
- Hold for 2 seconds, then lower with control.
Trainer Tip:
Keep your knees directly over your ankles at the top — not beyond. The higher surface should challenge your glutes, not strain your lower back.
4. Marching Bridge
Why it works:
This dynamic version adds unilateral loading and core stability by forcing one leg to support your body at a time. It improves coordination and pelvic control.
Muscles worked:
Gluteus maximus, gluteus medius, hamstrings, hip flexors, core stabilizers.
How to do it:
- Start at the top of a bridge.
- Keeping hips level, lift one knee toward your chest, then lower and repeat with the other leg.
- Continue alternating in a slow, controlled march.
Trainer Tip:
Avoid rocking or dropping your hips as you march. Keep your core tight and move deliberately — quality beats quantity.
5. Single-Leg Glute Bridge
Why it works:
This unilateral challenge eliminates compensation, increasing glute activation and improving balance and symmetry between sides.
Muscles worked:
Gluteus maximus (working side), hamstrings, core stabilizers, erector spinae.
How to do it:
- Lie on your back and lift one leg straight up.
- Drive through the heel of the planted foot to lift your hips.
- Pause at the top, squeeze glutes, then lower slowly.
- Complete reps on one side before switching.
Trainer Tip:
Keep both thighs parallel at the top. If your hips drop or twist, lower the range or regress to a marching bridge.
6. Bridge Hold (Isometric Bridge)
Why it works:
Holding the top position builds muscular endurance, postural stability, and mind–muscle connection. It’s a joint-friendly way to strengthen the glutes.
Muscles worked:
Gluteus maximus, hamstrings, core stabilizers.
How to do it:
- Perform a bridge and hold at the top position.
- Keep glutes and abs engaged, maintaining a straight line from shoulders to knees.
- Hold for 20–30 seconds, breathing steadily.
Trainer Tip:
Don’t hold your breath. Breathe through your nose and maintain gentle tension throughout the hold for best endurance gains.
7. Weighted Hip Bridge
Why it works:
Adding external load (barbell, dumbbell, or plate) increases resistance, promoting muscle hypertrophy and strength gains.
Muscles worked:
Gluteus maximus, hamstrings, adductors, core.
How to do it:
- Place a weight across your hips (use a towel or pad for comfort).
- Drive through your heels to lift hips until glutes fully contract.
- Lower slowly under control for full eccentric engagement.
Trainer Tip:
Start with light weights and focus on smooth, controlled tempo (2-second up, 2-second down). Keep your chin tucked and ribs down to protect your spine.
Programming Variables
| Goal | Sets | Reps | Tempo | Rest | Frequency |
|---|---|---|---|---|---|
| Strength | 3–4 | 8–12 | 2-1-2 | 60–90s | 2–3x/week |
| Hypertrophy | 3–5 | 10–15 | 2-1-2 | 45–60s | 2–3x/week |
| Endurance | 2–3 | 15–20 | 2-1-2 | 30–45s | 3–4x/week |
| Rehab/Mobility | 2 | 8–12 | Controlled | 45s | 3x/week |
Common Mistakes to Avoid
- Overarching the back: Leads to lumbar strain instead of glute engagement.
- Pushing from toes: Always drive through heels.
- Not engaging core: Keep ribs down and pelvis neutral.
- Rushing the motion: Pause and contract at the top for maximum benefit.
Benefits of Glute Bridge Exercises
- Builds Glute Strength & Shape: Tones and lifts the glutes effectively without heavy weights.
- Improves Posture & Core Stability: Strengthens posterior chain and stabilizers that support spinal alignment.
- Reduces Low Back Pain: Encourages proper hip mechanics and reduces lumbar load.
- Enhances Athletic Power: Improves hip drive for running, jumping, and sprinting.
- Supports Knee & Hip Health: Balances anterior–posterior chain strength and improves joint control.
Safety Tips
- Warm up with hip mobility and core activation drills (e.g., cat–cow, leg swings, bird-dog).
- Use a flat, non-slip surface and controlled movement.
- If you feel strain in your lower back, reduce range or check core engagement.
- Seniors or beginners can start with supported bridges (hands on the floor for balance).
- If recovering from injury, consult a licensed physical therapist before loading.
FAQs
1. Are glute bridges and hip thrusts the same?
No. Glute bridges are done on the floor with shorter range; hip thrusts use a bench for greater extension and load.
2. How often should I do glute bridges?
2–3 times per week is ideal for strength and tone. Rest 24–48 hours between sessions.
3. Can glute bridges help with back pain?
Yes — when done with proper form, they can improve hip stability and reduce lumbar stress.
4. Should I squeeze my glutes at the top?
Yes. Hold for 1–2 seconds to fully engage the glutes and build endurance.
5. Are they safe for seniors or beginners?
Absolutely. Start with bodyweight or isometric holds, and use support as needed.
6. When can I add weights?
Once you can perform 15+ reps with perfect form and no discomfort, add a light dumbbell or plate.
7. How long until I see results?
With consistent practice (3x/week), most people notice glute firmness and strength gains within 4–6 weeks.
Conclusion
The glute bridge is a powerhouse movement for building strong, lifted, and functional glutes. Whether you’re training for strength, mobility, or rehabilitation, this joint-friendly exercise delivers results — anytime, anywhere.
Start with bodyweight, focus on form, and progress gradually to more advanced variations for long-term strength and stability.
Add glute bridges to your next lower-body or full-body workout and feel the difference in your strength, posture, and power.
References
- Lehecka BJ, et al. (2017). Building a Better Gluteal Bridge: EMG of Hip Muscles During Modified Single-Leg Bridges — Int J Sports Phys Ther.
Direct, bridge-specific EMG and coaching implications; great for “Variations & Progressions.” - Neto WK, et al. (2020). Gluteus Maximus Activation During Common Strength and Conditioning Exercises: Systematic Review — J Sports Sci Med.
High-level synthesis on glute max activation across exercises; supports positioning of bridges vs. other lifts. - Macadam P, et al. (2019). Examination of Gluteus Maximus EMG During Body-Weight Exercises: Systematic Review — Human Movement.
Bodyweight-focused evidence; perfect for justifying bridge efficacy without equipment. - Youdas JW, et al. (2015). Magnitudes of Muscle Activation of Spine Stabilizers, Gluteus Maximus, and Hamstrings During Selected Exercises — J Strength Cond Res.
Bridging on stable vs. unstable surfaces; supports your “core/stability” and “mistakes/safety” sections. - Youdas JW, et al. (2017). EMG of Gluteus Maximus & Hamstrings: Supine Resisted Hip Extension vs. Unilateral Bridge to Neutral — J Electromyogr Kinesiol.
Shows unilateral bridge advantages and hamstring/glute balance; ideal for “Single-Leg Bridge.” - Lehman GJ, et al. (2005). Trunk Muscle Activity During Bridging on and off a Swiss Ball — Chiropractic & Osteopathy.
Evidence for how instability modifies core demand in bridging; supports “progressions” and “safety.” - Ahn SE, et al. (2024). Effects of Gluteal Muscle-Strengthening, Core-Stabilization Training on Chronic Low Back Pain: RCT — BMC Musculoskelet Disord.
Current clinical outcome data linking glute work (incl. bridges) to pain/function improvements. - ACSM Position Stand (2009). Progression Models in Resistance Training for Healthy Adults — Med Sci Sports Exerc.
Authoritative programming guardrails (sets/reps/tempo/frequency) to underpin your “Programming Variables.”