
The bear crawl is a full-body bodyweight exercise that builds core stability, shoulder strength, and total-body coordination by moving on your hands and feet with your knees hovering just off the floor. If you want one move that trains your core like a moving plank while also challenging your shoulders, hips, and conditioning, the bear crawl is a smart, equipment-free option.
This guide covers exactly how to do a bear crawl with clean form, what muscles it works, the biggest benefits, and the best variations (from beginner-friendly to advanced).
What Is a Bear Crawl Exercise?
A bear crawl is a ground-based locomotion drill where you support your body on your hands and feet while keeping your knees slightly off the floor. You move forward (or backward/sideways) with small, controlled steps, typically using an opposite hand-and-foot pattern.
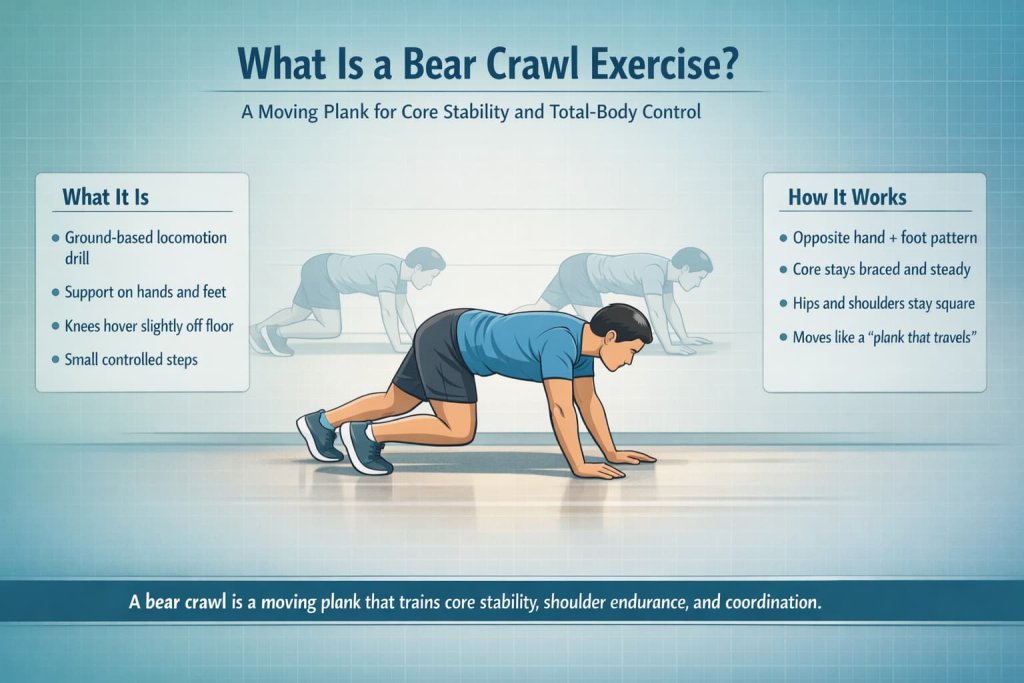
Think of it as a plank that moves: your job is to keep your ribcage stacked over your pelvis, avoid twisting, and stay steady while your limbs travel.
How to Do a Bear Crawl With Proper Form
Use these cues to keep the movement effective and joint-friendly.
Setup
- Start on all fours with hands under shoulders and knees under hips.
- Spread fingers and press the floor away (don’t sink into your shoulders).
- Brace your core gently like you’re preparing for a light poke.
Move into the hover
- Lift knees 1–3 inches off the floor.
- Keep hips level and slightly below shoulder height (avoid piking up).
- Keep your spine neutral (no rounding, no sagging).
Crawl
- Step forward with your right hand and left foot together (small step).
- Then step with your left hand and right foot.
- Stay quiet and controlled—minimal bounce.
- Breathe continuously; don’t hold your breath.
Simple form checklist
- Back stays flat and steady
- Knees hover (not touching)
- Steps stay short and smooth
- Hips and shoulders stay square (no twisting)
Muscles Worked in the Bear Crawl
Bear crawls are a true team sport for your body. The main muscle groups include:
- Core: deep abdominals and obliques (stability), plus spinal stabilizers (neutral posture)
- Shoulders and upper back: deltoids, serratus anterior, rotator cuff, mid-back stabilizers
- Chest and arms: pecs, triceps, and forearms (support and control)
- Hips and legs: glutes, quads, hamstrings, and calves (drive and stability)
Exact emphasis depends on your speed, step size, and whether you crawl forward, backward, or laterally.
Bear Crawl Variations (Beginner to Advanced)
These bear crawl variations progress from simple holds to challenging crawling patterns that build full-body strength and control. Use the easier options to lock in form first, then level up with movement-based variations for more core and shoulder demand.
1) Bear Hover Hold (Easiest)
Why it works:
This is the simplest way to train the bear crawl position without the added challenge of movement. It builds shoulder endurance and teaches your core to brace while your knees hover, which is the foundation for every crawling variation.
Muscles worked:
Core stabilizers (deep abs, obliques), shoulders (deltoids), serratus anterior, upper back stabilizers, quads, glutes.
How to do it:
- Start on all fours with hands under shoulders and knees under hips
- Brace your core and press the floor away with your hands
- Lift your knees 1–3 inches off the floor
- Keep hips level and your back flat (no sagging or piking)
- Hold for 10–30 seconds while breathing steadily
Trainer Tip:
If your wrists feel stressed, shorten the hold, spread your fingers wider, and actively push the floor away to reduce “collapse” in the shoulders.
2) Bear Hover March (Beginner-Friendly)
Why it works:
The hover march teaches cross-body coordination (opposite arm and leg) while keeping the trunk stable. It’s the best bridge between a static hold and traveling bear crawls because it adds movement without speeding up.
Muscles worked:
Core (anti-rotation), shoulders and upper back, hip stabilizers, quads, glutes, forearms.
How to do it:
- Set up in a bear hover (knees 1–3 inches off the floor)
- Lift your right hand and left foot slightly (small controlled lift)
- Place them down softly, then lift your left hand and right foot
- Keep hips and shoulders square to the floor
- Continue alternating for 6–12 controlled “steps” per side
Trainer Tip:
Make the lifts tiny. The goal is zero shifting, zero twisting. If your hips rock side to side, slow down and reduce the height of each lift.
3) Forward Bear Crawl (Standard)
Why it works:
This is the classic version that turns core stability into a moving skill. You’re resisting rotation and low-back arching while your shoulders, hips, and legs work together to travel smoothly.
Muscles worked:
Core stabilizers, shoulders, serratus anterior, chest and triceps (support), glutes, quads, calves, forearms.
How to do it:
- Start in a bear hover with knees hovering just off the floor
- Step forward with your right hand and left foot at the same time
- Then step forward with your left hand and right foot
- Keep steps short and controlled, hips level, spine neutral
- Crawl for 10–20 yards or 20–40 seconds
Trainer Tip:
Quiet steps = good control. If you hear heavy stomping, you’re likely taking steps that are too big or letting your trunk sway.
4) Backward Bear Crawl (Harder)
Why it works:
Backward crawling increases the coordination challenge and often demands more shoulder stability because you can’t “see” your hand placement as easily. It also forces you to stay more controlled instead of rushing.
Muscles worked:
Core (anti-extension and anti-rotation), shoulders and upper back, glutes and hamstrings (drive), quads (stability), forearms.
How to do it:
- Start in a bear hover and stabilize your trunk first
- Step backward with your right hand and left foot together
- Then step backward with your left hand and right foot
- Keep hips low and level, and avoid piking up
- Crawl backward for 10–20 yards or 15–30 seconds
Trainer Tip:
Reduce your speed and step size at first. Most form breakdown happens when people try to move backward too quickly.
5) Lateral Bear Crawl (Harder)
Why it works:
Moving sideways challenges your core in a different way by increasing anti-lateral-flexion demands (resisting side-bending). It also hits hip stability hard because your body must stay square while shifting side to side.
Muscles worked:
Obliques, deep core stabilizers, shoulders, serratus anterior, glute medius (hip stability), quads, forearms.
How to do it:
- Get into a bear hover with knees hovering
- Step your right hand and right foot one small step to the right
- Follow with your left hand and left foot
- Keep your chest facing the floor and hips level
- Continue 5–10 steps each direction
Trainer Tip:
Imagine a glass of water on your low back. Your goal is no tipping. If your hips swing or rotate, make the steps smaller and slow down.
6) Bear Crawl With Pauses (Advanced Control)
Why it works:
Pauses increase time under tension and force you to “own” the bear position mid-set. This builds stronger bracing endurance and better movement quality without needing to go faster or crawl farther.
Muscles worked:
Core (bracing endurance), shoulders and upper back stabilizers, glutes and quads, forearms, chest and triceps (support).
How to do it:
- Crawl forward for 2–3 controlled steps
- Stop and hold a perfect hover for 2 seconds
- Continue crawling for 2–3 more steps
- Repeat for 20–40 seconds total
Trainer Tip:
Treat every pause like a mini plank. Exhale slightly, brace, and keep your shoulders “pushed away” from the floor to avoid sinking.
Bear Crawl Benefits
Bear crawls are popular because they train multiple athletic qualities at once.
Builds serious core stability (anti-rotation and anti-extension)
Your trunk has to resist twisting and low-back arching while your arms and legs move. That’s why bear crawls often feel like core work even though you’re crawling.
Strengthens shoulders and upper-back control
Your shoulders support a big portion of your bodyweight. Keeping your shoulder blades stable while moving helps develop control that carries over to push-ups, planks, and many strength exercises. The movement is also listed in major exercise libraries used by trainers for total-body training and conditioning, including the ACE Fitness Exercise Library.
Improves coordination, balance, and movement quality
Because you’re using a cross-body pattern (right hand + left foot, left hand + right foot), bear crawls train coordination and full-body timing.
Can raise your heart rate quickly
Quadrupedal locomotion can be surprisingly demanding. A 2025 study indexed on PubMed found quadrupedal walking produced higher physiological demands than bipedal walking at the same speed (including higher energy cost and heart rate), which supports why crawling drills can feel like conditioning work.
Common Bear Crawl Mistakes (And Quick Fixes)
Mistake: Hips too high (turns into a downward-dog shuffle)
Fix: Shorten steps and think “knees forward, hips level.”
Mistake: Low-back sagging
Fix: Exhale gently, brace your abs, and crawl slower.
Mistake: Big, sloppy steps that rock the body
Fix: Make each step half the size and aim for silent movement.
Mistake: Wrist discomfort
Fix: Start with shorter sets, warm up wrists, and keep hands under shoulders. If needed, do a bear hover hold on a soft mat first.
Bear Crawl Programming: Sets, Reps, and Progressions
Use time or distance—both work well.
Beginner (2–3 days/week)
- Bear hover hold: 3 sets of 15–25 seconds
- Or bear hover march: 3 sets of 6–10 slow steps per side
Intermediate
- Forward bear crawl: 3–5 rounds of 20–40 seconds
- Rest 45–75 seconds between rounds
Advanced conditioning finisher
- Forward crawl 20 seconds → backward crawl 20 seconds
- Rest 60 seconds
- Repeat 3–5 rounds
A practical starting point for many people is working in the 30–60 second range per set and repeating for multiple rounds, adjusting rest as needed.
Who Should Do Bear Crawls (And Who Should Be Careful)
Bear crawls can be a great fit if you want:
- Core stability training that isn’t just sit-ups
- Shoulder and upper-body endurance
- Athletic coordination and conditioning
Be extra cautious (or choose a regression) if you have:
- Ongoing wrist pain or recent wrist injury
- Shoulder pain with weight-bearing positions
- Uncontrolled high blood pressure or dizziness with exertion
If pain is sharp, worsening, or feels wrong, stop and get guidance from a qualified professional.
Bear Crawl FAQs
1) What does the bear crawl work the most?
Most people feel it most in the core and shoulders, but it also trains hips and legs because you’re supporting and moving your bodyweight.
2) Is the bear crawl better than a plank?
It’s different. A plank builds static stability; a bear crawl builds stability while moving (often harder) and adds coordination and conditioning.
3) How long should I do bear crawls?
A common range is 20–60 seconds per set (or a short distance), repeated for 3–5 rounds depending on your fitness level.
4) Why do bear crawls make my wrists hurt?
Often it’s too much volume too soon, hands too far forward, or limited wrist tolerance. Start with shorter holds, keep hands under shoulders, and build gradually.
5) Should my knees touch the floor?
In a standard bear crawl, knees hover slightly off the floor. For a beginner regression, you can start with knees down to learn positions, then progress to the hover.
6) Can bear crawls help with conditioning?
Yes. Crawling drills can elevate heart rate quickly, and quadrupedal locomotion can be more demanding than regular walking at the same speed.
7) How do I make bear crawls harder without going faster?
Add pauses, extend the set time, crawl backward or laterally, or reduce rest between rounds.
Conclusion
Bear crawls are one of the simplest ways to train your core, shoulders, and full-body coordination at the same time—no equipment needed. Start with a bear hover or slow march, then progress to forward, backward, and lateral crawls as your control improves.
If you want, tell me your fitness level (beginner/intermediate/advanced) and your goal (core strength, conditioning, athletic performance), and I’ll build a short bear crawl routine that fits your week.
References
- Buxton, J. D., et al. (2022). A comparison of the energy demands of quadrupedal movement training to walking (full text). PubMed Central
- Buxton, J. D., et al. (2022). The effects of a novel quadrupedal movement training program on functional movement, dynamic balance, range of motion, and upper body strength/endurance. Journal of Strength and Conditioning Research
- Buxton, J., et al. (2024). Comparison of muscle activation during quadrupedal movement training movements and traditional bodyweight exercises. ScienceDirect