
Yes — core exercises may help reduce lower back pain by improving spinal stability, posture, and muscular support.
Most cases of lower back pain are mechanical, meaning they are related to muscle weakness, stiffness, or poor movement control — not structural damage. Strengthening your deep and surface-level core muscles improves how your spine handles daily stresses.
Understanding the right exercises is important because many traditional ab workouts (like sit-ups) can actually increase discomfort. Instead, safe, slow, spine-friendly exercises help support the lower back, improve function, and may reduce symptoms over time.
Below, you’ll find 17 beginner-friendly exercises, expert guidance, safety notes, and a clear routine you can follow at home.
Benefits of Core Exercises for Lower Back Pain
Strengthening the core supports your spine in several important ways:
- Helps stabilize the lower back during daily movements
- Reduces strain on spinal joints and ligaments
- Improves posture during sitting, standing, and lifting
- Supports better movement control and reduces flare-ups
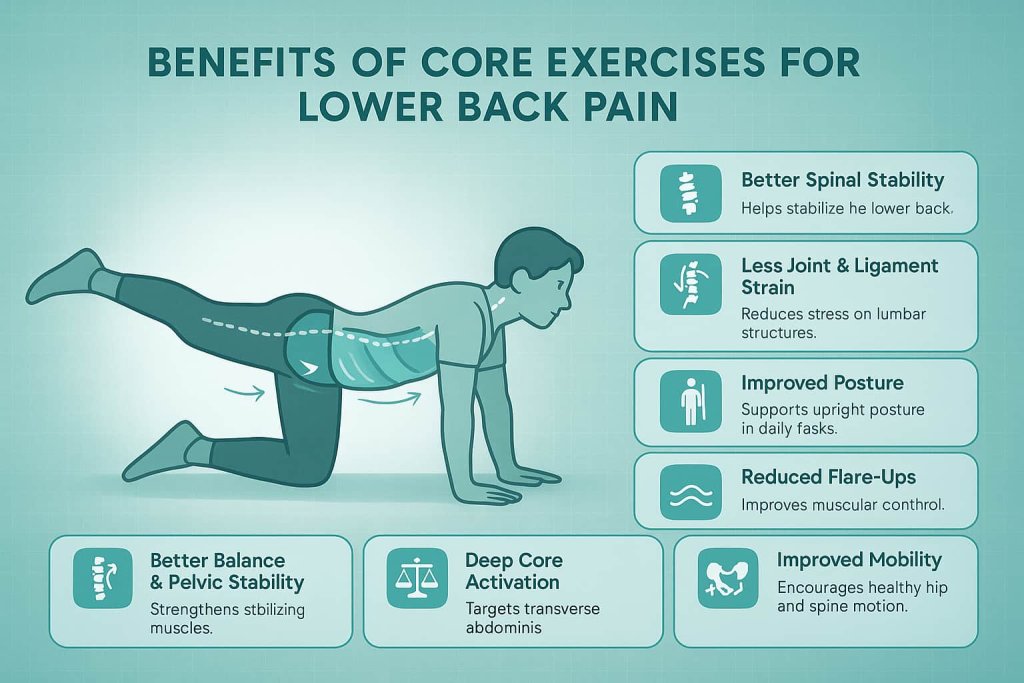
- Enhances balance and pelvic stability
- Activates underused deep muscles like the transverse abdominis
- Encourages healthy mobility in the hips and thoracic spine.
Warm Up Before Core Exercises
A gentle warm-up prepares your spine and core for safe movement.
Quick 2–3 Minute Warm-Up:
- March in place — 20–30 seconds
- Pelvic tilts — 8–10 reps
- Cat–Cow — 6–8 reps
- Hip circles — 10 per direction
- Deep diaphragmatic breathing — 30–45 seconds
Move slowly and keep your spine comfortable at all times.
17 Best Core Exercises for Lower Back Pain (Safe & Beginner-Friendly)
These 17 core exercises are safe, beginner-friendly options that help strengthen your spine-supporting muscles without adding stress to your lower back. Each movement focuses on stability, control, and proper alignment—key elements for managing and reducing lower back discomfort.
1. Dead Bug
Why it works:
Strengthens deep core stabilizers while teaching the spine to stay neutral during limb movement. Helps reduce excessive lumbar extension, which is a common trigger for discomfort.
Muscles worked:
Transverse abdominis, obliques, hip flexors, deep spinal stabilizers.
How to do it:
- Lie on your back with arms straight above your shoulders and hips/knees bent at 90 degrees.
- Brace your core gently, keeping ribs down.
- Slowly lower your right arm and left leg toward the floor without letting your lower back arch.
- Return to the starting position.
- Repeat on the other side.
Trainer Tip: Move slowly and keep your lower ribs anchored so your spine stays neutral.
2. Bird Dog
Why it works:
Enhances spinal stability by coordinating the core, glutes, and back muscles. Reduces stress on the lumbar spine during everyday bending and lifting.
Muscles worked:
Lower back stabilizers, glutes, abs, upper back.
How to do it:
- Begin on all fours, hands under shoulders, knees under hips.
- Brace gently and extend opposite arm and leg in a straight line.
- Hold for 1–2 seconds.
- Return with control and switch sides.
Trainer Tip: Your hips should remain level—avoid rotating or arching your back.
3. Glute Bridge
Why it works:
Strong glutes support the pelvis and lower back, reducing load on lumbar structures.
Muscles worked:
Glutes, hamstrings, deep core.
How to do it:
- Lie on your back with knees bent and feet hip-width apart.
- Press through your heels and lift hips until your body forms a straight line.
- Pause briefly, then lower slowly.
Trainer Tip: Maintain a light core brace to prevent flaring your ribcage upward.
4. Side Plank (Knee-Bent)
Why it works:
Targets the lateral core and QL muscles that stabilize the spine in daily movements like walking and lifting.
Muscles worked:
Obliques, deep stabilizers, glute medius.
How to do it:
- Lie on your side with knees bent and elbow under shoulder.
- Lift hips until your body forms a straight diagonal line from knees to head.
- Hold 10–20 seconds; switch sides.
Trainer Tip: Keep shoulder stacked directly over elbow to avoid strain.
5. Front Plank (Modified)
Why it works:
Builds foundational core strength without stressing the lower back the way full planks sometimes can.
Muscles worked:
Abs, deep core, shoulders.
How to do it:
- Position yourself on forearms and knees.
- Brace lightly and form a straight line from head to knees.
- Hold 10–20 seconds with steady breathing.
Trainer Tip: Quality matters more than duration—avoid long holds that cause sagging.
6. Pelvic Tilts
Why it works:
Improves pelvic control, reduces stiffness, and helps retrain movement patterns for people with tight or achy lower backs.
Muscles worked:
Lower abs, lumbar stabilizers.
How to do it:
- Lie on your back with knees bent and feet flat.
- Tilt pelvis backward to flatten the lower back.
- Then tilt forward to create a small arch.
- Repeat slowly.
Trainer Tip: Keep movements small, smooth, and pain-free.
7. Cat–Cow
Why it works:
Promotes mobility through the spine and helps reduce stiffness linked to prolonged sitting.
Muscles worked:
Lumbar and thoracic extensors/flexors.
How to do it:
- Start on hands and knees.
- Arch your back upward (cat).
- Then gently lower your spine and lift your chest/tailbone (cow).
- Move with slow breathing.
Trainer Tip: Avoid forcing the range; stay within a comfortable arc.
8. Supine Marching
Why it works:
Strengthens the deep abdominal muscles while keeping the spine in a stable, protected position.
Muscles worked:
Transverse abdominis, hip flexors.
How to do it:
- Lie on your back and brace gently.
- Lift one leg into a march position.
- Lower slowly and switch sides.
- Keep pelvis still.
Trainer Tip: Place your hands on your pelvis—if it rocks, reduce your range.
9. Bridge March
Why it works:
Challenges hip and core stability while maintaining a lifted pelvis, improving control needed for daily tasks like walking and stair climbing.
Muscles worked:
Glutes, hamstrings, core.
How to do it:
- Lift into a standard glute bridge.
- Lift one knee toward your chest, lower, and alternate.
- Keep hips steady.
Trainer Tip: If hips wobble, widen your stance for more support.
10. Wall Sit with Core Brace
Why it works:
Teaches spinal bracing while the body is under light load, helping prepare for real-life activities like lifting and carrying.
Muscles worked:
Quads, glutes, deep core.
How to do it:
- Stand against a wall and slide into a chair-like position.
- Gently brace your core.
- Hold 10–20 seconds.
Trainer Tip: Keep your lower back lightly touching the wall to maintain alignment.
11. Seated Knee Lifts
Why it works:
Provides a gentle, accessible core exercise for people with limited mobility or discomfort lying on the floor.
Muscles worked:
Lower abs, hip flexors.
How to do it:
- Sit tall on a sturdy chair.
- Lift one knee toward your chest.
- Lower and alternate legs.
Trainer Tip: Keep torso upright—don’t lean backward to lift the knee.
12. Standing March with Core Brace
Why it works:
Improves dynamic control of the spine while mimicking everyday movements like walking.
Muscles worked:
Core, hip flexors, pelvic stabilizers.
How to do it:
- Stand tall, brace your core lightly.
- Lift one knee at a time into a slow march.
- Maintain posture throughout.
Trainer Tip: Keep ribs stacked over hips to avoid arching.
13. Lower Trunk Rotations
Why it works:
Gently increases lumbar mobility and reduces stiffness without placing heavy load on the spine.
Muscles worked:
Obliques, lumbar muscles (light activation).
How to do it:
- Lie on your back with knees bent and together.
- Rotate knees slowly to one side.
- Return and repeat to the other side.
Trainer Tip: Keep the motion small and controlled—avoid forcing rotation.
14. Single-Leg Bridge
Why it works:
Builds unilateral glute strength, which supports pelvic alignment and reduces compensations that strain the lower back.
Muscles worked:
Glutes, hamstrings, core.
How to do it:
- Lift into a bridge using one leg while the other extends.
- Lower slowly and switch legs.
- Keep hips level.
Trainer Tip: If hips twist, return to double-leg bridges until stronger.
15. Modified Dead Bug Heel Taps
Why it works:
A beginner-level stabilization drill that strengthens the deep core without requiring long lever arms.
Muscles worked:
Transverse abdominis, lower abs.
How to do it:
- Lie on your back with knees lifted.
- Lower one heel to tap the floor lightly.
- Return and alternate sides.
Trainer Tip: Keep your spine neutral—no arching as the heel drops.
16. Prone Press-Up (If Comfortable)
Why it works:
For some people, gentle extension may help reduce pressure and may offer short-term relief from stiffness.
Muscles worked:
Lower back extensors, hip flexor stretch (light).
How to do it:
- Lie on your stomach with hands under shoulders.
- Gently press up while keeping hips down.
- Pause briefly and lower.
Trainer Tip: Stop immediately if pain radiates into the legs.
17. Child’s Pose Breathing
Why it works:
Relaxes the spine, stretches the hips, and encourages diaphragmatic breathing, which may reduce tension.
Muscles worked:
Lower back, glutes, hips.
How to do it:
- Sit back onto your heels, arms reaching forward.
- Take slow, deep breaths into your ribcage.
- Stay for 20–30 seconds.
Trainer Tip: If knees feel tight, widen your stance or place a pillow under your hips.
How Often Should You Do Core Exercises for Lower Back Pain?
- 2–3 sessions per week for strengthening
- 1–2 sets per exercise for beginners
- 8–12 slow reps or 10–20 second holds
- Increase difficulty gradually once movements feel easy
- Pair core work with walking or light aerobic exercise, which evidence shows improves lower back symptoms
Avoid pushing into sharp pain or performing long, exhausting plank holds.
Safety Guidelines
- Keep movements slow and controlled.
- Stop if you experience sharp or radiating pain.
- Avoid heavy lifting or fast twisting motions during flare-ups.
- Talk to a healthcare provider if you have red flags such as severe weakness, numbness, bowel/bladder changes, cancer history, or recent trauma.
- These exercises may support lower back health, but they are not a substitute for medical care.
FAQ — Core Exercises for Lower Back Pain
1. Can core exercises actually help lower back pain?
Yes. Research shows core strengthening may reduce pain and improve function for many people with chronic, nonspecific back pain.
2. Should I avoid sit-ups and crunches?
Often yes, especially during flare-ups. They can stress the spine and hip flexors.
3. How long before I see improvement?
Many people notice changes within 3–6 weeks with consistent training.
4. Can I do these exercises every day?
Light mobility daily is fine. Strengthening is best done 2–3 times per week.
5. Do I need equipment?
No — all exercises here are bodyweight only.
6. Are planks safe for lower back pain?
Yes, if performed in modified, short-hold variations.
7. When should I see a doctor or PT?
If pain is severe, worsening, or accompanied by numbness, weakness, or red-flag symptoms.
Conclusion
Core exercises are a powerful, low-impact way to support your spine, reduce strain, and help manage lower back discomfort. When performed consistently and with proper form, these movements may strengthen your stabilizing muscles and improve daily function.
Start slowly, choose pain-free variations, and stay consistent. If you need personalized guidance, consult a physical therapist or qualified clinician.
This content is for informational purposes only and not medical advice.
References
- Akhtar MW et al. (2017). Effectiveness of core stabilization exercises and routine exercise therapy in management of pain in chronic non-specific low back pain: A randomized controlled clinical trial. Pakistan Journal of Medical Sciences.
https://pubmed.ncbi.nlm.nih.gov/29067082/ - Wang XQ et al. (2012). A Meta-Analysis of Core Stability Exercise versus General Exercise for Chronic Low Back Pain. PLOS ONE.
https://journals.plos.org/plosone/article?id=10.1371/journal.pone.0052082 - Smrcina Z et al. (2022). A Systematic Review of the Effectiveness of Core Stability Exercises in Patients with Non-Specific Low Back Pain. International Journal of Sports Physical Therapy.
https://ijspt.scholasticahq.com/article/37251-a-systematic-review-of-the-effectiveness-of-core-stability-exercises-in-patients-with-non-specific-low-back-pain - George SZ et al. (2021). Interventions for the Management of Acute and Chronic Low Back Pain: Revision 2021. Journal of Orthopaedic & Sports Physical Therapy (JOSPT) Clinical Practice Guideline.
https://pubmed.ncbi.nlm.nih.gov/34719942/ - Zhou T et al. (2024). Recent clinical practice guidelines for the management of low back pain: a global comparison. BMC Musculoskeletal Disorders.
https://bmcmusculoskeletdisord.biomedcentral.com/articles/10.1186/s12891-024-07468-0 - Mayo Clinic Staff (2023). Exercises to improve your core strength. Mayo Clinic.
https://www.mayoclinic.org/healthy-lifestyle/fitness/in-depth/core-strength/art-20546851 - Harvard Health Publishing (2024). Stretching and strengthening exercises to relieve and prevent lower back pain. Harvard Health Publishing.
https://www.health.harvard.edu/pain/stretching-and-strengthening-exercises-to-relieve-and-prevent-lower-back-pain - Harvard Health Publishing (2024). Want a stronger core – skip the sit-ups. Harvard Health Publishing.
https://www.health.harvard.edu/staying-healthy/want-a-stronger-core-skip-the-sit-ups