
Yes — foam roller workouts can effectively relieve muscle soreness, improve flexibility, and even support strength recovery.
Foam rolling works by releasing muscle tension and improving blood flow, which speeds up recovery and enhances performance. It’s a science-backed way to recover faster and train smarter — especially when combined with a structured warm-up or cooldown.
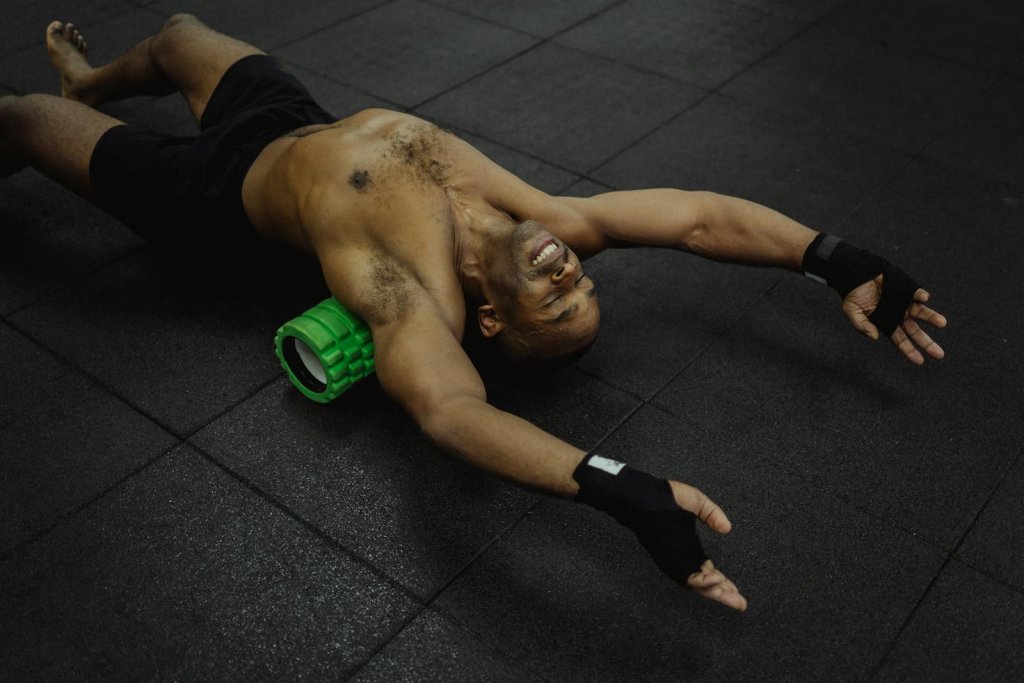
Whether you’re an athlete, lifter, or desk worker, learning the right foam rolling technique can help reduce tightness, prevent injury, and boost strength performance over time.
Why Foam Rolling Works
Foam rolling is a type of self-myofascial release (SMR) — using pressure to loosen tight fascia (the connective tissue around muscles). Research shows it helps:
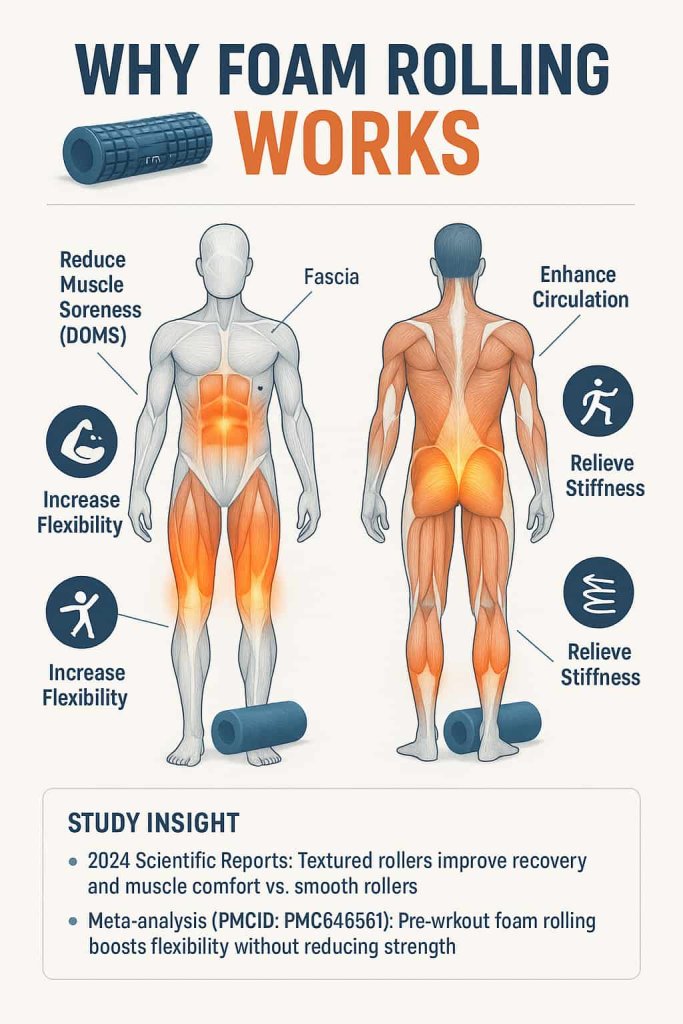
- Reduce delayed-onset muscle soreness (DOMS)
- Increase short-term flexibility and range of motion
- Enhance circulation and muscle recovery
- Decrease perceived muscle stiffness
👉 Study Insight:
A 2024 Scientific Reports study found that textured foam rollers (grooved or ridged) improve recovery and perceived soreness compared to smooth rollers by stimulating deeper muscle layers (Nature, 2024).
Another meta-analysis confirmed that foam rolling before workouts enhances flexibility without reducing strength.
How to Use a Foam Roller Properly
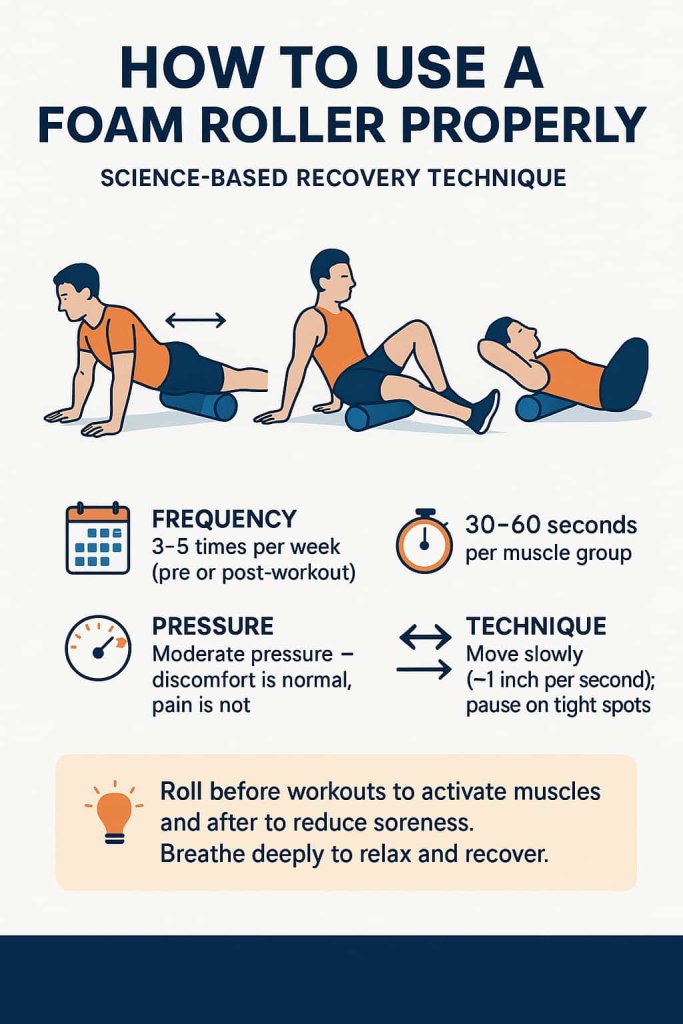
- Frequency: 3–5 times a week (pre or post-workout)
- Duration: 30–60 seconds per muscle group
- Pressure: Apply moderate pressure — discomfort is normal, pain is not
- Technique: Move slowly (about 1 inch per second), pausing on tight spots
💡 Pro Tip:
Roll before workouts to activate muscles and after to reduce soreness. Always breathe deeply to encourage relaxation and recovery.
16 Best Foam Roller Workouts
Below are the top 16 foam roller exercises targeting all major muscle groups. Each includes its purpose, technique, and trainer tip.
1. Quadriceps Roll
Why it works:
Relieves tightness and stiffness in the front thighs caused by squats, cycling, or sitting. Foam rolling the quads boosts blood flow, improves flexibility, and helps prevent knee pain by releasing tension in the fascia surrounding the muscle.
Muscles worked:
Rectus femoris, vastus medialis, vastus lateralis, vastus intermedius
How to do it:
- Lie face down with the foam roller positioned under your thighs.
- Support yourself on your forearms (plank position).
- Engage your core and slowly roll from your hip crease to just above the knees.
- Pause for 10–20 seconds on tender spots to allow the muscle to release.
- Repeat for 60 seconds per leg.
Trainer Tip:
Keep your abs tight and move slowly — avoid rolling directly over the knees.
2. Hamstring Roll
Why it works:
Targets the back of the thighs, improving flexibility and reducing tension from running, sitting, or heavy deadlifting. Promotes better hip mobility and circulation in the posterior chain.
Muscles worked:
Biceps femoris, semitendinosus, semimembranosus
How to do it:
- Sit with the roller beneath your hamstrings.
- Place your hands slightly behind your hips for support.
- Lift your hips off the floor to apply pressure.
- Roll from just below the glutes to above the knees.
- Pause on tight areas and flex/extend the knee gently for deeper release.
Trainer Tip:
Cross one leg over the other to increase intensity and focus on one hamstring at a time.
3. Calf Roll
Why it works:
Loosens tight calf muscles to improve ankle mobility, stride length, and squat depth. Ideal after running or plyometric workouts.
Muscles worked:
Gastrocnemius, soleus, plantaris
How to do it:
- Sit with legs extended and roller beneath your calves.
- Support yourself with your hands behind you.
- Lift your hips slightly and roll from ankles to just below the knees.
- Pause on sore points and flex your toes up and down.
- Roll each calf for about 45–60 seconds.
Trainer Tip:
Rotate legs slightly inward and outward to target all angles of the calf.
4. Glute Roll
Why it works:
Releases tight glute muscles that contribute to hip stiffness and lower-back discomfort. Improves mobility for squats, lunges, and hip thrusts.
Muscles worked:
Gluteus maximus, gluteus medius, piriformis
How to do it:
- Sit on the roller with knees bent and feet flat.
- Cross one ankle over the opposite knee (figure-4 position).
- Lean toward the side of the crossed leg.
- Roll slowly over the glute area for 30–60 seconds.
- Switch sides.
Trainer Tip:
Focus on short, controlled rolls; don’t rush. Daily rolling can ease chronic tightness.
5. IT Band Roll
Why it works:
Relieves tension in the outer thigh fascia (IT band) that stabilizes the knee. Helps reduce lateral knee discomfort and improve hip alignment.
Muscles worked:
Tensor fasciae latae (TFL), vastus lateralis, IT band fascia
How to do it:
- Lie on your side with the roller under your outer thigh.
- Support your upper body with your forearm and opposite leg.
- Roll slowly from the hip down to just above the knee.
- Pause on tender points for a few seconds.
- Repeat for 45–60 seconds per leg.
Trainer Tip:
Move slowly — the IT band is sensitive. Roll surrounding muscles (TFL and quads) for better comfort.
6. Inner Thigh (Adductor) Roll
Why it works:
Improves groin flexibility and hip rotation. Beneficial for athletes performing lateral movements like soccer, hockey, or skating.
Muscles worked:
Adductor magnus, longus, brevis, gracilis, pectineus
How to do it:
- Lie face down with one leg bent out to the side.
- Place the roller under your inner thigh.
- Support your body with forearms.
- Roll from the groin area to just above the knee.
- Apply steady pressure, pausing on sore spots.
Trainer Tip:
Keep your abs tight to prevent lower-back arching. Use slow, deep breaths.
7. Hip Flexor Roll
Why it works:
Releases shortened hip flexors caused by sitting or cycling, helping to improve posture and reduce lower back tension.
Muscles worked:
Psoas major, iliacus, rectus femoris
How to do it:
- Lie face down and position the roller just below your hip bones.
- Support yourself on your forearms.
- Shift your body side to side across the front of your hips.
- Roll for 30–45 seconds per side.
- Focus only on the muscle area — avoid the pelvis.
Trainer Tip:
Follow up with a standing hip stretch for best results.
8. Upper Back Roll
Why it works:
Relieves stiffness from sitting, lifting, or poor posture. Enhances thoracic mobility and supports better shoulder mechanics.
Muscles worked:
Trapezius, rhomboids, erector spinae
How to do it:
- Lie on your back with the roller under your upper back.
- Cross arms over your chest or support your head lightly.
- Lift your hips and slowly roll from mid-back to shoulder blades.
- Pause and extend arms overhead for extra stretch.
Trainer Tip:
Avoid rolling the lower back. Focus on the upper and mid-back only.
9. Lat Roll
Why it works:
Loosens tight lats that limit shoulder flexion and cause poor posture. Rolling here enhances pulling performance.
Muscles worked:
Latissimus dorsi, teres major, posterior deltoid
How to do it:
- Lie on one side with the roller under your armpit.
- Extend your top arm overhead and keep your thumb pointing upward.
- Roll from mid-rib to mid-back slowly.
- Pause at tender areas and breathe deeply.
Trainer Tip:
Rotate slightly backward for deeper activation of the lat fibers.
10. Chest (Pec) Roll
Why it works:
Opens up the chest muscles to counteract rounded shoulders and tight pecs from bench pressing or desk posture.
Muscles worked:
Pectoralis major, pectoralis minor
How to do it:
- Lie face down at an angle, with the roller under one side of your chest.
- Place your arm slightly out to the side.
- Move gently side to side and slightly up toward the shoulder joint.
- Roll for 30–45 seconds per side.
Trainer Tip:
Use a massage ball for deeper pec minor release near the front shoulder.
11. Shoulder Roll
Why it works:
Releases tension in the deltoid and rotator cuff muscles, enhancing recovery after pressing or throwing movements.
Muscles worked:
Anterior, lateral, and posterior deltoids; supraspinatus
How to do it:
- Lie sideways with the roller under your shoulder.
- Roll forward and backward in small motions.
- Adjust your arm position to target different deltoid heads.
- Spend 30–45 seconds per side.
Trainer Tip:
Perfect for post-workout recovery — pair with shoulder mobility drills.
12. Neck Base Roll
Why it works:
Reduces tension headaches and neck stiffness by targeting the muscles at the skull base. Improves cervical posture.
Muscles worked:
Suboccipitals, upper trapezius, levator scapulae
How to do it:
- Lie flat on your back.
- Place the roller at the base of your skull (not directly under the neck).
- Gently nod your head “yes” and “no.”
- Roll slightly side to side for 30–45 seconds.
Trainer Tip:
Never roll on the cervical spine — focus only at the skull base.
13. Lower Back (Caution)
Why it works:
Provides gentle tension relief in the lumbar region. Should be done carefully to avoid pressure on the spine.
Muscles worked:
Erector spinae, quadratus lumborum
How to do it:
- Sit with the roller under your lower back.
- Cross your arms over your chest.
- Lift hips slightly and roll just 2–4 inches up and down.
- Keep the movement small and controlled.
- Roll for 20–30 seconds only.
Trainer Tip:
Engage your abs for support and avoid excessive pressure or arching.
14. Glute Bridge with Roller
Why it works:
Combines muscle activation with balance training. Strengthens the glutes and core while providing mild massage to the lower body.
Muscles worked:
Gluteus maximus, hamstrings, abdominals
How to do it:
- Lie on your back with knees bent and feet resting on the roller.
- Engage your core and press through your heels to lift hips.
- Hold at the top for 1–2 seconds.
- Lower slowly and repeat for 10–12 reps.
Trainer Tip:
Squeeze glutes at the top. Avoid overextending your back.
15. Plank Roll
Why it works:
Strengthens the core and shoulders while improving joint stability through controlled instability.
Muscles worked:
Rectus abdominis, obliques, deltoids, triceps
How to do it:
- Start in a forearm plank position.
- Place one forearm on the roller.
- Gently roll the roller forward and backward 4–6 inches.
- Keep your hips stable and core tight.
- Switch arms after 15–20 seconds.
Trainer Tip:
Focus on control over speed — slow movement increases muscle activation.
16. Rolling Lunge Stretch
Why it works:
Combines active stretching and tissue release to restore hip extension and reduce soreness after leg workouts.
Muscles worked:
Psoas, rectus femoris, gluteus maximus, adductors
How to do it:
- Get into a half-lunge position with your back shin resting on the roller.
- Keep your front knee over your ankle.
- Gently rock your body forward and backward 4–6 times.
- Switch sides after 30–45 seconds.
Trainer Tip:
Use this at the end of lower-body sessions to improve flexibility and recovery.
How to Combine Foam Rolling with Strength Training
| Goal | When to Foam Roll | Focus Area |
|---|---|---|
| Warm-up | Before workout | Light rolling for activation |
| Recovery | After workout | Longer holds, deeper pressure |
| Rest day | Anytime | Full-body maintenance |
💡 Combine 5–6 exercises per session (10–15 minutes total) for best results.
Common Foam Rolling Mistakes to Avoid
- Rolling too fast or with excessive pressure
- Rolling directly over bones or joints
- Ignoring pain signals
- Not breathing deeply or relaxing muscles
FAQ
1. Can foam rolling build muscle strength?
Indirectly — yes. Foam rolling helps muscles recover faster and maintain flexibility, which supports long-term strength progress.
2. How long should I foam roll each muscle?
30–60 seconds per muscle group is ideal.
3. Should I foam roll before or after workouts?
Do both — before for activation, after for recovery.
4. Can I foam roll every day?
Yes, daily use is safe if done with moderate pressure and proper form.
5. Does foam rolling break up lactic acid?
No — it improves circulation, helping your body clear metabolites naturally.
6. Which foam roller is best for soreness?
Textured or medium-density rollers (like TriggerPoint GRID) provide the best balance of pressure and comfort.
7. Is foam rolling safe for beginners?
Absolutely — start gently and increase intensity gradually.
Conclusion
Foam rolling isn’t just recovery — it’s active maintenance for your body.
When done right, it relieves soreness, improves flexibility, and keeps you stronger for every workout ahead.
Start with these 16 science-backed moves and make foam rolling a part of your weekly fitness routine for better performance and mobility.