
Yes — targeted posture and strengthening exercises may help reduce a neck hump by improving alignment, flexibility, and muscular balance. A “neck hump” (often related to forward head posture and upper-back rounding) is usually a posture pattern, not a quick cosmetic issue. Correcting it requires consistent mobility work, deep neck flexor activation, upper-back strengthening, and daily posture habits.

Below you’ll find a practical warm-up, 10 step-by-step exercises, programming guidelines, safety notes, and FAQs — designed for clarity and quick wins.
What Is a Neck Hump (and Why It Happens)
A “neck hump” — medically known as thoracic hyperkyphosis or forward head posture — forms where the base of your neck meets your upper back.
Common causes include:
- Prolonged screen or desk work (“tech neck”)
- Weak deep neck flexors and upper-back muscles

- Tight pectoral and hip-flexor muscles
- Poor ergonomics or prolonged slouching
In rare cases, a pronounced hump can result from structural issues such as osteoporosis, vertebral fractures, congenital curvature, or a fat pad (“buffalo hump”).
If your hump is firm, painful, or worsening, consult a licensed medical provider before beginning exercise.
Why Neck Hump Correction Matters
When your head juts forward and your upper back rounds, it can:
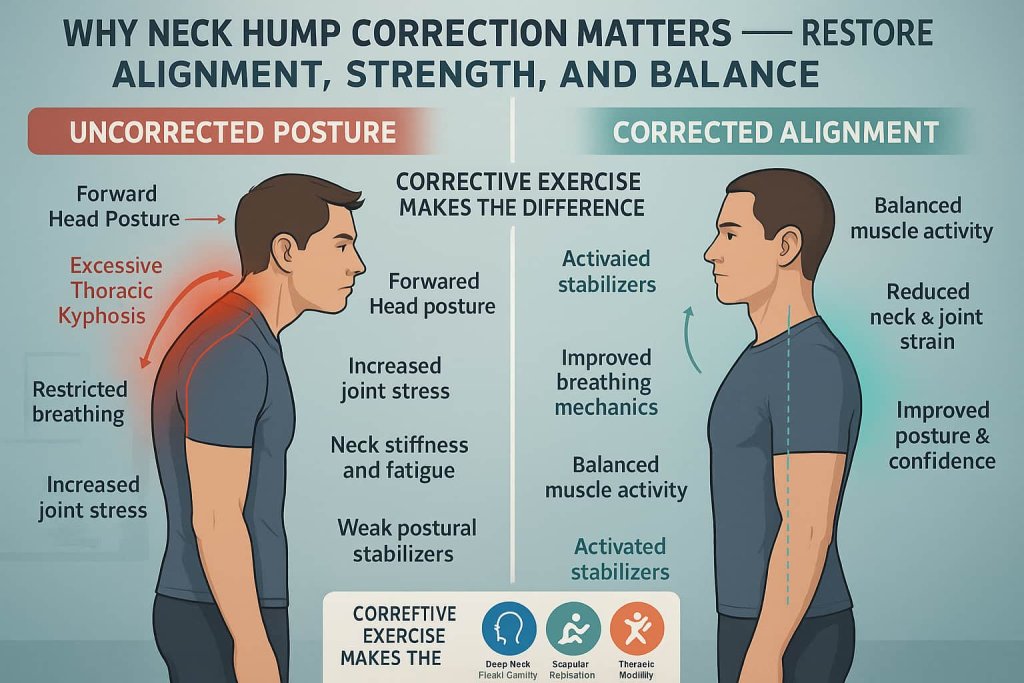
- Increase stress on cervical and thoracic joints
- Shorten the chest and neck muscles
- Weaken stabilizers that hold your head upright
- Alter breathing and shoulder mechanics
Corrective exercise re-balances strength and mobility across these areas, helping to relieve stiffness, restore alignment, and prevent further postural drift.
Research shows that combining deep cervical flexor strengthening, scapular retraction, and thoracic mobility can measurably improve posture and reduce forward-head distance within weeks.
Warm-Up Before You Begin
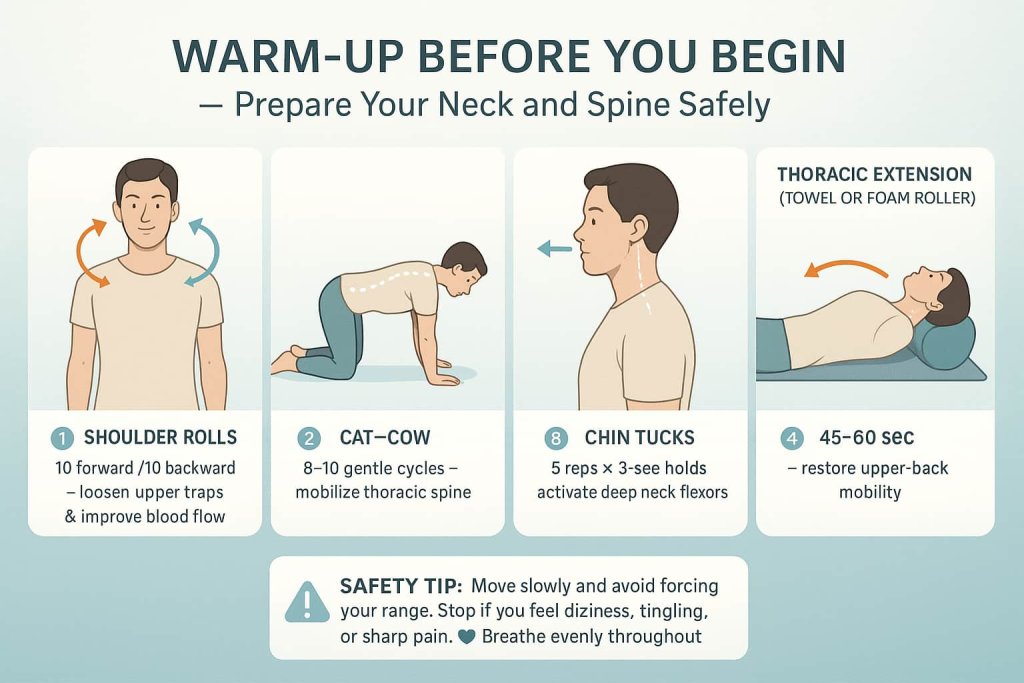
Always warm up before performing posture or neck exercises. This prepares your muscles, improves circulation, and reduces risk of strain.
Quick Warm-Up Routine:
- Shoulder rolls — 10 forward, 10 backward
- Cat–Cow — 8–10 gentle cycles emphasizing mid-back movement
- Chin tucks — 5 reps, 3-second holds
- Thoracic extension over a rolled towel or foam roller — 45–60 seconds
Safety Tip:
Move slowly and avoid forcing your range. Stop if you feel dizziness, tingling, or sharp pain.
The 10 Best Neck Hump Exercises
Below are the most effective, research-supported movements for strengthening weak areas, releasing tight tissues, and retraining your posture.
1) Chin Tuck (Deep Cervical Flexors)
Why it works:
Recruits and re-educates the deep neck flexors to counter forward-head posture. Regular practice improves head-over-shoulder alignment, unloads facet joints, and reduces overuse of the upper traps and suboccipitals.
Muscles worked:
Longus colli, longus capitis, deep cervical stabilizers; reduces dominance of sternocleidomastoid and suboccipitals.
How to do it:
- Stand or sit tall with ribs stacked over pelvis, eyes level.
- Imagine sliding your skull straight back along a shelf (gentle “double-chin”).
- Keep the crown of your head reaching up; do not look up or down.
- Hold 3–5 seconds, breathe quietly, then release under control.
Dosage: 10–12 reps × 2–3 sets, daily or during posture breaks.
Trainer Tip:
Cue “glide, don’t nod.” If you feel strain under the chin, reduce range; quality beats amplitude.
2) Supine DCF Nod (Towel Support)
Why it works:
External feedback from the towel helps minimize jaw clenching and SCM dominance, isolating the deep flexors with tiny, precise motion.
Muscles worked:
Deep cervical flexors (longus colli/capitis) with minimal superficial recruitment.
How to do it:
- Lie on your back, knees bent; place a small rolled towel beneath the base of your skull.
- Lightly press the skull into the towel to find neutral.
- Perform tiny “yes” nods, as if saying “micro-yes,” keeping the throat soft.
- Pause 1–2 seconds at the end of the nod; return to neutral smoothly.
Dosage: 10–15 reps × 2 sets.
Trainer Tip:
Keep tongue resting on the roof of the mouth to relax the jaw and discourage SCM over-activity.
3) Cervical Isometric Holds (Neutral)
Why it works:
Builds low-risk strength around the neck without joint shear. Isometrics improve endurance of support musculature in positions you actually use all day.
Muscles worked:
Global cervical flexors, extensors, and lateral flexors/rotators in a balanced, joint-friendly way.
How to do it:
- Sit or stand tall in neutral.
- Flexion: place palm on forehead, gently press your head forward into your hand without moving.
- Extension: palm on the back of head, press back gently.
- Lateral: palm on the temple, press sideways gently (both sides).
- Hold each effort 5–8 seconds; breathe steadily.
Dosage: 3–4 directions × 3–5 holds each.
Trainer Tip:
Use only 20–30% effort—just enough to feel activation. “Meet your hand,” don’t overpower it.
4) Wall Angels
Why it works:
Trains scapular upward rotation and posterior tilt while encouraging thoracic extension—key to reversing rounded shoulders and the visible “hump.”
Muscles worked:
Middle/lower trapezius, rhomboids, serratus anterior (assist), rotator cuff stabilizers.
How to do it:
- Stand with sacrum, mid-back, and head lightly against the wall, heels 4–6 inches forward.
- Set ribs down (no flaring). Start arms in a “W” (elbows at shoulder height).
- Without arching, slide arms to a comfortable “Y,” then return to “W.”
- Keep neck long and chin gently tucked.
Dosage: 8–12 reps × 2–3 sets.
Trainer Tip:
If wrists/elbows can’t touch the wall without rib flare, reduce range. Quality scapular motion beats forced contact.
5) Prone Y–T–W Raises
Why it works:
Targets the mid-back “brakes” (mid/lower traps, rhomboids) that pull the shoulder girdle out of protraction and support an extended, proud chest.
Muscles worked:
Mid/lower trapezius, rhomboids, posterior deltoid, upper thoracic extensors.
How to do it:
- Lie prone on a bench or floor, forehead down (neck neutral).
- Y: arms overhead, thumbs up; lift and pause 1–2 seconds.
- T: arms out to the side, thumbs up; lift and pause.
- W: elbows bent, squeeze blades down/back; lift and pause.
- Move with control; keep ribs heavy.
Dosage: 6–10 reps per shape × 2 rounds.
Trainer Tip:
Think “scapulas slide into back pockets.” If low-back joins in, reduce lift height.
6) Banded Seated Row (Scapular Retraction Focus)
Why it works:
Restores the pulling strength that counteracts rounded shoulders and sustains neutral head position by anchoring the shoulder blades.
Muscles worked:
Rhomboids, mid/lower traps; lats and biceps as assistants.
How to do it:
- Sit tall with a band anchored at mid-torso height.
- Grip handles; start with arms long and shoulders down.
- Pull elbows back, finishing beside your torso; squeeze blades together.
- Control the return; keep neck relaxed.
Dosage: 10–15 reps × 3 sets.
Trainer Tip:
Keep forearms parallel to the floor and avoid shrugging. Exhale as you pull, inhale as you return.
7) Foam-Roller Thoracic Extension
Why it works:
Reintroduces extension to a chronically flexed thoracic spine, improving rib mechanics and head-over-shoulder alignment.
Muscles worked:
Thoracic extensors/erector spinae; opens anterior chest structures.
How to do it:
- Place a foam roller perpendicular to your mid-back; knees bent, hands cradle head.
- Gently extend over the roller, pausing at a comfortable end range.
- Return to neutral; shift the roller 1–2 inches up or down and repeat.
- Keep lower ribs stacked (don’t hinge from the low back).
Dosage: 8–10 gentle extensions at 2–3 levels.
Trainer Tip:
Think “long spine” as you extend. If you feel pinching, reduce range or move to a new segment.
8) Quadruped “Open Book” Rotation
Why it works:
Restores thoracic rotation, which often disappears with desk posture. Better rotation frees the neck from compensating.
Muscles worked:
Thoracic rotators/extensors; deep core stabilizers controlling the ribcage.
How to do it:
- On all fours, place one hand behind your head.
- Keep hips square; rotate your upper back to point the elbow toward the ceiling.
- Pause briefly, then return with control.
- Keep the chin tucked softly; eyes follow the elbow.
Dosage: 8–10 reps/side × 2–3 sets.
Trainer Tip:
If hips sway, narrow the range and brace gently through your abdomen.
9) Doorway Pec Stretch
Why it works:
Lengthens tight pecs that drag the shoulders into protraction, making the upper back look more rounded.
Muscles stretched:
Pectoralis major/minor; anterior shoulder structures.
How to do it:
- Stand in a doorway; forearm and elbow on the frame at ~90°.
- Step through until you feel a front-chest stretch—no pinching in the shoulder.
- Keep ribs down and chin gently tucked; breathe slowly.
Dosage: 30–45 seconds/side × 2–3.
Trainer Tip:
Try two angles: elbow slightly below shoulder (lower fibers) and slightly above (upper fibers), as comfort allows.
10) Half-Kneeling Hip-Flexor Stretch
Why it works:
Tight hip flexors tilt the pelvis forward, encouraging compensatory rounding up the chain. Opening them supports a more neutral stack.
Muscles stretched:
Iliopsoas, rectus femoris, TFL (assist).
How to do it:
- Half-kneel with front knee at 90°.
- Lightly tuck the tailbone and squeeze the back-leg glute.
- Glide hips forward only until you feel a front-hip stretch—stay tall.
- Breathe in through the nose, out through pursed lips.
Dosage: 30–45 seconds/side × 2–3.
Trainer Tip:
Add a gentle arm-reach overhead on the kneeling side to bias the psoas—only if ribs stay down.
Programming & Progression
| Phase | Weeks | Focus | Key Notes |
|---|---|---|---|
| Foundation | 1–4 | Learn form | 1 set per move; add daily wall resets |
| Build Strength | 5–8 | Add resistance | 2–3 sets; band rows, longer holds |
| Maintain & Integrate | 9+ | Posture habit | Combine micro-breaks + weekly strength |
Frequency: 2–3 sessions/week for full program; daily resets encouraged.
Tempo: Slow and controlled (3–4 sec eccentrics).
Rest: 30–60 sec between sets.
Goal: Maintain pain-free, quality motion.
Common Mistakes to Avoid
- Over-tucking the chin instead of gliding it back
- Arching the lower back during wall angels
- Shrugging shoulders in rows or Y–T–W raises
- Forcing deep extensions or rotations
- Ignoring ergonomic factors between sessions
Pro Tip: Posture correction is a daily practice, not just a workout.
Ergonomic & Daily Habits for Long-Term Results
- Keep screens at eye level and shoulders relaxed.
- Use a chair supporting natural lumbar curve.
- Switch positions every 30–40 minutes.
- Walk, stretch, and practice your wall reset hourly.
- Strengthen glutes and core to support upright alignment throughout the day.
Safety, Red Flags & When to Seek Medical Advice
These exercises are intended for general posture improvement. Stop and consult a medical professional if you experience:
- Numbness, tingling, or weakness in arms or legs
- Sharp or radiating neck/back pain
- Known osteoporosis or vertebral fractures
- Rapidly worsening curvature or deformity
People with structural conditions (Scheuermann’s disease, congenital kyphosis) should seek individualized programs supervised by a licensed physical therapist.
This guide supports posture awareness and strength; it is not medical treatment.
Frequently Asked Questions
Q1: How long until I see results?
Expect posture awareness changes within 2–4 weeks and visible improvement after 8–12 weeks with consistency.
Q2: Will stretching alone fix my neck hump?
No — stretching helps, but strengthening your deep neck flexors and upper back is essential.
Q3: Is it safe if I have mild neck pain?
If pain is mild and not radiating, begin with gentle chin tucks and breathing drills; stop if pain worsens.
Q4: Can I do these exercises daily?
Yes, mobility and breathing work can be daily; strengthening 2–3 days/week is ideal.
Q5: What if my hump is fatty or structural?
Posture work may help alignment, but fatty humps (“buffalo hump”) or structural deformities need medical evaluation.
Q6: Are posture braces helpful?
They can cue awareness temporarily but do not build lasting muscle strength or correction.
Conclusion
Correcting a neck hump isn’t instant — it’s a gradual realignment process.
By combining thoracic mobility, deep neck flexor activation, scapular strength, and consistent daily resets, you’ll restore balance, relieve tension, and retrain your posture for the long term.
Start small, stay consistent, and celebrate each step toward a stronger, straighter spine.
References
- Blomgren J, Strandell E, Jull G, et al. Effects of Deep Cervical Flexor Training on Impaired Physiological Functions Associated With Neck Pain: A Systematic Review.
https://pmc.ncbi.nlm.nih.gov/articles/PMC6263552/ - Chaiyawijit S, et al. (2024). McKenzie Neck Exercise vs. Craniocervical Flexion Exercise on Deep Neck Flexor Strength & Endurance: Randomized Trial.
https://pmc.ncbi.nlm.nih.gov/articles/PMC11578404/ - Cleland JA, Childs JD, et al. (2005). Immediate Effects of Thoracic Manipulation in Patients With Neck Pain: Randomized Clinical Trial.
https://pubmed.ncbi.nlm.nih.gov/15922233/ - Lee KW, et al. (2016). Effect of Thoracic Manipulation and Deep Craniocervical Flexor Training on Pain and Neck Disability.
https://pmc.ncbi.nlm.nih.gov/articles/PMC4755998/ - Chen Y, et al. (2024). Effects of Scapular Treatment on Chronic Neck Pain: Systematic Review and Meta-analysis.
https://pmc.ncbi.nlm.nih.gov/articles/PMC10983729/ - Katzman WB, Vittinghoff E, et al. (2017). Targeted Spine-Strengthening & Posture Training Program to Reduce Hyperkyphosis in Older Adults (SHEAF RCT).
https://pubmed.ncbi.nlm.nih.gov/28689306/ - Kado DM, et al. (2009). Hyperkyphosis Predicts Mortality Independent of Vertebral Osteoporosis in Older Women.
https://pmc.ncbi.nlm.nih.gov/articles/PMC2711520/ - NHS. Kyphosis — Overview, Causes, Diagnosis & Treatment (Patient Guidance).
https://www.nhs.uk/conditions/kyphosis/