
The Smith machine hip thrust is one of the safest and most effective exercises for building strong, round glutes. Unlike the free-weight version, this movement uses a guided bar path that reduces balance issues and lowers injury risk.
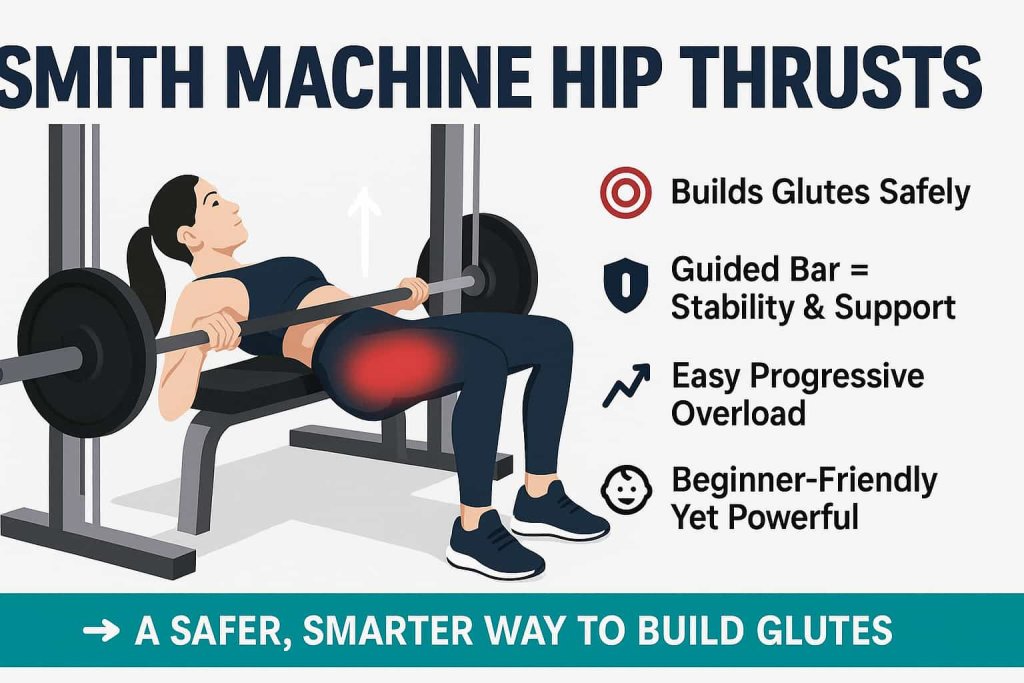
If you want a glute exercise that combines strength, stability, and progressive overload, the Smith machine hip thrust deserves a spot in your routine. It’s especially helpful for beginners, those training alone, or lifters recovering from lower back or balance issues. In this guide, you’ll learn the benefits, muscles worked, proper form, mistakes to avoid, and expert tips.
What Is the Smith Machine Hip Thrust?
The Smith machine hip thrust is a hip extension exercise performed with the barbell fixed on a Smith machine instead of using a free bar. You sit on the floor with your upper back supported by a bench, place the Smith barbell across your hips, and drive your hips upward until your body forms a straight line from shoulders to knees.
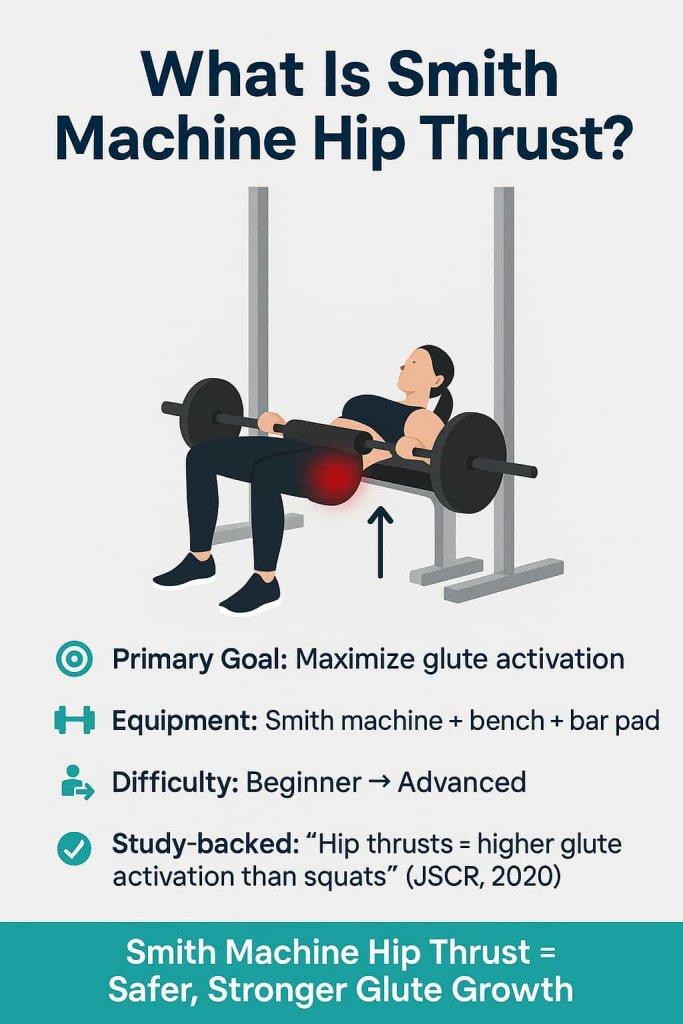
- Primary goal: Maximize glute activation.
- Equipment needed: Smith machine, bench, hip pad or bar pad.
- Difficulty level: Beginner to advanced (weight can be easily progressed).
👉 According to a 2020 study in the Journal of Strength & Conditioning Research, hip thrust variations generate higher glute activation than squats at full hip extension【pmc.ncbi.nlm.nih.gov, 2020】.
Muscles Worked in Smith Machine Hip Thrusts
The Smith machine hip thrust primarily targets the glutes, but it also recruits several supporting muscles:
- Gluteus Maximus – main driver of hip extension.
- Gluteus Medius & Minimus – assist in stabilization.
- Hamstrings – support hip extension and stability.
- Quadriceps – stabilize during upward thrust.
- Core & Lower Back – protect spine and maintain posture.
- Adductors – activated depending on foot stance.
Benefits of Smith Machine Hip Thrusts
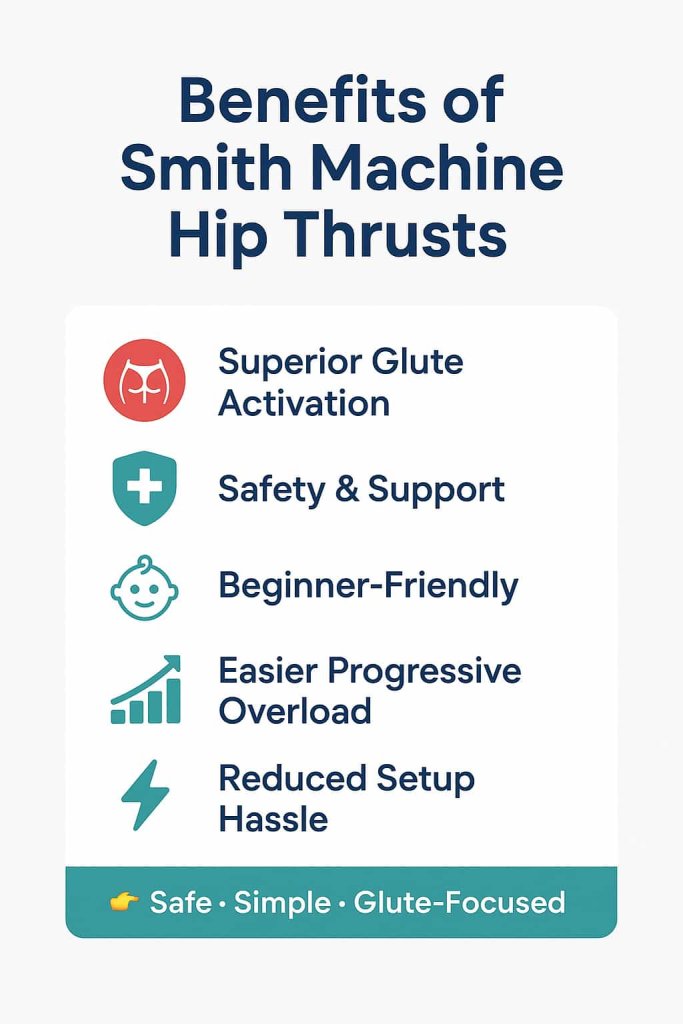
1. Superior Glute Activation
The Smith machine provides stability, allowing you to push heavier loads and fully squeeze the glutes at the top of the movement.
2. Safety and Support
The fixed bar path makes it safer than free-bar hip thrusts, especially if you’re training without a spotter.
3. Beginner-Friendly
Perfect for those new to hip thrusts, since balancing a free bar can be intimidating.
4. Easier Progressive Overload
Weights can be added gradually without worrying about bar stability.
5. Reduced Setup Hassle
Unlike free weights, you don’t need to lift and balance the bar into position—it slides smoothly on the Smith rails.
How to Do Smith Machine Hip Thrusts (Step-by-Step)
- Set Up the Bench & Bar
- Place a bench behind the Smith machine.
- Adjust the bar to about knee height.
- Position Yourself
- Sit on the floor with your upper back resting on the bench.
- Place a bar pad across your hips for comfort.
- Foot Placement
- Keep feet hip-width apart, heels under knees.
- Toes slightly out.
- Execution
- Brace your core, tuck chin slightly.
- Drive hips upward, pushing through heels.
- Pause at the top, squeezing glutes.
- Lower hips slowly until just above the floor.
- Breathing
- Inhale as you lower, exhale as you thrust up.
Common Mistakes to Avoid
- ❌ Hyperextending the lower back – keep ribs down, avoid overarching.
- ❌ Feet too far forward/back – wrong stance shifts tension away from glutes.
- ❌ Bouncing reps – control the negative phase for maximum activation.
- ❌ Short range of motion – lower hips enough to stretch glutes before driving up.
Variations of Smith Machine Hip Thrusts
1. Single-Leg Smith Machine Hip Thrust
Why it works: Forces each glute to work independently, correcting imbalances and building unilateral strength. It also improves balance and coordination.
Muscles worked: Gluteus maximus (primary), gluteus medius, hamstrings, core stabilizers.
How to do it:
- Position yourself under the Smith machine bar, with your upper back resting on a bench.
- Place one foot on the ground, the other leg extended straight out.
- Drive through the planted heel, pushing the bar upward until hips are fully extended.
- Lower with control and repeat before switching legs.
Trainer Tip: Start lighter than your two-leg hip thrust weight. Focus on keeping your pelvis level—avoid letting the lifted side drop.
2. Pause Reps (Smith Machine Hip Thrust with Isometric Hold)
Why it works: Holding at the top increases time under tension, maximizing glute contraction and muscle recruitment. Great for building strength endurance.
Muscles worked: Gluteus maximus, hamstrings, erector spinae, core.
How to do it:
- Perform a standard Smith machine hip thrust.
- At the top, hold the squeeze for 2–3 seconds.
- Keep tension in the glutes before slowly lowering back down.
Trainer Tip: Exhale and brace your core during the pause to prevent your lower back from arching.
3. Banded Smith Machine Hip Thrust
Why it works: Adding a resistance band increases tension at lockout, where glute activation is strongest. This forces you to push harder at the peak contraction.
Muscles worked: Gluteus maximus, gluteus medius, hamstrings, core.
How to do it:
- Anchor a resistance band around the barbell and under the bench or rack base.
- Set up for the hip thrust as usual.
- As you drive up, the band increases resistance near lockout.
- Lower with control and repeat.
Trainer Tip: Use a medium-to-heavy band for best results. Ensure it’s secured tightly so it doesn’t slip mid-set.
Programming & Frequency
- Reps & Sets: 3–4 sets of 8–12 reps for hypertrophy.
- Strength Focus: 4–6 reps with heavier loads.
- Frequency: 2–3 times per week, allowing 48 hours rest between sessions.
- Best Pairings: Squats, Romanian deadlifts, and lunges for complete lower-body development.
Who Should Do Smith Machine Hip Thrusts?
✅ Beginners learning proper hip thrust form
✅ Athletes needing explosive hip extension (e.g., sprinters, jumpers)
✅ Bodybuilders targeting glute growth
✅ People with balance issues or training alone
✅ Those recovering from lower back strain (with professional guidance)
FAQs About Smith Machine Hip Thrusts
1. Are Smith machine hip thrusts better than barbell hip thrusts?
Not necessarily better, but safer and easier for beginners. Free-bar hip thrusts engage more stabilizers, while Smith thrusts allow heavier loading with stability.
2. Do Smith machine hip thrusts build glutes effectively?
Yes. Studies confirm hip thrusts (machine or free bar) produce very high glute activation.
3. How much weight should I start with?
Start with the empty Smith bar (15–25 lbs depending on machine). Add plates gradually as form improves.
4. Can I replace squats with hip thrusts?
No. Squats and hip thrusts complement each other—squats emphasize quads, hip thrusts target glutes.
5. Should I use a pad for Smith machine hip thrusts?
Yes, always use a hip pad or barbell pad to prevent hip bone discomfort.
6. Is the Smith machine hip thrust good for athletes?
Yes, it improves hip power, sprint speed, and jump height by strengthening glutes.
7. How do I prevent lower back pain during hip thrusts?
Keep core braced, avoid over-arching, and adjust foot position to ensure proper form.
Conclusion
The Smith machine hip thrust is a glute-building powerhouse that combines strength, safety, and convenience. It’s an ideal choice for beginners, solo lifters, and anyone looking to maximize glute growth with controlled, heavy loading. Add it to your lower-body training 2–3 times per week, and your glutes will grow stronger, rounder, and more powerful.
👉 Ready to build glutes the safe way? Next time you’re at the gym, set up the Smith machine and start thrusting!