
Wrist mobility exercises can help improve how comfortably your wrist moves, reduce everyday stiffness, and support better hand function when they are done gently and consistently. They are especially useful when your wrists feel tight from typing, lifting, gripping, yoga, or repeated hand use, but they are not a substitute for medical care when pain is severe, worsening, or linked to injury, numbness, or swelling.

Guidance from Cleveland Clinic, AAOS, and the NHS supports gentle range-of-motion work, tendon glides, and condition-specific exercises as part of self-care or rehab.
Why wrist mobility exercises matter
Your wrist needs enough motion for daily tasks like typing, lifting, pushing up from a chair, carrying bags, and gripping objects. When the joint and surrounding soft tissues get stiff, those simple tasks can feel awkward or uncomfortable. Clinical guidance commonly includes wrist flexion, extension, side-to-side motion, and finger or tendon gliding because these movements help maintain range of motion and hand function.
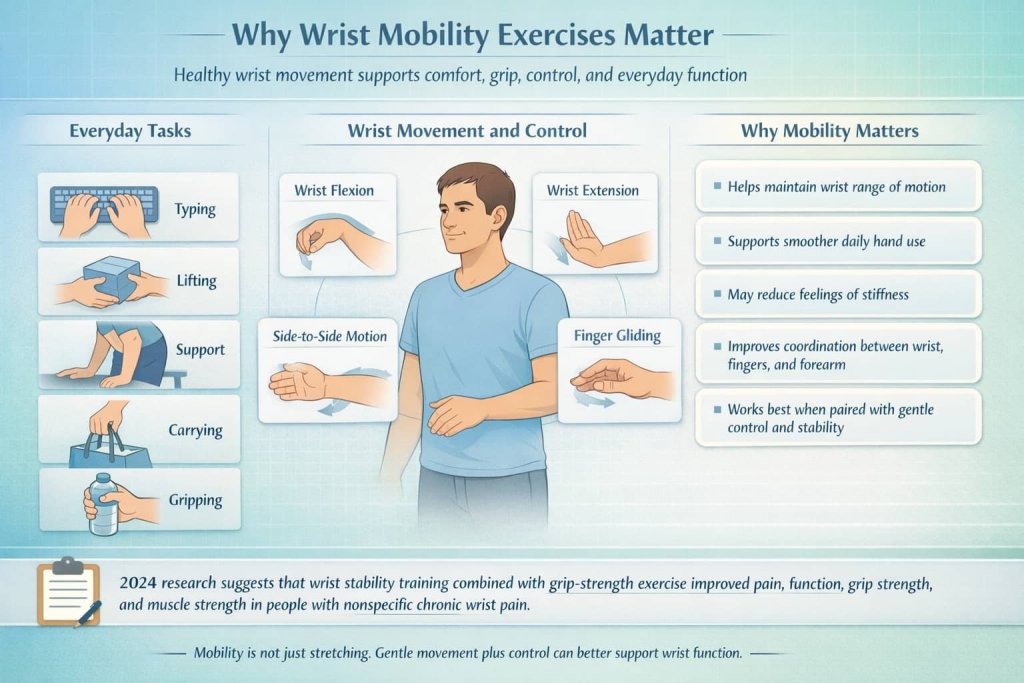
Mobility work is not only about stretching. It can also support coordination between the wrist, fingers, and forearm. A 2024 study on people with nonspecific chronic wrist pain found that wrist stability training combined with grip-strength work improved pain, function, grip strength, and muscle strength, which suggests that gentle mobility plus control work may be more useful than random stretching alone.
Who may benefit most from wrist mobility exercises
Wrist mobility exercises may help people whose wrists feel stiff from desk work, repetitive gripping, mild overuse, or recovery phases where a clinician has already cleared movement. Exercise-based rehabilitation also showed immediate-term improvements in pain, function, stiffness, and grip strength in people with hand osteoarthritis in a 2024 systematic review and meta-analysis published by JOSPT.
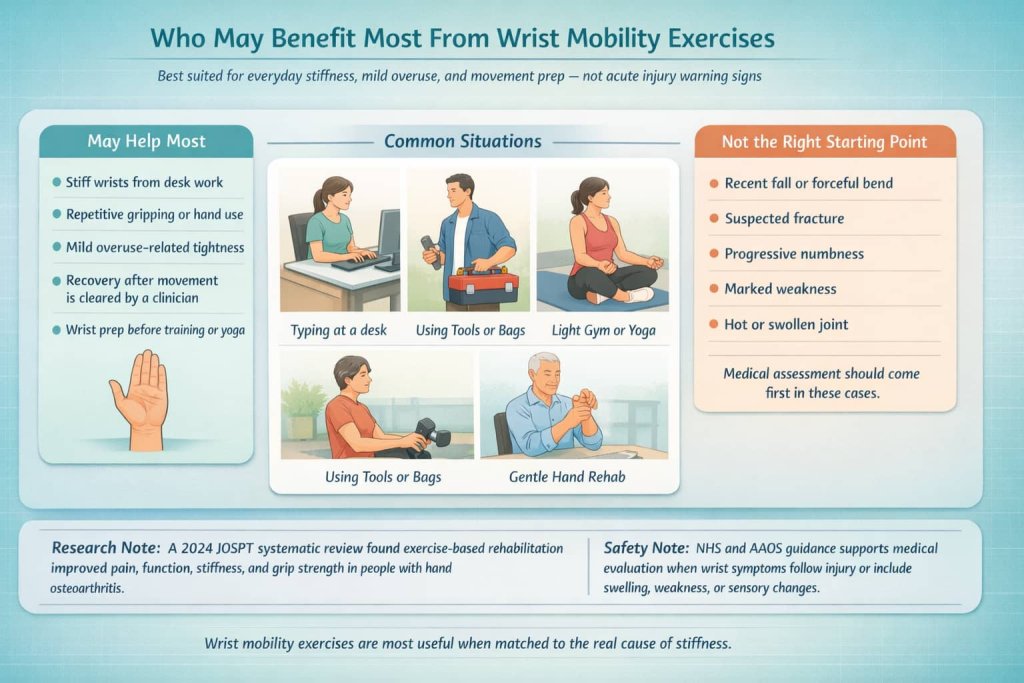
They may also be useful when you want to prepare the wrists for training, especially before load-bearing positions or exercises that demand wrist extension. Still, if symptoms are linked to a fall, a forceful bend, suspected fracture, progressive numbness, marked weakness, or a hot swollen joint, self-directed exercise is not the right starting point. The NHS and AAOS both recommend medical assessment in those situations.
10 best wrist mobility exercises
These 10 best wrist mobility exercises can help improve flexibility, reduce stiffness, and support smoother everyday hand and wrist movement. They include gentle stretches, range-of-motion drills, and simple control exercises that are easy to add to your daily routine.
1. Wrist flexion and extension
How to do it:
- Sit or stand with your forearm supported on a table or your thigh.
- Move your hand down so the wrist bends forward.
- Return to neutral, then move the hand up so the wrist bends backward.
- Move slowly and stay in a comfortable range.
- Do 8 to 12 controlled reps each way.
Why it works:
This is one of the most basic and useful wrist mobility exercises because it takes the joint through its main bending patterns. Cleveland Clinic includes wrist range-of-motion work as a simple starting point for stiffness and wrist discomfort.
Muscles worked:
This movement lightly engages the wrist flexors and extensors in the forearm while improving motion at the wrist joint itself.
Trainer Tip:
Keep the movement smooth. Do not force the end range or bounce.
2. Side-to-side wrist deviation
How to do it:
- Rest your forearm on a table with the hand hanging off the edge or held in front of you.
- Move your hand side to side from the wrist, like a gentle windshield-wiper motion.
- Pause briefly at each end of the range.
- Keep the forearm still.
- Do 8 to 12 reps per side.
Why it works:
Side-to-side wrist motion is often overlooked, but it matters for daily tasks like turning keys, carrying objects, and controlling hand position. Cleveland Clinic specifically includes this movement in wrist range-of-motion work.
Muscles worked:
This drill involves the wrist muscles that guide radial and ulnar deviation, along with stabilizing forearm muscles.
Trainer Tip:
Think “small and controlled,” not “big and aggressive.”
3. Wrist circles
How to do it:
- Make a loose fist or keep your fingers relaxed.
- Extend your arm slightly in front of you.
- Draw slow circles with your wrist in one direction.
- Reverse the direction after several reps.
- Do 5 to 10 circles each way.
Why it works:
Wrist circles combine several movement directions into one drill. They can work well as a warm-up before typing, lifting, or upper-body training because they help the joint move through multiple angles in a low-load way. This exercise is a practical extension of standard wrist range-of-motion guidance.
Muscles worked:
The forearm flexors, extensors, and smaller stabilizers all contribute as the hand moves through the circle.
Trainer Tip:
Make the circles slow enough that you can feel each part of the motion.
4. Prayer stretch
How to do it:
- Place your palms together in front of your chest.
- Keep the palms pressed lightly together.
- Lower your hands slowly until you feel a stretch through the wrists and forearms.
- Hold for 15 to 30 seconds.
- Repeat 2 to 4 times.
Why it works:
The prayer stretch is widely used in hand-therapy programs because it gently stretches the wrist and forearm tissues, especially when extension feels limited. Dorset County Hospital and other NHS hand-therapy resources commonly include this style of stretching for wrist stiffness.
Muscles worked:
You mainly feel this through the wrist flexor muscles and soft tissues on the palm side of the forearm.
Trainer Tip:
You should feel a stretch, not sharp pain or tingling.
5. Reverse prayer stretch
How to do it:
- Bring the backs of your hands together below chest level if comfortable.
- Lift the hands gently while keeping the shoulders relaxed.
- Stop at a mild to moderate stretch.
- Hold for 10 to 20 seconds.
- Repeat 2 to 3 times.
Why it works:
This variation stretches the opposite side of the wrist compared with the standard prayer stretch. It can be useful when extension-heavy positions are not the only problem and you want a more balanced mobility routine.
Muscles worked:
This tends to stretch the wrist extensors and the tissues along the back of the forearm and wrist.
Trainer Tip:
Skip this one if it feels pinchy or compressive in the wrist joint.
6. Tabletop wrist rocks
How to do it:
- Start on hands and knees on a mat or soft surface.
- Place your shoulders over your hands.
- Gently shift your body weight forward until you feel a light stretch at the wrists.
- Rock back to reduce the load.
- Repeat for 8 to 10 slow reps.
Why it works:
This drill helps the wrists get used to light load-bearing, which can be helpful for people preparing for planks, push-ups, or yoga positions. It also lets you control how much weight goes into the hands by changing your body position.
Muscles worked:
You load the wrist joint while the forearm muscles, shoulder stabilizers, and hand muscles help control position.
Trainer Tip:
Start with only a small forward shift. More pressure is not better.
7. Forearm pronation and supination
How to do it:
- Bend your elbow to 90 degrees and keep it close to your side.
- Start with your palm facing up.
- Slowly rotate your forearm until the palm faces down.
- Return to the start.
- Do 8 to 12 reps each direction.
Why it works:
Although this is technically forearm rotation, it strongly affects how your wrist and hand function in daily life. It is especially useful for tasks like turning doorknobs, using tools, and changing grip position. Rehab guidance for upper-limb recovery commonly includes this type of motion along with wrist active range-of-motion work.
Muscles worked:
The pronator and supinator muscles do most of the work, with the wrist and hand muscles helping maintain alignment.
Trainer Tip:
Keep the elbow tucked in so the movement comes from the forearm, not the shoulder.
8. Tendon glides
How to do it:
- Hold your hand up with the fingers straight.
- Slowly bend the fingers into a hook-like position.
- Move into a fuller fist if comfortable.
- Then open the hand back up fully.
- Perform 5 to 10 slow cycles.
Why it works:
Tendon glides are commonly used to support hand and finger motion and may help reduce stiffness around the wrist and hand by improving how the tendons move. AAOS recommends tendon-focused exercises in carpal tunnel care, and Cleveland Clinic also includes tendon glides in its wrist exercise guidance.
Muscles worked:
This movement targets the finger flexor tendons and small hand muscles more than the wrist itself, but it supports overall wrist-hand mobility.
Trainer Tip:
Move through each hand shape slowly rather than rushing straight into a fist.
9. Finger extension opens

How to do it:
- Start with a relaxed fist.
- Open the hand wide and spread the fingers.
- Hold briefly at the open position.
- Return to the fist.
- Do 10 to 15 reps.
Why it works:
Many people with stiff wrists also spend long periods gripping or typing, which keeps the hand in a more closed position. Alternating between fist and full finger extension can help balance that pattern and support overall hand function. Cleveland Clinic includes hand-opening exercises in its hand mobility guidance.
Muscles worked:
This drill uses the finger extensors and intrinsic hand muscles while encouraging smoother hand opening.
Trainer Tip:
Do not clamp the fist hard. Keep the effort light.
10. Light ball squeeze with neutral wrist
How to do it:
- Hold a soft ball or rolled towel in your hand.
- Keep your wrist in a neutral, straight position.
- Squeeze gently for 3 to 5 seconds.
- Relax fully between reps.
- Do 8 to 12 reps.
Why it works:
This is more of a support exercise than a pure mobility drill, but light grip work can complement wrist mobility because function depends on both movement and control. Cleveland Clinic includes grip strengthening for some wrist conditions, and a 2024 study indexed by PubMed suggests grip work paired with wrist stability training can improve pain and function in people with nonspecific chronic wrist pain.
Muscles worked:
The finger flexors, grip muscles, and stabilizers of the wrist and forearm all contribute.
Trainer Tip:
Keep the wrist straight. Avoid bending it while squeezing.
How often should you do wrist mobility exercises?
For general stiffness, a short routine done most days is usually more practical than one long session once a week. Many hand-therapy style guides use gentle repetitions or short holds, often performed daily, while advising people to reduce force or frequency if exercises cause lingering pain. Dorset County Hospital advises changing the exercise if it causes intense and lasting pain, such as pain that lasts more than 30 minutes afterward.
A simple starting plan is 5 to 10 minutes, 1 to 2 times per day, using low effort and a comfortable range. If you are returning from injury or dealing with a diagnosed condition such as carpal tunnel syndrome, arthritis, or post-fracture stiffness, it is better to follow guidance from your clinician because the right exercise choice and dosage can vary by condition.
Before You Start Wrist Mobility Exercises
Start gently. Wrist mobility exercises should feel controlled and comfortable, not forced. A mild stretch is fine, but sharp pain, tingling, numbness, or instability means you should stop.
Before you begin, keep these points in mind:
- Start with a small range of motion
- Move slowly and stay in control
- Do not force the stretch
- Stop if pain gets sharper or symptoms spread
- Begin with unloaded drills before weight-bearing positions
- Get medical advice first if you have swelling, major weakness, recent injury, or ongoing numbness
A few minutes of gentle practice is usually enough at the start. The goal is to improve wrist movement gradually, not push through discomfort.
Common Mistakes That Can Make Wrist Stiffness Worse
A common mistake is forcing the wrist too aggressively. Mobility work should feel gentle and controlled, not sharp or unstable. It also helps to remember that wrist movement depends on the fingers and forearm too, not just the wrist itself.
Common mistakes include:
- Forcing the range of motion
- Moving too fast or bouncing the stretch
- Ignoring finger and forearm mobility
- Using the same exercise for every type of wrist problem
- Pushing through numbness, tingling, or pain
- Skipping medical advice when symptoms suggest carpal tunnel syndrome or injury
If stiffness comes from desk work or mild overuse, simple mobility drills may help. But if you also have numbness, tingling, night symptoms, or weak grip, the issue may need a more specific approach.
When to stop and get medical advice
Do not rely on wrist mobility exercises alone if your pain started after a fall or forceful twist, if your wrist looks deformed, or if you cannot move it normally. The NHS says you should see a GP if the pain is getting worse, keeps coming back, has not improved after 2 weeks of home treatment, or comes with tingling, loss of sensation, fever, or a painful warm swollen wrist.
You should also get prompt medical care if there is severe swelling, bruising, major weakness, a snap or popping sound at injury, or suspected fracture or dislocation. Those signs are more consistent with trauma or another condition that needs assessment before you start a self-guided mobility routine.
Sample 5-minute wrist mobility routine
This quick sequence keeps things simple:
- Wrist flexion and extension: 10 reps each way
- Side-to-side deviation: 10 reps each way
- Wrist circles: 5 circles each direction
- Prayer stretch: 20 seconds
- Forearm pronation and supination: 10 reps each way
- Tendon glides: 5 slow cycles
That gives you a balanced mix of joint motion, soft-tissue mobility, and hand movement without turning the session into a long workout. It also lines up well with the movement categories commonly recommended in clinical and patient-education sources.
FAQs about wrist mobility exercises
Are wrist mobility exercises safe to do every day?
Usually yes, when they are gentle and do not increase symptoms. Daily light range-of-motion work is common in hand-therapy guidance, but pain that is intense, lasting, or worsening is a sign to reduce or stop and get advice.
Can wrist mobility exercises help carpal tunnel syndrome?
They may help some people as part of a broader plan, especially when a clinician recommends tendon or nerve-gliding exercises. AAOS includes exercise as one treatment option, but splinting, activity changes, and medical treatment may also be needed depending on severity.
What is the best wrist mobility exercise for beginners?
Wrist flexion and extension is usually the easiest place to start because it is simple, low load, and easy to control. Gentle side-to-side motion and tendon glides are also beginner-friendly options.
Should wrist mobility exercises hurt?
No. Mild stretching or effort is fine, but sharp pain, tingling, instability, or lingering symptoms are not good signs. NHS guidance recommends medical review when wrist pain is worsening, persistent, or associated with numbness, swelling, warmth, or feeling unwell.
Can mobility exercises improve grip strength too?
Mobility alone is not the same as strength training, but mobility can support better hand use. A 2024 study indexed by PubMed suggests that combining wrist stability work with grip-strength exercise can improve pain, function, and grip strength in people with nonspecific chronic wrist pain.
Are wrist circles enough on their own?
Usually not. Wrist circles are useful, but a more complete routine should also include flexion, extension, side-to-side motion, finger or tendon movement, and sometimes forearm rotation.
How long does it take to notice improvement?
That depends on the cause. Mild stiffness from repetitive use may improve fairly quickly with consistent gentle practice, while arthritis, nerve problems, or post-injury stiffness often take longer and may need formal rehab. The NHS advises getting checked if home care has not helped after 2 weeks.
Conclusion
Wrist mobility exercises can be a smart, low-risk way to improve flexibility, reduce stiffness, and support better daily movement when you choose gentle drills and stay consistent. Start with simple range-of-motion work, add tendon glides and forearm rotation, and stop if symptoms become sharp, numb, or clearly worse. For ongoing pain or injury-related stiffness, use these exercises as a starting point for a conversation with a qualified clinician, not as a replacement for medical care.