
If you’re new to core training, the best ab workouts for beginners focus on simple, safe, and controlled movements that strengthen your deep core muscles without straining your lower back. These exercises help build stability first, then gradually introduce flexion- and rotation-based movements for a balanced, strong core.
Understanding how to start correctly matters because beginner-friendly ab exercises support better posture, reduce low-back stress, improve daily movement, and prepare your body for more advanced training. This guide gives you the safest and most effective step-by-step plan using research-backed beginner core exercises.
You’ll find stability moves, gentle crunch variations, standing options, progressions, safety reminders, common mistakes to avoid, FAQs, and authoritative external references.
Benefits of Beginner Ab Workouts
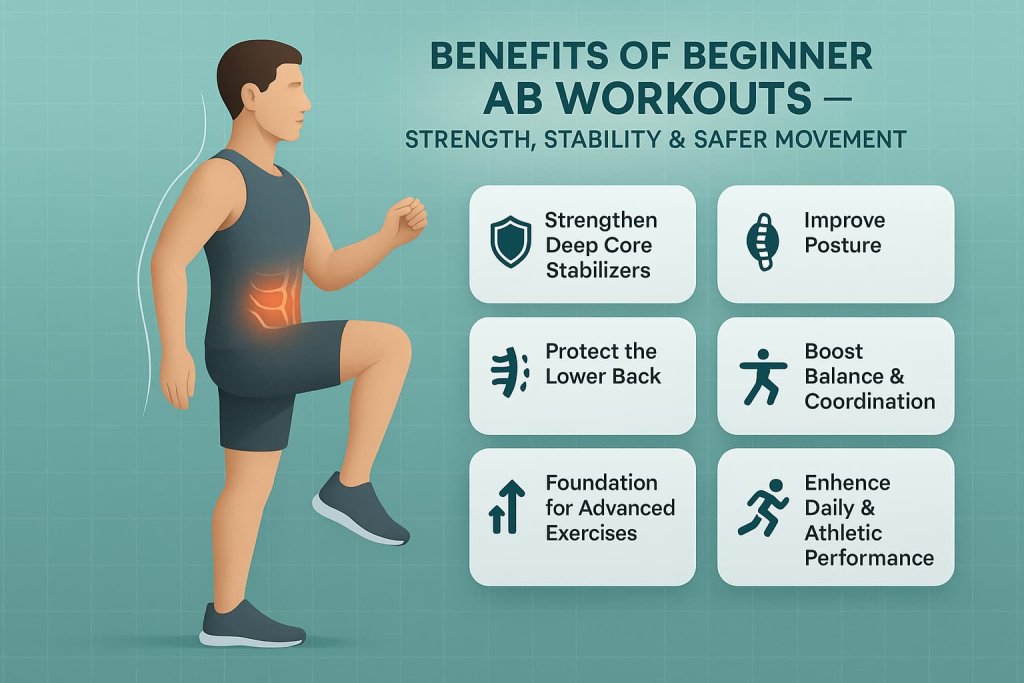
Even simple core exercises can deliver meaningful improvements:
- Strengthen deep core stabilizers for safe movement
- Improve posture and reduce excessive spinal arching
- Help protect the lower back during daily lifting
- Boost balance and coordination
- Build the foundation for more advanced exercises
- Improve performance in walking, running, and strength training
Warm-Up Before You Begin
A brief warm-up prepares your spine, hips, and core for safe ab training.
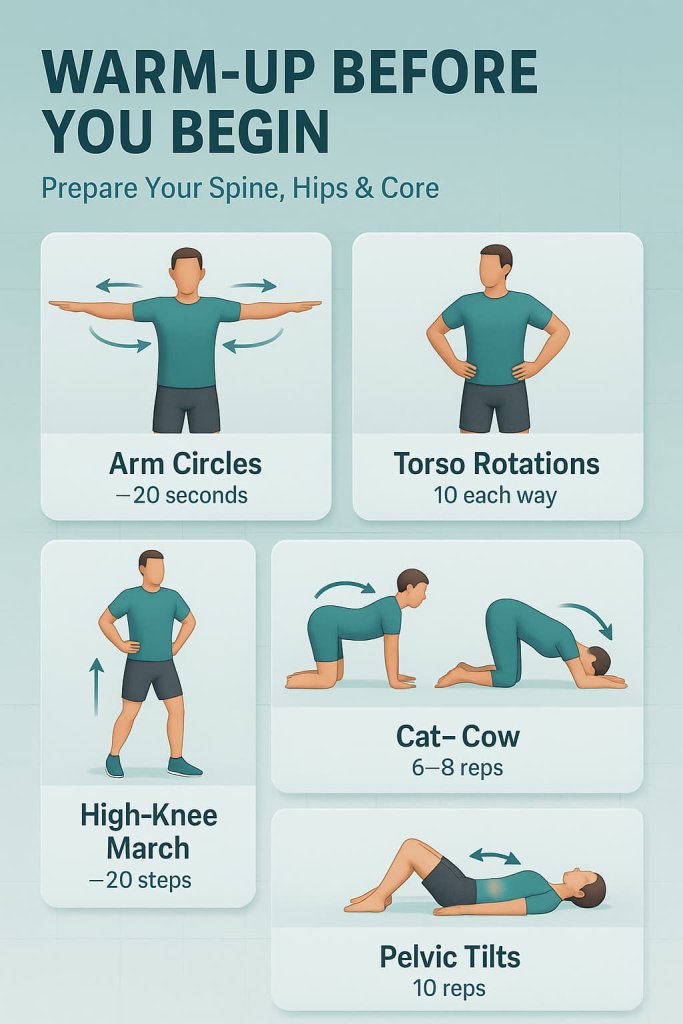
Quick Warm-Up (2–3 Minutes):
- Arm circles – 20 seconds
- Torso rotations – 10 each way
- High-knee march – 20 steps
- Cat–cow – 6–8 slow reps
- Pelvic tilts – 10 reps
Trainer Tip: Keep movements slow to improve core engagement before your workout.
15 Best Ab Workouts for Beginners
These beginner-friendly ab exercises build core strength safely using simple, controlled movements. Each one is designed to improve stability, posture, and confidence without stressing the lower back.
1. Dead Bug
Why it works:
Builds core stability by teaching your abs to resist movement while the limbs move, helping maintain a neutral spine and improving coordination.
Muscles worked:
Deep core, transverse abdominis, lower abs, hip flexors, spinal stabilizers.
How to do it:
- Lie on your back with arms extended toward the ceiling and knees bent in a tabletop position.
- Brace your core lightly.
- Slowly extend your right arm overhead and left leg forward without touching the floor.
- Return to the starting position and switch sides.
- Keep your lower back gently pressed into the floor throughout.
Trainer Tip:
Exhale as you extend your limbs—it helps keep your core braced and stable.
2. Bird Dog
Why it works:
Improves spinal stability and teaches the body to control rotation, a key skill for safe daily movement.
Muscles worked:
Core, glutes, lower back stabilizers, deep spinal muscles.
How to do it:
- Begin on all fours with hands under shoulders and knees under hips.
- Extend your right arm forward and left leg backward.
- Pause for 1–2 seconds, squeezing your core and glutes.
- Return slowly and switch sides.
Trainer Tip:
Place a water bottle on your lower back—if it doesn’t fall, your form is solid.
3. Forearm Plank (Short Hold)
Why it works:
Strengthens the entire core through anti-extension control, protecting the lower back.
Muscles worked:
Deep core, abs, obliques, shoulders, glutes.
How to do it:
- Place forearms on the floor, elbows under shoulders.
- Extend your legs and form a straight line from head to heels.
- Brace your core and hold a short 10–20 second plank.
Trainer Tip:
Squeeze your glutes—this keeps your lower back from sagging.
4. Kneeling Side Plank
Why it works:
Provides an easier side plank variation that safely strengthens the obliques without overloading beginners.
Muscles worked:
Obliques, transverse abdominis, shoulder stabilizers, deep core.
How to do it:
- Kneel on your side with your elbow under your shoulder.
- Extend your top leg and lift your hips off the floor.
- Hold a straight line from head to knee.
Trainer Tip:
Keep your top hip stacked directly above the bottom hip—no twisting.
5. Glute Bridge
Why it works:
Strengthens the posterior chain, which supports the spine and improves core balance.
Muscles worked:
Glutes, hamstrings, deep core, hip stabilizers.
How to do it:
- Lie on your back with knees bent and heels on the floor.
- Press through your heels to lift your hips upward.
- Stop when your ribs and pelvis align.
- Lower slowly.
Trainer Tip:
Drive knees slightly outward to keep hips aligned and glutes engaged.
6. Basic Crunch (Small Range)
Why it works:
Targets upper abs with controlled flexion while keeping strain off the lower back.
Muscles worked:
Upper rectus abdominis, obliques (minor involvement).
How to do it:
- Lie on your back, knees bent, fingertips behind your ears.
- Curl your shoulder blades just off the floor by bringing ribs toward pelvis.
- Lower slowly with control.
Trainer Tip:
Keep your chin away from your chest—as if holding a small orange under your chin.
7. Reverse Crunch
Why it works:
Teaches proper posterior pelvic tilt, activating the lower abs more effectively than swinging the legs.
Muscles worked:
Lower abs, transverse abdominis, hip flexors (slight).
How to do it:
- Lie on your back with knees bent and legs lifted.
- Pull knees toward your chest while lifting your hips gently off the floor.
- Lower back down slowly.
Trainer Tip:
Imagine curling your tailbone upward instead of pulling with your legs.
8. Heel Taps
Why it works:
Improves lower-ab control through small, precise movements that reduce lower-back strain.
Muscles worked:
Lower abs, transverse abdominis.
How to do it:
- Lie on your back, knees bent to tabletop.
- Lower one heel toward the floor and tap lightly.
- Bring it back up and switch sides.
Trainer Tip:
Stop if your lower back arches—shorten the range.
9. Seated Knee Tucks
Why it works:
A beginner-friendly variation that strengthens abs with controllable leg movement.
Muscles worked:
Abs, hip flexors, deep core.
How to do it:
- Sit on the floor, lean back slightly, hands beside your hips.
- Lift your knees toward your chest.
- Extend legs out slowly and repeat.
Trainer Tip:
Keep your chest lifted to avoid rounding your lower back.
10. Standing Side Bend (Bodyweight)
Why it works:
Strengthens the obliques while improving lateral flexibility—great for beginners who can’t get on the floor.
Muscles worked:
Obliques, core stabilizers, deep trunk muscles.
How to do it:
- Stand tall with feet shoulder-width apart.
- Slide one arm down the same-side leg as you bend sideways.
- Return upright and switch sides.
Trainer Tip:
Keep your hips still—only your torso should bend.
11. Standing March with Core Brace
Why it works:
Teaches bracing and stability needed for lifting, walking, and daily tasks.
Muscles worked:
Core, hip flexors, stabilizers around the spine.
How to do it:
- Stand tall and gently brace your core.
- Lift one knee to hip height, lower, and alternate.
- Maintain steady breathing throughout.
Trainer Tip:
Exhale as each knee lifts to reinforce core engagement.
12. Lying Leg Slide
Why it works:
A safer alternative to full leg raises, minimizing lower-back pressure while strengthening the lower abs.
Muscles worked:
Lower abs, deep core, hip flexors.
How to do it:
- Lie on your back, knees bent.
- Slide one heel forward until your leg is almost straight.
- Slide it back and switch legs.
Trainer Tip:
Keep your ribcage down—your lower back should stay neutral.
13. Stability Ball Crunch
Why it works:
The ball increases the range of motion and muscle activation, making it more effective than a floor crunch.
Muscles worked:
Upper abs, obliques, deep stabilizers.
How to do it:
- Sit on the ball and walk your feet forward until your lower back rests on it.
- Support your head lightly and curl upward.
- Lower with control.
Trainer Tip:
Move slowly to maximize ab engagement and avoid bouncing.
14. Modified Hollow Hold (Tucked)
Why it works:
Creates full-core tension safely, helping beginners build deep core strength.
Muscles worked:
Transverse abdominis, lower abs, hip flexors.
How to do it:
- Lie on your back with knees tucked toward your chest.
- Raise your shoulders slightly off the floor.
- Hold for 10–20 seconds while breathing normally.
Trainer Tip:
Press the lower back into the floor gently to stay stable.
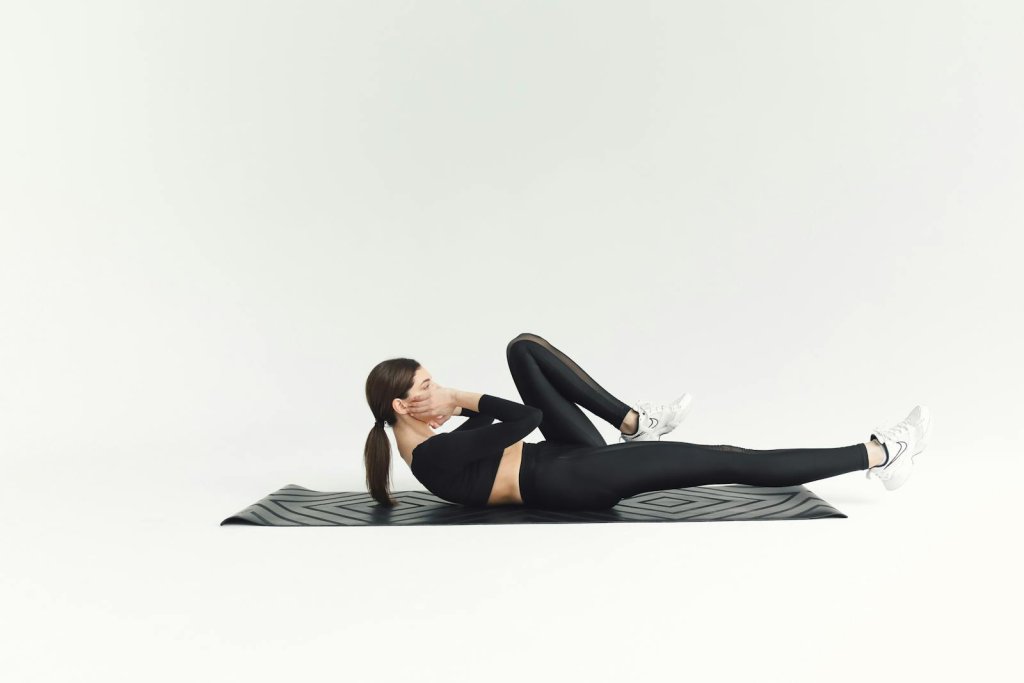
15. Bicycle Crunch (Beginner Tempo)
Why it works:
Engages the abs and obliques with controlled rotation—extremely effective when done slowly.
Muscles worked:
Abs, obliques, hip flexors.
How to do it:
- Lie on your back, hands lightly behind your head.
- Bring opposite elbow to knee as the other leg extends.
- Switch sides with a slow, smooth rotation.
Trainer Tip:
Slow tempo = better core activation and less strain. Focus on form, not speed.
Beginner Ab Workout Routine (Follow This Plan)
Use this sample routine 2–3 times per week:
Workout A – Stability First
- Dead bug – 8 reps each side
- Bird dog – 8 reps each side
- Forearm plank – 15–25 seconds
- Glute bridge – 10–12 reps
- Kneeling side plank – 15–20 seconds each side
Workout B – Gentle Flexion + Core Control
- Basic crunch – 10–12 reps
- Heel taps – 12–16 reps
- Reverse crunch – 8–10 reps
- Tucked hollow hold – 10–20 seconds
- Standing march (core braced) – 20 steps
Rotate A and B for balanced development.
Safety Tips for Beginners
- Stop if you feel sharp or radiating pain.
- Avoid holding your breath—exhale during effort.
- Keep movements slow and controlled.
- If you have back sensitivity, prioritize stability moves.
- Reduce range of motion when your form breaks down.
Common Mistakes to Avoid
- Pulling your neck forward during crunches
- Letting your lower back arch excessively
- Moving too quickly
- Doing only crunches and skipping stability work
- Training abs every day without recovery
How Often Should Beginners Train Abs?
Beginners should train abs 2–3 times per week, allowing at least one rest day between sessions. Start with 10–15 minutes, using 8–12 slow reps or 10–20 second holds per exercise. Increase time or reps gradually as control improves. Avoid daily ab training to prevent fatigue and lower-back strain.
Who Should Avoid Certain Ab Exercises
Avoid or modify ab exercises if you have active lower-back pain, recent abdominal or pelvic surgery, disc issues, dizziness, or sharp pain during movement. Pregnant individuals should avoid intense crunching and prolonged supine positions. When unsure, choose neutral-spine exercises like dead bugs, bird dogs, and glute bridges.
FAQ
1. Can beginners train abs every day?
No. Most beginners benefit from 2–3 weekly sessions to allow recovery.
2. How long should a beginner ab workout take?
10–15 minutes is enough when exercises are done slowly and with good control.
3. Which beginner ab exercise is safest for the lower back?
Dead bugs, bird dogs, and planks are generally the most spine-friendly.
4. Do ab workouts burn belly fat?
No exercise targets belly fat specifically. Core training strengthens muscles; fat loss requires overall calorie control.
5. Should beginners start with crunches or planks?
Start with stability exercises like planks, dead bugs, and bird dogs, then add crunch variations later.
6. Can beginners do ab workouts without lying on the floor?
Yes. Standing marches, standing side bends, and anti-rotation presses are excellent options.
Conclusion
Beginner ab training should feel safe, controlled, and purposeful. By starting with stability-based exercises and gradually adding gentle crunch and rotation variations, you’ll build a stronger, more stable core in just a few weeks. Stay consistent, progress slowly, and focus on form—your core will get stronger with every session.
References
- American Council on Exercise (ACE) – ACE-Sponsored Study Reveals Best and Worst Abdominal Exercises
- Garber, C. E. et al. (2009) – ACSM Position Stand: Quantity and Quality of Exercise for Developing and Maintaining Fitness in Healthy Adults (Med Sci Sports Exerc)
- Smrcina, Z. et al. (2022) – A Systematic Review of the Effectiveness of Core Stability Exercises in Patients with Non-Specific Low Back Pain
- Wang, X. Q. et al. (2012) – A Meta-Analysis of Core Stability Exercise versus General Exercise for Chronic Low Back Pain (PLOS ONE)
- Ghorbanpour, A. et al. (2018) – Effects of McGill Stabilization Exercises and Conventional Exercises on Chronic Nonspecific Low Back Pain
- Tsartsapakis, I. et al. (2024) – Comparison of Core Stability Exercises and Muscle Thickness Using Different Activation Maneuvers (Dead Bug, Bird Dog, Side Plank)