
Reverse lunges are often knee-friendlier than forward lunges because stepping backward can reduce kneecap (patellofemoral) joint loading for many people while still training your glutes and legs hard. Research comparing forward vs backward lunges found higher patellofemoral joint force and loading rate in the forward lunge, which helps explain why reverse lunges frequently feel more comfortable for sensitive knees.
Reverse lunges also fit perfectly into strength guidelines that recommend training major muscle groups at least 2 days per week, making them a smart, simple lower-body staple.
What Are Reverse Lunges
A reverse lunge (also called a backward lunge) is a lower-body exercise where you step one leg back, lower under control until both knees bend, then push through the front foot to return to standing.
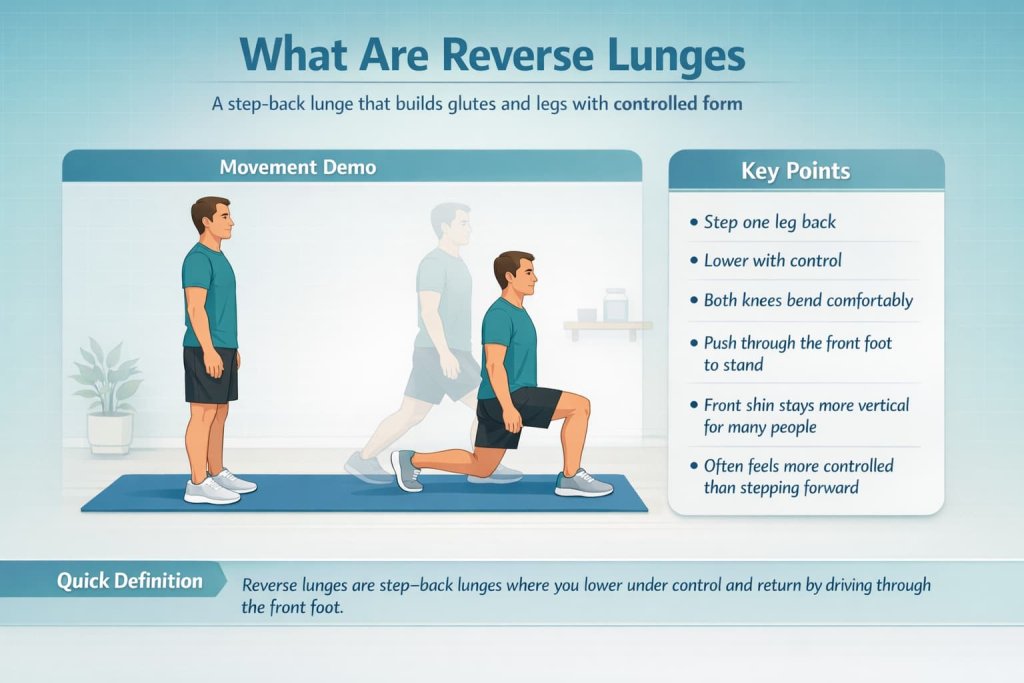
Compared with stepping forward, stepping backward often lets you keep the front shin more vertical and control depth more easily, which can reduce “front-knee pressure” for many lifters.
How to Do a Reverse Lunge
How to do it:
- Stand tall with feet about hip-width apart and brace your midsection.
- Step one leg straight back (don’t cross behind you).
- Land softly on the ball of the back foot and keep most of your weight on the front foot.
- Lower under control until both knees bend comfortably (aim for a front shin that stays close to vertical).
- Keep your torso tall and your hips facing forward.
- Push through the whole front foot to stand back up.
- Repeat all reps on one side, then switch.
Reverse Lunge Variations and When to Use Them
Pick the variation that matches your goal, your balance, and how your knees feel during the movement.
1. Bodyweight Reverse Lunge
Why it works: This is the cleanest way to learn the pattern. With no load, you can focus on step length, knee tracking, and a controlled descent—so your front leg actually does the work instead of relying on momentum. It’s also easier to adjust range of motion if you’re building confidence or managing sensitivity in the front knee.
How to do it:
- Stand tall with feet hip-width and brace your core.
- Step one leg back to “railroad tracks,” landing softly on the ball of the back foot.
- Keep most of your weight on the front foot (heel stays down).
- Lower under control until both knees bend comfortably.
- Keep your torso tall and hips facing forward.
- Push through the whole front foot to return to standing.
- Repeat reps on one side, then switch.
Trainer Tip: Slow the lowering phase to 2–3 seconds. If you wobble, shorten the step slightly and use a light fingertip support on a wall or chair until balance improves.
2. Dumbbell Reverse Lunge
Why it works: Dumbbells make progressive overload simple without changing your mechanics much. Holding weight at your sides lowers the “balance demand” compared with racked positions for many people, while still challenging your legs and glutes. It’s a reliable choice for building strength and muscle once your bodyweight form is consistent.
How to do it:
- Hold a dumbbell in each hand at your sides, stand tall, and brace.
- Step one leg back and land softly on the ball of the foot.
- Keep shoulders stacked over hips (avoid leaning forward).
- Lower smoothly; keep the front knee tracking in line with your toes.
- Drive through the front foot to stand up—don’t push off the back leg.
- Complete reps on one side, then switch.
Trainer Tip: Think “front leg does 80–90% of the work.” If you feel the back leg helping too much, reduce the load and slow down the last half of the descent.
3. Goblet Reverse Lunge
Why it works: The goblet hold (one dumbbell at the chest) often helps people stay upright and “stacked,” which can improve control and reduce forward tipping. It also makes it easier to feel the front glute working—especially if you slightly shorten the range to keep perfect form.
How to do it:
- Hold one dumbbell vertically at your chest (elbows slightly down).
- Stand tall, brace, and step one leg back to a stable stance.
- Lower under control while keeping your torso tall and ribs stacked.
- Keep the front heel down and the knee tracking over the toes.
- Push through the front foot to return to standing.
- Repeat reps on one side, then switch.
Trainer Tip: If the weight pulls you forward, lighten the dumbbell and focus on “zipper up” posture—tall chest without arching your low back.
4. Reverse Lunge to Knee Drive
Why it works: Adding a knee drive increases balance, coordination, and single-leg stability. It also trains you to control the transition from lowering to standing—useful for athletic movement, running mechanics, and building confidence on one leg. The key is staying smooth and controlled so the knee drive doesn’t turn into a hop.
How to do it:
- Start standing tall and brace your core.
- Step one leg back into a reverse lunge and lower with control.
- Drive through the front foot to stand.
- As you stand, bring the back knee forward and up to a comfortable height.
- Pause briefly to regain balance (no rushing).
- Step that leg back again into the next rep.
- Complete reps, then switch sides.
Trainer Tip: Add a 1-second pause at the top of the knee drive. If you can’t hold the pause without wobbling, slow down and reduce the knee lift height until your balance catches up.
Why Reverse Lunges Can Feel Easier on the Knees
The “knee-friendlier” reputation isn’t just gym talk. In a biomechanics study indexed on PubMed, the forward lunge showed greater patellofemoral joint force and loading rate than the backward lunge.
What this means in real life:
- If forward lunges irritate the front of your knee, reverse lunges are often a good first swap to try.
- Comfort still depends on your form, stride length, depth, and control. “Knee-friendly” doesn’t mean “risk-free.”
For coaching cues and safe setup, NSCA lunge guidance is a useful reference for common errors and progressions.
Muscles Worked in Reverse Lunges
Reverse lunges train multiple major muscle groups at once. The primary movers and key stabilizers commonly include:
- Gluteus maximus (glutes)
- Quadriceps (front thigh)
- Hamstrings (back thigh)
- Calves
- Hip stabilizers (glute med/min) and core for balance/control
The NSCA notes lunges strengthen the leg muscles—especially glutes, hamstrings, quads, and calves—and can improve balance and core stability.
Form Cues That Make Reverse Lunges Work Better
Use these quick cues to get more glutes/legs with less joint annoyance:
Standout cues
- “Front foot stays heavy.” (Big toe, little toe, heel stay grounded.)
- “Knee tracks with toes.” (No collapsing inward.)
- “Drop straight down.” (Avoid tipping or twisting.)
- “Own the bottom.” (A brief pause can improve control.)
Stride and depth tips
- Too short of a step often makes the front knee travel forward and can feel “knee-y.”
- Too long can pull you out of balance or turn it into more of a hip hinge.
- Choose a step length that lets you lower smoothly while keeping the front foot planted and stable.
Common Reverse Lunge Mistakes
- Knee cave (valgus)
If the front knee caves inward, you’ll usually feel instability and lose power. Slow down and focus on tracking the knee over the middle toes. - Pushing off the back foot
If you “spring” off the back leg, the front leg stops doing the work. Keep the back leg as a support, not the engine. - Wobbling or twisting hips
Most wobble is solved by slowing the descent, shortening the range slightly, and bracing more strongly.
How to Program Reverse Lunges for Strength or Muscle
Pick one of these simple templates:
For strength and control
- 3–5 sets of 5–8 reps per side
- Rest 90–150 seconds between sets
- Use a slower lowering phase (2–3 seconds down)
For muscle and conditioning
- 2–4 sets of 8–12 reps per side
- Rest 60–90 seconds
- Add a brief pause at the bottom for more time under tension
A practical “minimum effective” approach is to train major muscle groups at least twice per week, as recommended by the CDC.
Who Should Modify or Get Guidance First
Consider getting coaching or choosing a simpler option (like supported split squats) if you:
- Have persistent or sharp knee, hip, or back pain during lunges
- Recently had a lower-body injury or surgery and aren’t cleared for loaded training
- Can’t control knee tracking and balance even with slower reps and shorter range
A smart rule: discomfort that builds rep-to-rep, changes your form, or lingers afterward is a sign to reduce depth, reduce load, or switch variations.
Reverse Lunges vs Forward Lunges
Reverse lunges are often the better first choice if:
- You want a lunge that commonly feels easier on the front of the knee
- You want more control and stability while learning
Forward lunges can still be great, especially for people who tolerate them well and want a strong “step forward” pattern—but if you’re choosing one lunge to start with, reverse lunges are usually the safer bet for most beginners.
FAQs
Are reverse lunges better for knees than forward lunges?
Often, yes. A study comparing forward vs backward lunges found higher patellofemoral joint force and loading rate in the forward lunge, which supports why reverse lunges may feel more comfortable for many people.
Should my back knee touch the floor?
Not required. Aim for a depth you can control without losing balance or letting the front heel lift. If the back knee lightly touches and your form stays solid, that’s fine.
Why do I lose balance on reverse lunges?
Common causes are stepping too narrow (like walking a tightrope), rushing the descent, or not bracing. Step back to “railroad tracks,” slow down, and keep the front foot heavy.
Do reverse lunges grow glutes?
They can, especially when you use good depth, control, and progressive overload over time. They also train quads and improve single-leg stability.
How many reverse lunges should I do?
A practical starting point is 2–4 sets of 8–12 reps per side, 1–3 times per week depending on your program and recovery.
What’s the best reverse lunge for beginners?
Bodyweight reverse lunges first, then progress to goblet or dumbbell reverse lunges once your balance and knee tracking are consistent.
Can I do reverse lunges if I have knee pain?
Many people can, but it depends on the cause. Try a shorter range, slower tempo, and lighter load. If pain persists or worsens, get guidance from a qualified professional.
Conclusion
Reverse lunges are a high-value lower-body move because they build strong glutes and legs while often feeling easier on the knees than forward lunges. Start with controlled bodyweight reps, lock in balance and knee tracking, then add load gradually and consistently to keep progressing.
References
- ScienceDirect — Goulette D, et al. (2021). Patellofemoral joint loading during the forward and backward lunge.
- National Strength and Conditioning Association (NSCA) — Boyd J, Milton K. The Undervalued Lunge (PDF).
- World Health Organization (WHO) — WHO Guidelines on Physical Activity and Sedentary Behaviour (2020).
- British Journal of Sports Medicine (BJSM) — Bull FC, et al. (2020). WHO 2020 guidelines on physical activity and sedentary behaviour.
- PubMed Central (PMC) — Yang YJ, et al. (2019). An overview of current physical activity recommendations.