
Wall slides are a simple wall-based shoulder drill that can improve posture fast by training your shoulder blades (scapulae) to move smoothly as your arms lift overhead. Because the wall gives instant feedback, wall slides make it easier to practice “ribs down, shoulders down, neck long” alignment without fancy equipment.
If you sit a lot, deal with rounded shoulders, or want better shoulder mobility for pressing and overhead work, wall slides are one of the most practical daily exercises to start with.
What Are Wall Slides
Wall slides (often called wall angels or scapular wall slides) are controlled arm “slides” up and down a wall while you keep your torso steady and your shoulder blades moving well.
Most people do them with:

- Back, head, and hips against the wall (posture-focused)
- Arms in a “goal post” position (elbows bent), then sliding upward
- Slow tempo so the shoulders don’t shrug and the ribs don’t flare
A posture-focused version is commonly taught as “wall angels,” like the steps described by the Cleveland Clinic.
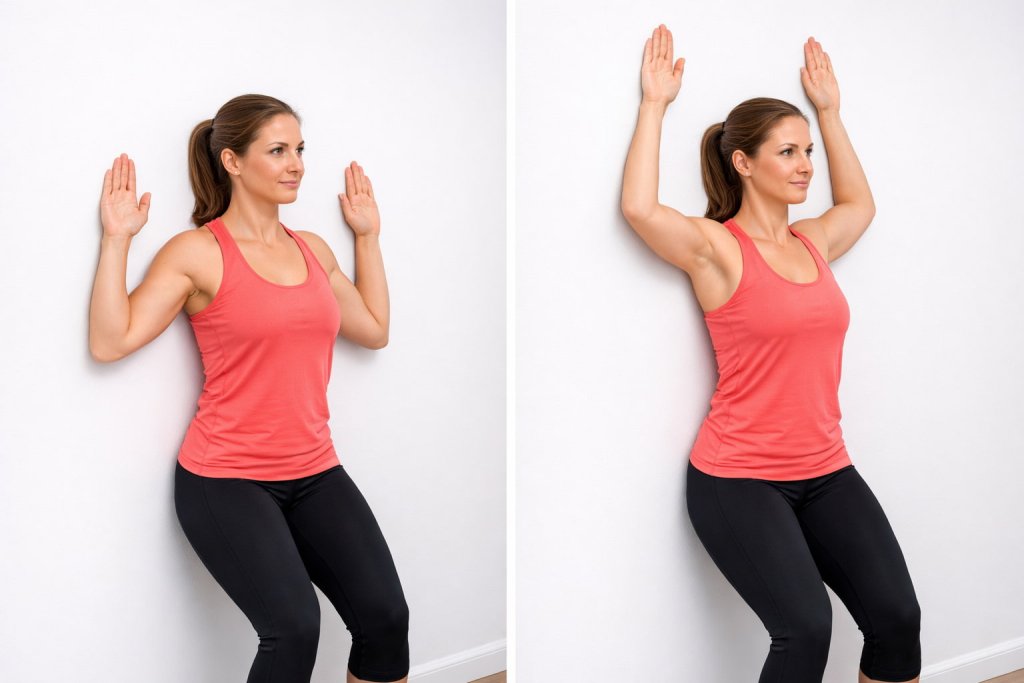
How to Do Wall Slides with Perfect Form
How to do it
- Stand with your back against a wall, feet about 6–12 inches away.
- Set a “stacked” posture: ribs down, glutes lightly on, chin gently tucked (neck long).
- Bring arms to a goal-post position (upper arms roughly level with shoulders if you can), with elbows bent.
- Keep shoulders relaxed (no shrugging), and lightly press forearms/hands toward the wall as tolerated.
- Slowly slide your arms up a few inches, then stop before your ribs flare or your low back arches.
- Slide back down with the same control.
- Breathe quietly throughout; exhale as you slide up if that helps keep ribs down.
Trainer Tip
If you can’t keep wrists and elbows against the wall, don’t force it. Use the range you can control while keeping ribs down and shoulders out of your ears. Quality beats range.
Wall Slide Variations and Progressions
These wall slide variations help you match the exercise to your mobility level, strength, and posture needs. Progress gradually to improve shoulder control, stability, and overhead movement quality without losing proper form.
1) Wall Angels with Bent Elbows
Why it works:
Bent elbows shorten the lever arm, which reduces the mobility demand at the shoulder joint. This makes it easier to maintain rib control, avoid low-back arching, and focus on smooth scapular upward rotation. It’s ideal for beginners or anyone working on posture correction.
Muscles worked:
Serratus anterior, middle trapezius, lower trapezius, rotator cuff, and upper-back stabilizers.
How to do it:
- Stand with your back against the wall and ribs gently tucked down.
- Bring arms into a goal-post position (elbows bent about 90 degrees).
- Keep wrists and elbows lightly in contact with the wall as tolerated.
- Slowly slide arms upward within a pain-free range.
- Pause briefly at the top without shrugging.
- Slide back down under control.
Trainer Tip:
If you feel neck tension, lower your starting arm position and think “shoulder blades glide down and around the ribs.” Keep your jaw relaxed and chin gently tucked.
2) Mini-Range Wall Slide with Pause
Why it works:
Using a smaller range with pauses increases motor control and reinforces proper alignment. The brief hold improves awareness of rib position and scapular stability rather than turning the movement into a stretch.
Muscles worked:
Serratus anterior, lower trapezius, mid traps, rotator cuff, and deep core stabilizers (for rib control).
How to do it:
- Set your posture with ribs down and lower back neutral.
- Slide arms upward only 2–4 inches.
- Hold for 2–3 seconds while breathing calmly.
- Keep shoulders relaxed and avoid arching.
- Return slowly to the start position.
Trainer Tip:
Focus on quiet breathing during the pause. A slow exhale often helps prevent rib flare and keeps the movement controlled.
3) Band-Resisted Wall Slides (Advanced)
Why it works:
Adding light resistance increases activation of scapular stabilizers and shoulder muscles. Research indexed on PubMed suggests that different band placements (for example, around the wrists versus elbows) can alter muscle activation patterns during wall-slide variations, making this progression useful for targeted strengthening.
Muscles worked:
Serratus anterior, lower trapezius, middle trapezius, rotator cuff, and additional shoulder stabilizers depending on band tension.
How to do it:
- Place a light resistance band around your wrists or forearms.
- Stand in wall-slide position with ribs stacked over pelvis.
- Apply gentle outward tension on the band.
- Slowly slide arms upward while maintaining posture.
- Return under control without losing tension.
Trainer Tip:
If you notice shrugging, rib flaring, or neck tension, reduce band resistance immediately. This variation should enhance control—not compromise it.
Why Wall Slides Can Improve Posture
“Posture” isn’t just standing up straight. It’s also how your shoulder blades control arm movement without your neck and low back doing extra work.
Wall slides can help because they:
- Encourage better scapular upward rotation as arms lift overhead
- Promote controlled movement instead of “shrugging and arching”
- Train upper-back and shoulder muscles to coordinate during daily reaching
For many readers, the “fast” improvement is mostly this: you feel straighter because your upper back and shoulder blades start moving more cleanly during basic arm motion.
Wall Slides Benefits
Wall slides may help you:
- Improve shoulder mobility in a controlled way
- Reduce rounded-shoulder posture patterns by reinforcing upper-back control
- Build shoulder stability for overhead reaching and lifting
- Improve movement quality in exercises like overhead press, pull-ups, and push-ups
Rehab research has also reported improved scapular alignment in certain shoulder-issue populations using wall-slide style training, as discussed in research available through PubMed Central.
Muscles Worked in Wall Slides
Wall slides typically involve:
- Serratus anterior (helps the shoulder blade move and stay stable)
- Lower and middle trapezius (helps control the scapula and reduce shrugging)
- Rotator cuff (helps keep the shoulder joint centered during motion)
- Thoracic extensors (upper-back muscles that support upright posture)
In a widely cited lab study indexed on PubMed, the wall slide was shown to effectively activate the serratus anterior at and above about 90 degrees of shoulder elevation.
Common Wall Slides Mistakes to Avoid
Ribs flaring and low-back arching
This is the most common compensation. If your ribs pop up as your arms rise, you’re training your low back more than your shoulder blades. Shorten the range and exhale gently as you slide.
Shrugging the shoulders
If your shoulders creep toward your ears, you lose the upper-back control effect. Think: shoulders heavy, neck long.
Moving too fast
Wall slides are a coordination drill. Slow reps help you feel scapular motion and keep posture steady.
Forcing full wall contact
Some bodies can’t maintain full hand or wrist contact initially due to mobility limits. Use the best contact you can without pain or strain.
How Many Reps of Wall Slides Should You Do
A practical starting point:
- 1–3 sets of 6–10 slow reps
- 3–5 days per week (or daily if it feels good and stays pain-free)
The American Council on Exercise includes scapular wall slides in simple posture routines with structured sets and reps for regular practice.
Who Should Avoid or Modify Wall Slides
Modify first (or skip for now) if you have:
- Sharp shoulder pain, catching, or pinching during overhead movement
- Recent shoulder surgery or a new injury (follow your clinician’s plan)
- Significant neck pain that worsens with arm elevation
- Numbness, tingling, or radiating symptoms down the arm
A safe rule: wall slides should feel like controlled work and mild stretching, not sharp pain.
FAQ
Are wall slides good for rounded shoulders
They can be, because they train scapular control and upper-back coordination. They’re most effective when you keep ribs down and avoid shrugging.
Do wall slides help shoulder mobility
They may help shoulder mobility by practicing overhead movement with good alignment, especially when you stay in a controlled, pain-free range.
What if I can’t keep my arms on the wall
That’s common. Use a smaller range, start lower, and focus on posture. Don’t force full contact—control matters more.
How often should I do wall slides
Most people do well with 3–5 days per week, or daily if it stays comfortable. Start with fewer reps and increase gradually.
Are wall slides the same as wall angels
They’re closely related and often used as the same exercise name. “Wall angels” usually emphasizes posture and wall-contact cues.
Can wall slides reduce shoulder pain
They may help some people by improving scapular mechanics and movement quality, but pain has many causes. If pain is persistent or sharp, get evaluated by a qualified professional.
Conclusion
Wall slides are one of the easiest ways to practice better shoulder mechanics and posture with zero equipment. Keep the range small, move slowly, and prioritize ribs-down control. Do that consistently, and you’ll usually notice a smoother overhead reach and a more upright feel in daily life.
If you want this tailored for desk workers, athletes, seniors, or beginners, I can customize the programming and variations to match.
References
- Journal of Orthopaedic & Sports Physical Therapy (JOSPT) — Shoulder exercises and serratus anterior activation (wall slide study)
- PubMed — Upper-extremity wall slide variations and band placement effects
- National Athletic Trainers’ Association (NATA) — Theraband applications for improved upper-extremity wall slide exercises (PDF)
- AAOS OrthoInfo — Shoulder conditioning program (rehab exercise guidance PDF)
- PubMed Central (PMC) — Scapular dyskinesis clinical review (scapular stabilizers)