
Heel slides are a gentle knee-bending exercise that can help restore knee mobility by improving knee flexion range of motion.
If your knee feels stiff from inactivity or you’re following a rehab plan, heel slides are often used because they’re low-impact, easy to control, and simple to do at home. A common “bed-supported knee bend” version is included in the American Academy of Orthopaedic Surgeons (AAOS) Total Knee Replacement Exercise Guide.
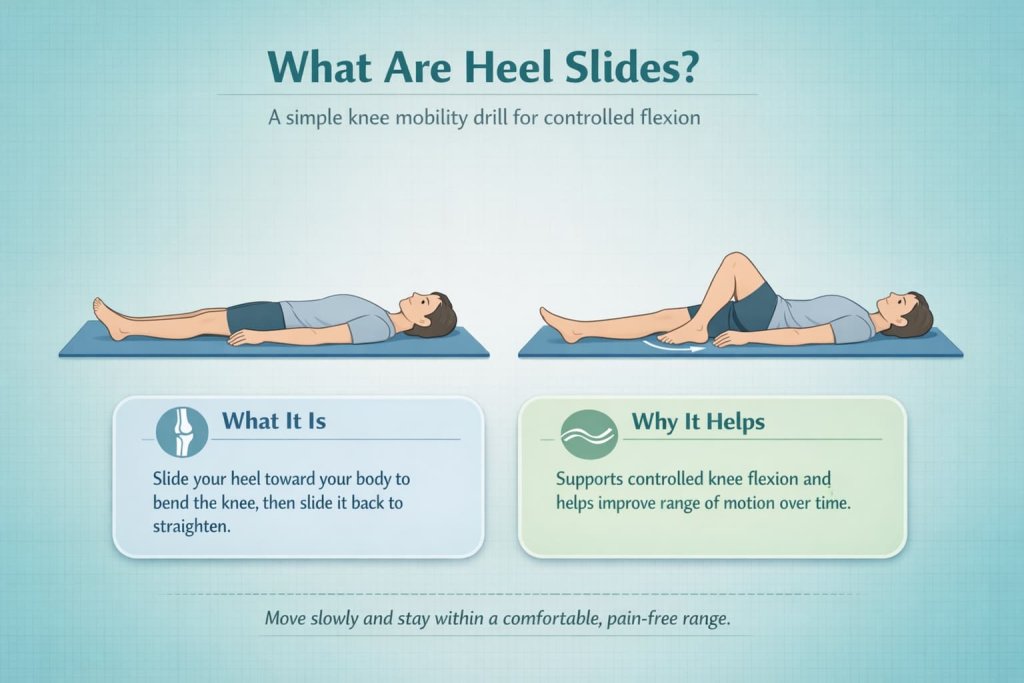
What Are Heel Slides?
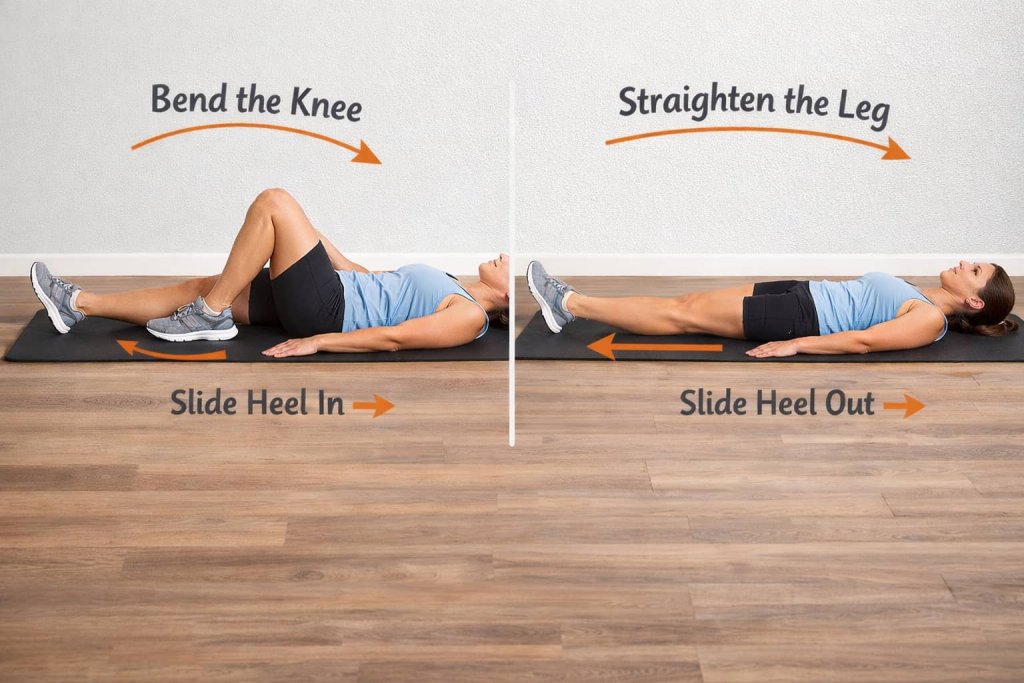
Heel slides are a basic mobility drill where you slide your heel toward your body to bend your knee, then slide it back out to straighten. The goal is smooth, controlled motion that gradually improves how far your knee can bend without forcing it.
How to Do Heel Slides Correctly
How to do it:
- Lie on your back on a bed or floor with legs straight (or bend your other knee for comfort)
- Keep your heel on the surface and slowly slide it toward your buttocks to bend your knee
- Stop at a strong but comfortable stretch (do not force)
- Hold 5–10 seconds, then slide the heel back out until your leg is straight again
- Repeat with slow, smooth control (no bouncing)
These cues match the “bed-supported knee bend” style described by the American Academy of Orthopaedic Surgeons (AAOS).
Trainer Tip:
If your heel “sticks,” place a towel or smooth cloth under the heel to reduce friction so the slide stays controlled and comfortable.
Heel Slides Variations and Progressions
1. Supine Heel Slides (Standard)
Why it works:
The supine version gives you the most control. Lying on your back reduces body weight through the knee and allows you to focus purely on smooth flexion and extension. It’s ideal for early mobility work and post-inactivity stiffness.
Muscles worked:
Hamstrings during knee bend, quadriceps during knee straightening, with light support from hip flexors and calf muscles.
How to do it:
- Lie on your back with legs straight
- Keep your heel in contact with the surface
- Slowly slide your heel toward your buttocks
- Pause briefly at a comfortable end range
- Slide back out until your knee is straight
- Repeat with slow, controlled motion
Trainer Tip:
Place a towel under your heel to reduce friction and keep the movement smooth and controlled.
2. Seated Heel Slides
Why it works:
The seated version brings mobility into a more functional position. It may feel more natural for people who prefer upright positions and can help connect knee mobility with everyday sitting-to-standing patterns.
Muscles worked:
Hamstrings during backward slide, quadriceps when extending the knee forward, with added postural engagement from the core.
How to do it:
- Sit tall in a sturdy chair
- Place both feet flat on the floor
- Slide one foot backward under the chair to bend the knee
- Pause briefly at a comfortable bend
- Slide the foot forward to straighten
- Repeat smoothly without bouncing
Trainer Tip:
Keep your chest tall and avoid leaning excessively backward to “cheat” the bend.
3. Wall Heel Slides (Light Progression)
Why it works:
This variation introduces gentle assistance from gravity. It may help increase knee flexion gradually, but only if the motion remains controlled and pain-free.
Muscles worked:
Hamstrings during knee bending, quadriceps during extension, with slightly greater stretch demand at deeper angles.
How to do it:
- Lie on your back close to a wall
- Place your foot flat against the wall
- Slowly let your heel slide down the wall
- Control the descent into a comfortable bend
- Use your leg muscles to slide the heel back up
- Repeat with steady control
Trainer Tip:
Do not let gravity pull you too fast. Stay in control throughout the movement.
4. Assisted Heel Slides (Rehab-Friendly Option)
Why it works:
Assisted heel slides support active-assisted range of motion. They allow you to guide the knee slightly farther without forcing, which can be helpful in structured rehab settings such as those outlined by Mass General Brigham.
Muscles worked:
Hamstrings and quadriceps actively, with assistance from the arms when using a towel or strap.
How to do it:
- Lie on your back with a towel or strap around your foot
- Hold the ends of the towel in your hands
- Slide your heel toward your body
- Gently use the towel to assist the bend if needed
- Pause briefly, then slowly return to start
- Keep the movement smooth and controlled
Trainer Tip:
Use the towel for guidance—not force. You should feel a stretch, not sharp pain.
Heel Slides Benefits for Knee Mobility and Function
Heel slides are commonly used to support:
- Better knee bending (flexion) over time, especially when stiffness is limiting daily movement
- More comfortable walking mechanics as your knee regains motion
- Early-stage rehab goals where controlled range of motion matters
Clinical rehab protocols after total knee arthroplasty frequently include “supine AAROM heel slides” as part of early mobility work, reflecting how widely this pattern is used in practice at Mass General Brigham.
What Causes Knee Stiffness?
Knee stiffness often happens when the joint isn’t moving regularly or when surrounding tissues are irritated. Limited motion can make bending feel tight or restricted.
Common causes include:
- Post-surgical inflammation
- Prolonged sitting or inactivity
- Joint swelling (fluid in the knee)
- Scar tissue formation
- Protective muscle tightening
If stiffness comes with severe swelling, redness, fever, or locking, seek medical evaluation before exercising.
Safety Checklist Before Starting Heel Slides
Before beginning heel slides, make sure:
- You’re cleared by your surgeon or physical therapist (if post-op).
- Pain is mild and manageable.
- There are no signs of infection or worsening swelling.
- You can bend the knee slightly without sharp pain.
- You’re on a stable, supportive surface.
During the exercise, move slowly and stop if pain sharply increases.
Heel Slides vs Other Knee Mobility Exercises
Heel slides focus directly on controlled knee bending. They’re especially useful in early mobility or rehab stages.
Quick comparison:
- Heel Slides: Controlled knee flexion; low-impact; ideal for early stiffness.
- Stationary Cycling: Rhythmic motion; useful once enough bend allows full pedal rotation.
- Quad Sets: Muscle activation with minimal joint movement; good for early strengthening.
- Passive Stretching: Holds the knee in a bent position; best when swelling is controlled.
Heel slides are often preferred early because they combine active movement with safe, self-controlled range of motion.
Who Heel Slides Are Often Used For
Heel slides are commonly used in plans for:
- Knee stiffness after long sitting or reduced activity
- Post-op rehab where your surgeon or physical therapist has cleared knee-bending work
- Early return-to-motion phases after certain knee injuries (when appropriate)
If you’re post-surgery, follow your surgeon or physical therapist’s instructions first. Many protocols use heel slides early, but timing and range limits can vary by procedure, as reflected in structured rehab pathways from Mass General Brigham.
Heel Slides With a Towel or Strap
If bending feels hard, assisted heel slides can help you move a little farther without forcing.
- Use a towel or strap around your foot and gently guide the heel toward you while you actively try to bend the knee.
This “active-assisted range of motion” approach appears in formal knee rehab protocols from Mass General Brigham.
Sets, Reps, and Frequency for Heel Slides
There isn’t one perfect number for everyone, but common clinical guidance looks like this:
- Reps: 8–12 per set is a typical starting point in general guidance from the.
- Hold: 5–10 seconds at the comfortable end range is commonly recommended in post-op guides from the American Academy of Orthopaedic Surgeons (AAOS).
- Daily frequency: Post-op rehab plans often include multiple short sessions per day early on, depending on your provider’s instructions, as outlined by Mass General Brigham.
A simple starting structure for general stiffness (non-post-op) is:
- 1–2 sets of 8–12 reps
- 1–2 times per day
- Increase range slowly before increasing volume
Common Heel Slide Mistakes to Avoid
- Moving too fast (using momentum instead of control)
- Letting the knee collapse inward while sliding
- Lifting the heel off the surface
- Forcing into sharp pain or pushing past your current safe range
- Holding your breath
When to Stop or Get Professional Guidance
Stop heel slides and contact a qualified clinician if you have:
- Sharp, worsening pain that doesn’t settle after stopping
- New swelling, redness, heat, fever, or wound changes after surgery
- Locking, giving way, or sudden loss of motion
- New numbness or tingling spreading down the leg
If you’re in post-op rehab, use the range and frequency your surgeon or physical therapist recommends. Many established protocols include heel slides, but your precautions come first, as outlined in rehabilitation frameworks from Mass General Brigham.
What the Research Says About Active Heel Slide Exercise After Knee Replacement
Peer-reviewed research indexed by PubMed has examined active heel-slide exercise therapy after total knee arthroplasty and compared it with continuous passive motion approaches, supporting the role of active, patient-controlled movement in functional recovery.
Ongoing systematic reviews published by Springer continue to evaluate continuous active motion versus continuous passive motion after TKA, reflecting continued research interest in active rehab strategies.
People Also Ask About Heel Slides
Do heel slides help knee stiffness?
They may help by practicing controlled knee bending and gradually improving tolerance to knee flexion, especially when stiffness is the main limiter.
How many heel slides should I do a day?
Many plans start with 8–12 reps per session, and post-op protocols may use multiple short sessions daily—always follow your clinician’s plan if you have one.
Are heel slides good after knee surgery?
They’re commonly included in knee replacement exercise guidance and rehab protocols, but your timing and range should match your surgeon or physical therapist’s instructions.
FAQs About Heel Slides
1) Should heel slides hurt?
You should feel a gentle stretch or mild discomfort at end range, not sharp pain. If pain spikes or lingers, reduce range or stop and check with a clinician.
2) How soon do heel slides improve knee mobility?
Many people notice small changes within days to weeks, depending on the cause of stiffness and how consistently they practice. Post-op timelines vary widely.
3) Can I do heel slides if my knee is swollen?
Mild swelling may happen with stiffness or rehab, but increased swelling after exercise can mean you’re doing too much. Reduce volume and follow medical guidance if swelling is significant.
4) Do I need equipment?
No. A towel under the heel (to reduce friction) or a strap around the foot (for assistance) can make them easier.
5) What’s better: heel slides or a stationary bike?
They serve different roles. Heel slides directly train knee-bend control and range of motion, while cycling supports rhythmic movement once you’re cleared and have enough bend to pedal comfortably.
6) Can heel slides help after sitting all day?
They may help if your knee feels stiff from inactivity, because they gently move the joint through flexion and extension without impact.
Conclusion
Heel slides are one of the simplest ways to train knee bending safely and consistently. Start with smooth, pain-limited reps, use a towel or strap if needed, and progress range gradually—especially if you’re following a rehab plan from your surgeon or physical therapist. Stay consistent, move with control, and let progress build steadily over time.
References
- Jia, Z., et al. (2024). Efficacy and safety of continuous passive motion and physical therapy after knee arthroplasty: A systematic review and meta-analysis. Journal of Orthopaedic Surgery and Research. PubMed Central.
- Jette, D. U., et al. (2020). Physical therapist management of total knee arthroplasty. Physical Therapy. PubMed Central.
- American Physical Therapy Association (APTA). (n.d.). Clinical Practice Guideline: Physical Therapist Management of Total Knee Arthroplasty.
- American Academy of Orthopaedic Surgeons (AAOS). (n.d.). Total Hip Replacement Exercise Guide. OrthoInfo.