
Posterior pelvic tilt exercises are targeted core, hip, and mobility moves that can help you regain better pelvic control and support a more neutral posture. If your pelvis tends to stay “tucked under” (often with a flatter low back), the right routine may help improve how your hips and spine stack during standing, sitting, and walking.
A smart plan usually includes three parts: learning the pelvic tilt motion, strengthening the deep core and hips, and gently addressing tight areas that pull you into the tuck. Clinical-style posture routines often include pelvic tilt drills for alignment and abdominal engagement, as shown by the Cleveland Clinic.
What Is Posterior Pelvic Tilt?
Posterior pelvic tilt is a posture pattern where the pelvis rotates backward, causing the tailbone to tuck under and the natural curve of the lower back to decrease. This can make the lower spine appear flatter than usual.
In a neutral posture, the pelvis sits balanced under the ribs with normal spinal curves. When the pelvis stays consistently tucked, it may influence alignment and movement mechanics.
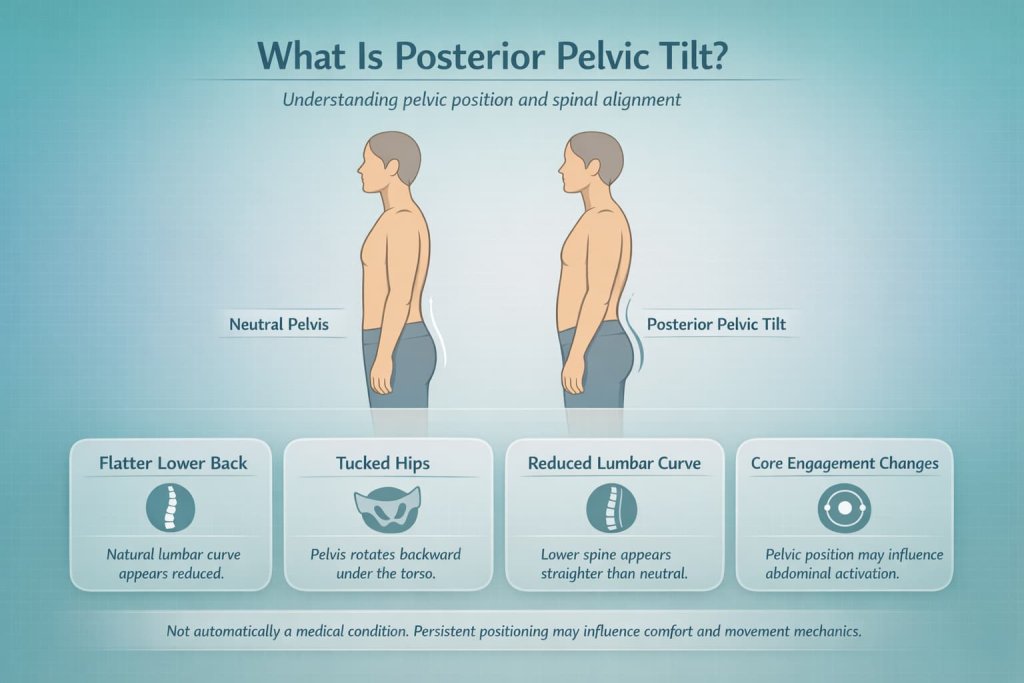
Posterior pelvic tilt may involve:
- A flatter-looking lower back
- Hips that feel tucked under
- Reduced lumbar curve
- Changes in how the core engages
It is not automatically a medical condition, but persistent positioning can affect comfort and function.
7 Best Posterior Pelvic Tilt Exercises
Improve posture and strengthen your core with these 7 best posterior pelvic tilt exercises designed to support neutral spine alignment. Each move focuses on pelvic control, core stability, and balanced hip strength for safer, more efficient movement.
1) Supine Pelvic Tilts
How to do it:
- Lie on your back with knees bent and feet flat on the floor, hip-width apart.
- Rest your arms by your sides and relax your shoulders.
- Inhale gently through your nose.
- As you exhale, slowly “tuck” your pelvis by tightening your lower abdominals so your lower back gently presses toward the floor.
- Pause briefly without holding your breath.
- Inhale and return to a neutral spine (not a large arch).
- Repeat slowly for 8–12 controlled reps.
Why it works:
Supine pelvic tilts teach you how to actively control pelvic position instead of staying stuck in a tucked posture. This improves awareness of neutral alignment and encourages proper abdominal engagement. Pelvic tilt drills are also commonly included in posture routines to improve alignment and core activation, as demonstrated by the Cleveland Clinic.
Muscles worked:
Deep core muscles (transverse abdominis and lower abdominals), pelvic stabilizers, and spinal stabilizers.
Trainer Tip:
Keep the movement small and controlled. Avoid pushing hard through your feet or clenching your glutes aggressively. The motion should come from gently rotating the pelvis, not lifting the hips.
2) Glute Bridge With Neutral Pelvis
How to do it:
- Lie on your back with knees bent and feet flat, about hip-width apart.
- Find a neutral pelvis (avoid strongly tucking or arching).
- Exhale and press through your heels to lift your hips.
- Raise until your body forms a straight line from shoulders to knees.
- Hold for 1–2 seconds while breathing normally.
- Lower slowly with control.
- Perform 8–12 repetitions.
Why it works:
The glute bridge strengthens hip extensors and supports pelvic stability. When your glutes are strong and active, they help maintain better alignment during standing, walking, and lifting movements.
Muscles worked:
Gluteus maximus, hamstrings, deep core stabilizers.
Trainer Tip:
If your hamstrings cramp, move your feet slightly farther from your hips and reduce the height of the lift. Focus on driving through your heels, not your toes.
3) Dead Bug
How to do it:
- Lie on your back with arms extended toward the ceiling.
- Lift your knees so hips and knees are bent at 90 degrees.
- Gently press your lower back toward the floor.
- Slowly extend one leg toward the floor while lowering the opposite arm overhead.
- Keep your core braced and breathing steady.
- Return to the starting position and switch sides.
- Perform 6–10 reps per side.
Why it works:
The dead bug trains core stability while the limbs move, which improves your ability to maintain a neutral pelvis during daily activities like walking and reaching.
Muscles worked:
Transverse abdominis, rectus abdominis, hip flexors, spinal stabilizers.
Trainer Tip:
Only lower your arm and leg as far as you can while keeping your lower back gently in contact with the floor. If your back arches, reduce the range.
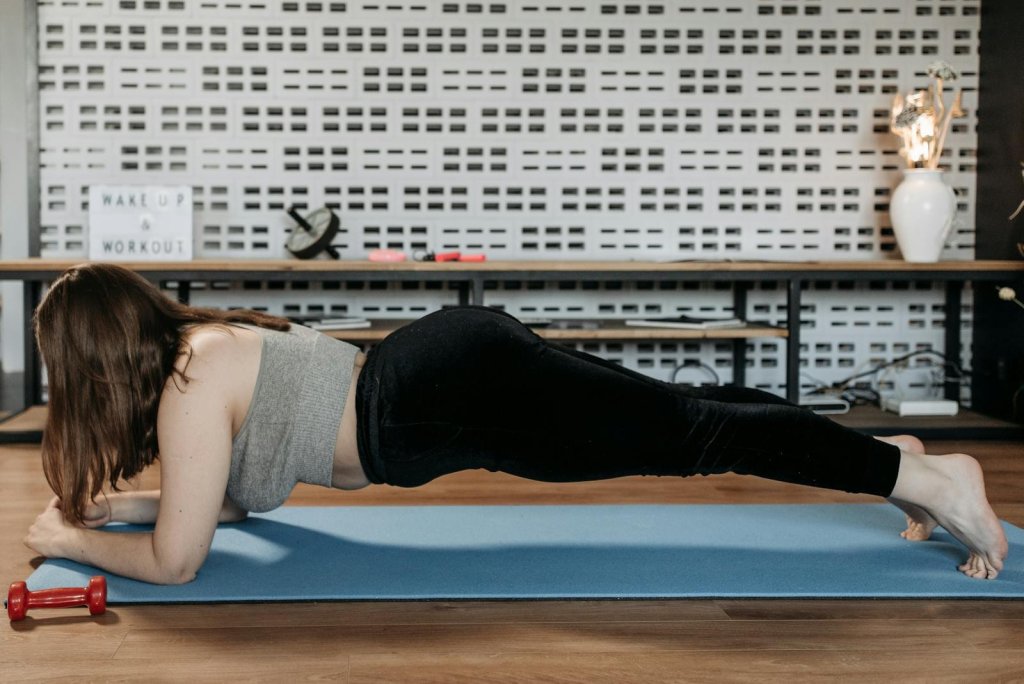
4) Forearm Plank With Pelvic Control
How to do it:
- Place your forearms on the floor with elbows under shoulders.
- Step your feet back until your body forms a straight line.
- Lightly squeeze your glutes and brace your core.
- Keep your head neutral and gaze toward the floor.
- Hold for 15–30 seconds while breathing steadily.
Why it works:
Planks build whole-core stability and help you resist excessive pelvic movement. This strengthens the muscles that support neutral alignment under load.
Muscles worked:
Abdominals (front and sides), glutes, shoulders, and spinal stabilizers.
Trainer Tip:
Avoid sagging or over-tucking your pelvis. Think about keeping your ribs stacked over your pelvis. If needed, perform from your knees or elevate your forearms.
5) Quadruped Rock-Back to Neutral
How to do it:
- Start on hands and knees with wrists under shoulders and knees under hips.
- Find a neutral spine position.
- Slowly rock your hips backward toward your heels.
- Keep your spine steady and controlled.
- Return forward and repeat for 8–12 reps.
Why it works:
This drill reinforces hip movement while maintaining pelvic control. It helps retrain coordination between the hips and core without excessive spinal flexion.
Muscles worked:
Core stabilizers, glutes, hip muscles, shoulder stabilizers.
Trainer Tip:
Move slowly and stay within a comfortable range. Avoid rounding your back excessively as you rock backward.
6) Hip Flexor March Hold (Supine)
How to do it:
- Lie on your back with knees bent and feet flat.
- Set your pelvis in neutral and lightly brace your core.
- Lift one knee toward tabletop (hip at 90 degrees).
- Hold for 2–3 seconds while breathing steadily.
- Lower slowly and alternate sides.
- Perform 6–10 reps per side.
Why it works:
This exercise strengthens hip flexors while challenging pelvic stability. It improves control during stepping, stair climbing, and single-leg movements.
Muscles worked:
Hip flexors, deep abdominals, pelvic stabilizers.
Trainer Tip:
If your lower back arches or lifts off the floor, reduce the height of the march and slow down the movement.
7) Hamstring Stretch With Gentle Control
How to do it:
- Lie on your back and loop a towel or resistance band around one foot.
- Keep the opposite leg bent or straight, depending on comfort.
- Slowly straighten the lifted leg until you feel a mild stretch in the back of the thigh.
- Hold for 20–30 seconds while breathing steadily.
- Switch sides.
Why it works:
Hamstrings are often associated with posterior pelvic tilt patterns. Research available through PubMed Central highlights how hamstring tightness can influence pelvic movement mechanics.
Muscles worked:
Hamstrings (primary), calves (secondary).
Trainer Tip:
Keep the stretch gentle and controlled. Avoid pulling aggressively. If you feel tingling or sharp discomfort, reduce intensity or stop.
How Posterior Pelvic Tilt Affects Posture and Core Strength
Because the pelvis acts as the foundation of the spine, its position directly influences posture and core activation.
Posterior pelvic tilt may affect:
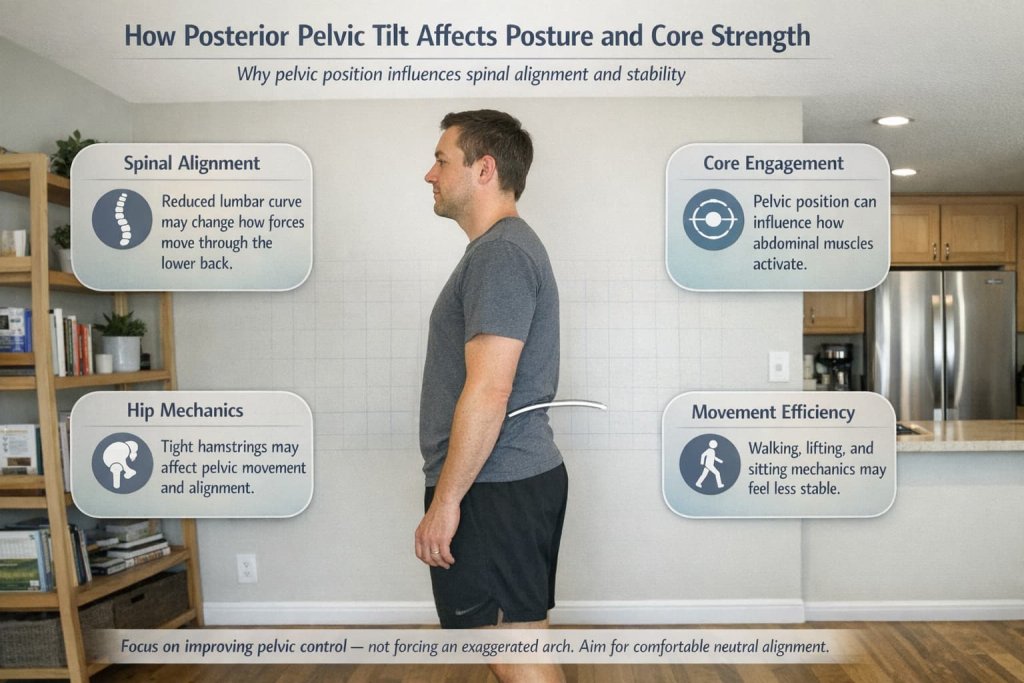
- Spinal alignment: Reduced lumbar curve can change how forces move through the lower back.
- Core engagement: Some abdominal muscles may become overactive while others contribute less effectively.
- Hip mechanics: Tight hamstrings may influence pelvic positioning, as research available through PubMed Central suggests hamstring tightness can affect pelvic motion.
- Movement efficiency: Walking, lifting, and prolonged sitting mechanics may feel less stable.
Posture routines that include pelvic control exercises are commonly recommended to support better alignment and abdominal activation, as noted by the Cleveland Clinic.
The goal is not to force an exaggerated arch, but to improve control and return to a comfortable neutral spine.
Why Posterior Pelvic Tilt Happens
Posterior pelvic tilt is often linked to a mix of habits and muscle balance factors, especially long periods of sitting and low daily movement. Many explanations point to a combination such as tight hamstrings and reduced strength or control in the core and hip muscles.
Research published in PubMed Central suggests that hamstring tightness can influence pelvic motion during bending and movement, which matters when you’re trying to restore pelvic control.
How to Self-Check Your Pelvic Position Safely
Try this quick, simple check:
- Stand sideways to a mirror and relax your ribs and shoulders.
- Notice if your hips look tucked under and your lower back looks very flat.
- Gently tilt your pelvis forward and backward a few times (small range).
- If it feels hard to move out of the tuck, your pelvis may be “stuck” in posterior tilt.
If you get sharp pain, numbness, tingling, or symptoms that worsen, stop and consider getting assessed by a qualified professional.
How to Use Posterior Pelvic Tilt Exercises Effectively
To get better results, focus on control over intensity:
- Move slowly and keep the motion small at first.
- Breathe normally (exhale during the effort is usually easiest).
- Aim for “neutral” rather than forcing a big arch or big tuck.
- Stop if pain increases.
Simple Weekly Routine (10–15 Minutes)
Perform this 3–5 days per week:
- Supine pelvic tilts: 2 sets of 8–12 reps
- Glute bridges: 2–3 sets of 8–12 reps
- Dead bug: 2 sets of 6–10 reps per side
- Forearm plank: 2–3 holds of 15–30 seconds
- Hamstring stretch: 2 holds of 20–30 seconds per side
Consistency matters more than intensity.
Common Mistakes to Avoid
- Over-tucking all day — the goal is neutral, not a constant posterior tilt
- Holding your breath during core work
- Stretching aggressively without building strength and control
- Rushing reps instead of moving slowly and staying stable
When to Seek Professional Guidance
Consider seeing a qualified clinician (such as a physical therapist or sports medicine provider) if you have:
- Persistent pain that doesn’t improve
- Pain that worsens with exercise
- Numbness, tingling, radiating symptoms, or weakness
- A recent injury or surgery affecting your back or hips
FAQs
Do posterior pelvic tilt exercises work for everyone?
They can help many people build better pelvic control and strength, but posture is individual. The best routine depends on your mobility, strength, daily habits, and symptoms.
How long does it take to see changes?
Many people notice better control in 2–4 weeks with consistent practice, but posture habits and strength changes usually take longer.
Should I stretch hamstrings if I have posterior pelvic tilt?
Gentle hamstring stretching may help if they feel consistently tight, but it works best alongside core and hip strengthening, not as a standalone fix.
Can sitting too much make posterior pelvic tilt worse?
Long periods of sitting and low movement are commonly mentioned contributors to pelvic position patterns.
Is posterior pelvic tilt the same as flat back posture?
They are related. Posterior pelvic tilt can reduce the natural curve of the lower back, which may appear as a flatter lumbar spine.
What’s the easiest exercise to start with?
Supine pelvic tilts are usually the best starting point because they teach the motion and help you find neutral before adding load.
Conclusion
Posterior pelvic tilt exercises work best when you focus on pelvic control first, then build core and hip strength with simple, repeatable movements. Start with pelvic tilts, add bridges and dead bugs, and practice a few minutes most days to support better alignment and more comfortable movement.
Stay consistent, move with control, and prioritize quality over intensity.
This content is for informational purposes only and not medical advice.