
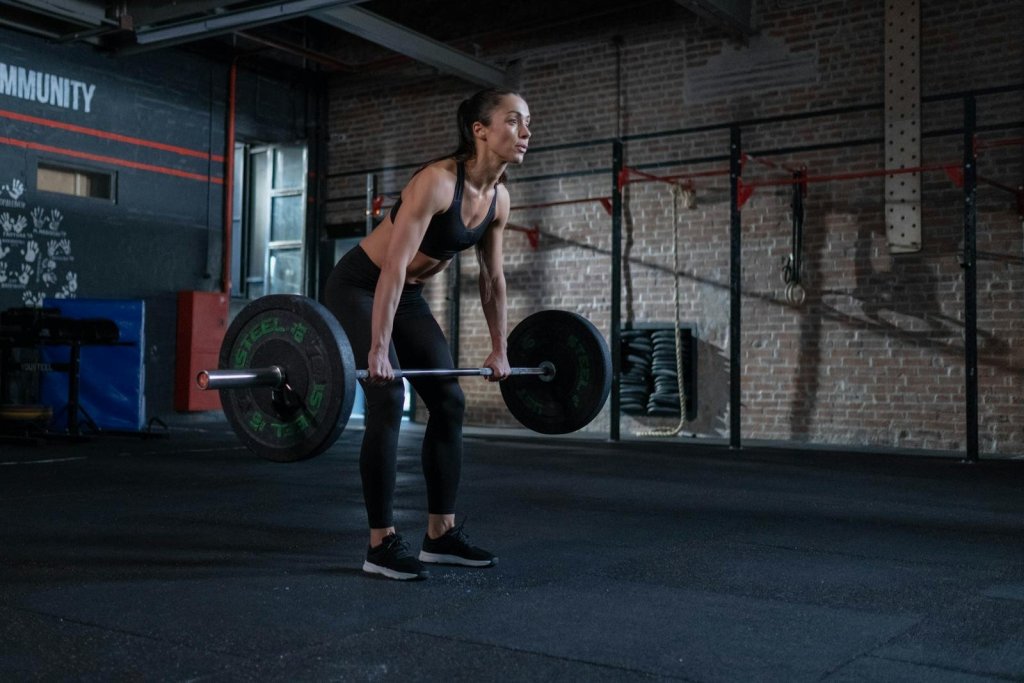
Bent over rows are one of the most effective exercises for building back thickness because they train your upper back, lats, and spinal erectors at the same time. If you want a stronger, more muscular-looking back with better pulling power, bent over rows belong near the top of your plan.
They also demand solid positioning, bracing, and smart loading. That’s why this guide focuses on clear form cues, common mistakes, and the best variations for your goal.
What Are Bent Over Rows?
Bent over rows are a hip-hinge rowing exercise where you hold a weight (usually a barbell or dumbbells), hinge forward, and pull the load toward your torso while keeping your spine stable.
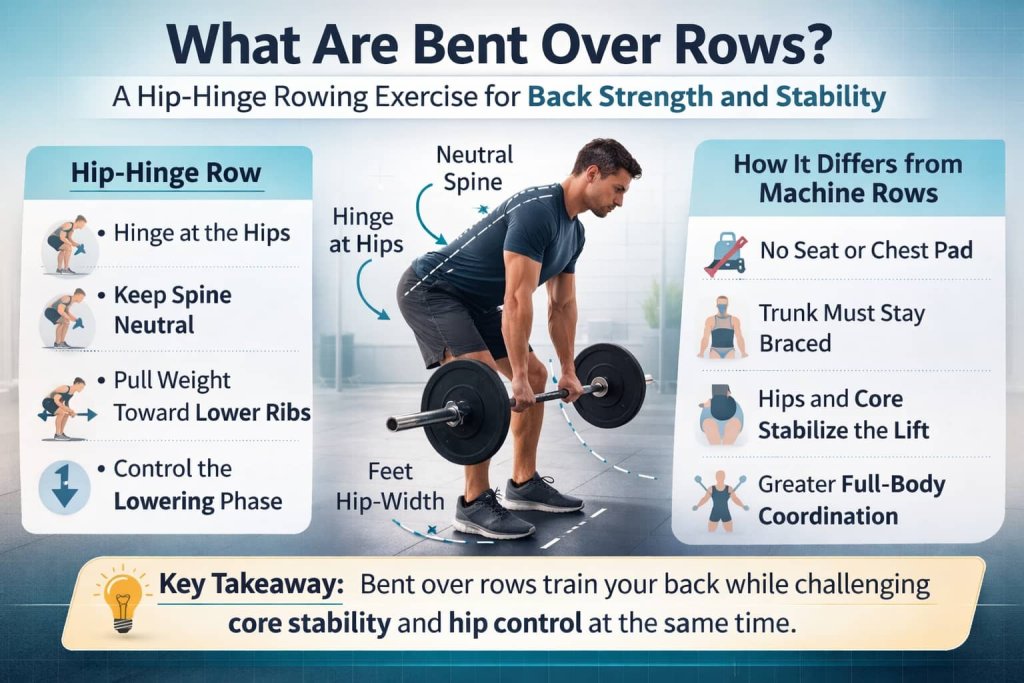
Unlike cable rows where the machine helps stabilize you, bent over rows ask your trunk and hips to stay locked in while your back muscles do the pulling.
Why Bent Over Rows Build a Thicker Back
Bent over rows are popular for “back thickness” because they heavily involve the mid-back (rhomboids and trapezius), while also training lats and the muscles that stabilize your spine.
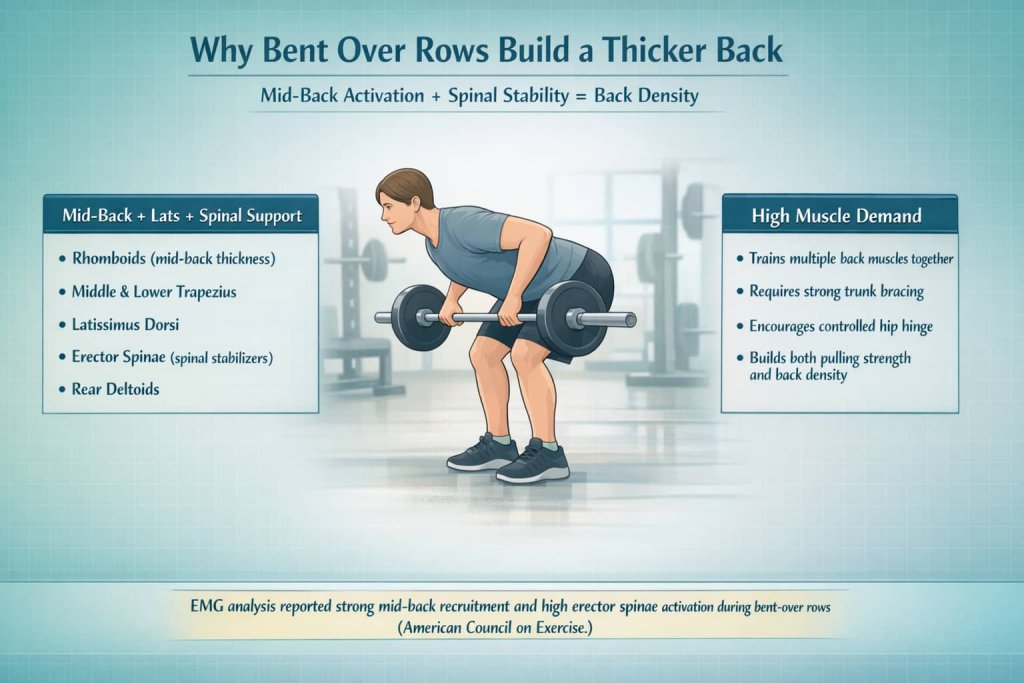
In an EMG analysis of common back exercises, the bent-over row was one of the top performers for mid-back recruitment and was the best exercise tested for erector spinae activation, which helps explain why it’s such a staple for back density and strength (American Council on Exercise (ACE)).
Bent Over Row Form
Setup checklist
- Stand with feet about hip-width apart.
- Grip the bar just outside shoulder-width (overhand to start).
- Hinge at the hips until your torso is roughly 30–60 degrees from the floor.
- Keep a slight bend in your knees.
- Brace your midsection and keep your spine neutral.
Rowing motion
- Pull the weight toward your lower ribs or belly button area.
- Drive elbows back (not up), keeping shoulders away from your ears.
- Pause briefly at the top without jerking.
- Lower under control until elbows straighten fully.
Best Bent Over Row Variations
Use these bent over row variations to match your goal and comfort, whether you want more back thickness, strength, or better control. Pick the version that lets you keep a stable hinge, neutral spine, and smooth reps without momentum.
1. Barbell Bent Over Row
Why it works:
The barbell version is the classic “back thickness” builder because it lets you use heavier loads while keeping a consistent pulling path. It also trains your ability to brace and hold a strong hinge, which carries over to many lifts.
How to do it:
- Stand hip-width and grip the bar just outside shoulder width
- Hinge back until your torso is about 30–60 degrees from the floor
- Brace your core and keep your spine neutral
- Pull the bar toward your lower ribs or belly button
- Pause briefly at the top without shrugging
- Lower the bar under control until arms fully extend
Trainer Tip:
Think “pull elbows back to your back pockets.” If you feel your torso rising to move the weight, lighten the load and slow the lowering phase.
2. Dumbbell Bent Over Row
Why it works:
Dumbbells allow a more natural arm path, which can feel smoother on the shoulders and help you “find” your lats and mid-back. They’re also great for building symmetry because each arm works independently.
How to do it:
- Hold a dumbbell in each hand and hinge into a strong row position
- Keep your chest “proud” and spine neutral
- Pull both dumbbells toward your lower ribs with elbows close to your body
- Pause briefly when the weights reach your torso
- Lower slowly until your arms straighten fully
Trainer Tip:
Let the dumbbells travel slightly “back” toward your hips, not straight up toward your shoulders. This usually increases lat involvement and reduces shrugging.
3. One-Arm Dumbbell Row (Bench-Supported)
Why it works:
This variation is easier to stabilize, so you can focus on pulling with the back instead of fighting your torso position. It’s also excellent for addressing left-right strength differences.
How to do it:
- Place one knee and the same-side hand on a bench for support
- Keep your working-side shoulder packed (not shrugged)
- Pull the dumbbell toward your hip or lower ribs
- Pause briefly with the elbow behind your torso
- Lower slowly until the arm fully extends
Trainer Tip:
Keep your hips and ribs “square” to the floor. If your torso rotates hard at the top, lower the weight and tighten your brace before each rep.
4. Pendlay Row
Why it works:
Pendlay rows start from the floor each rep, which encourages a powerful pull and reduces “cheating” with momentum from continuous reps. This makes it a strong option for building explosive strength and crisp technique.
How to do it:
- Set the bar on the floor like a deadlift start
- Hinge so your torso is closer to parallel with the floor
- Brace hard, then pull the bar to your lower chest/upper belly
- Set the bar back down on the floor under control
- Reset your brace before the next rep
Trainer Tip:
Treat every rep like a “single.” Reset your breath and brace each time so your spine position stays consistent.
5. Chest-Supported Row (Dumbbells or Machine)
Why it works:
Chest-supported rows reduce low-back fatigue because the bench or pad supports your torso. That lets you train your back hard even when your hinge endurance is limited or you’re trying to manage overall lower-back stress.
How to do it:
- Set an incline bench (or use a chest-supported row machine)
- Lie chest-down with feet planted and spine neutral
- Row the weights toward your ribs while keeping shoulders down
- Pause briefly at the top
- Lower slowly to full arm extension without losing control
Trainer Tip:
Avoid letting your shoulders roll forward at the bottom. Stop just short of “hanging” on the joints and keep light tension in your upper back.
Muscles Worked in Bent Over Rows
Bent over rows primarily target:
- Upper back: middle trapezius, lower trapezius, rhomboids
- Lats: latissimus dorsi
- Rear shoulders: posterior deltoids
- Arms: biceps and forearms (grip)
- Trunk support: spinal erectors and deep core stabilizers
That “support” work matters. Research comparing rowing variations found the standing bent-over row produced large back activation but also the greatest lumbar spine load among the rows tested, so your setup and load choice are a big deal (PubMed).
The Most Important Cue: Hip Hinge Plus Neutral Spine
If your back rounds or you “stand up” as you row, your rep turns into a different exercise and usually feels worse.
A peer-reviewed paper on teaching the hip hinge highlights how maintaining a neutral spine during lifting requires core stability and posture awareness, which fits perfectly with how you should approach rows: hinge, brace, then pull (PubMed Central (PMC)).
Common Bent Over Row Mistakes
1) Rounding your lower back
This often happens when the weight is too heavy or the hinge position is too low for your mobility.
Fix it:
- Raise your torso angle slightly.
- Reduce load.
- Row from a stronger, more stable hinge.
2) Turning it into a “standing heave”
If you jerk your torso up to move the weight, you lose back tension and shift the work away from the target muscles.
Fix it:
- Use a controlled tempo.
- Pause for 1 second at the top with your torso still.
3) Shrugging at the top
Shrugging shifts stress into your neck and upper traps instead of your mid-back.
Fix it:
- Think “shoulders down, elbows back.”
- Row to your torso, not to your collarbone.
4) Letting the bar drift forward
If the weight hangs away from your body, your lower back works harder to hold position.
Fix it:
- Keep the load close.
- Pull toward your torso, not straight up.
Bent Over Rows for Beginners
If you’re new, your first goal is to own the hinge and keep the same torso angle for the whole set.
Beginner-friendly options:
- Dumbbell bent over row (easier to find a comfortable path)
- Chest-supported row (reduces lower-back fatigue)
- One-arm dumbbell row with bench support (most stable)
If you’re learning the single-arm pattern, the technique resource is a solid reference for clean execution cues (National Strength and Conditioning Association (NSCA)).
How to Program Bent Over Rows
For muscle growth (hypertrophy)
- 3–5 sets of 6–12 reps
- 1–2 reps in reserve (stop before form breaks)
- Rest 90–150 seconds
For strength
- 3–6 sets of 3–6 reps
- Longer rest (2–3 minutes)
- Keep reps crisp and torso stable
Simple weekly plan (example)
- Day 1: Heavy rows (4 × 5–6)
- Day 2: Lighter rows (3 × 10–12) + a chest-supported row variation
How Much Weight Should You Use?
A good starting point is a load that lets you keep:
- the same torso angle,
- neutral spine,
- controlled lowering,
- and a brief pause at the top.
If your last 2 reps turn into body-English reps, the weight is too heavy for that set.
People Also Ask About Bent Over Rows
Are bent over rows better than seated rows?
Bent over rows tend to demand more total-body stability and trunk control, while seated rows are often easier to load without fatigue from holding a hinge. Many programs benefit from using both.
Do bent over rows build lats or upper back more?
They train both. Your elbow path and where you pull to (lower ribs vs. higher chest) can shift emphasis slightly, but most people get a strong “upper-back thickness” effect.
Are bent over rows safe for your lower back?
They can be safe when you hinge well, brace, and load appropriately. They also create higher lumbar loading than some supported row options, which is why smart technique and progression matter (PubMed).
FAQs
1) What’s the best grip for bent over rows?
Start with an overhand grip for balanced upper-back work. An underhand grip can increase biceps involvement and sometimes feels better on the shoulders, but it’s not automatically “better.”
2) Should I row to my chest or my stomach?
Most people do best rowing toward the lower ribs or belly-button area because it keeps the motion controlled and shoulders in a stronger position (ACE Exercise Library).
3) How far should I bend over?
Anywhere around 30–60 degrees can work. Choose an angle you can hold without rounding or losing brace.
4) Why do I feel bent over rows in my lower back?
Your lower back works to stabilize your hinge position. If you feel it excessively, reduce load, raise torso angle slightly, or use a chest-supported option for a phase.
5) Can I do bent over rows with dumbbells instead of a barbell?
Yes. Dumbbells often feel smoother on the joints and can help you train each side more evenly.
6) How often should I do bent over rows?
Most people do well with 1–2 times per week, depending on total pulling volume and recovery.
7) What’s a good alternative if I can’t hinge comfortably?
Try chest-supported rows, one-arm rows with bench support, or cable rows while you build hinge strength and control.
Conclusion
Bent over rows earn their reputation: they’re a high-return exercise for building a thicker, stronger back when your hinge, brace, and pulling path are solid. Start with a weight you can control, keep your torso stable, and progress gradually week to week.