
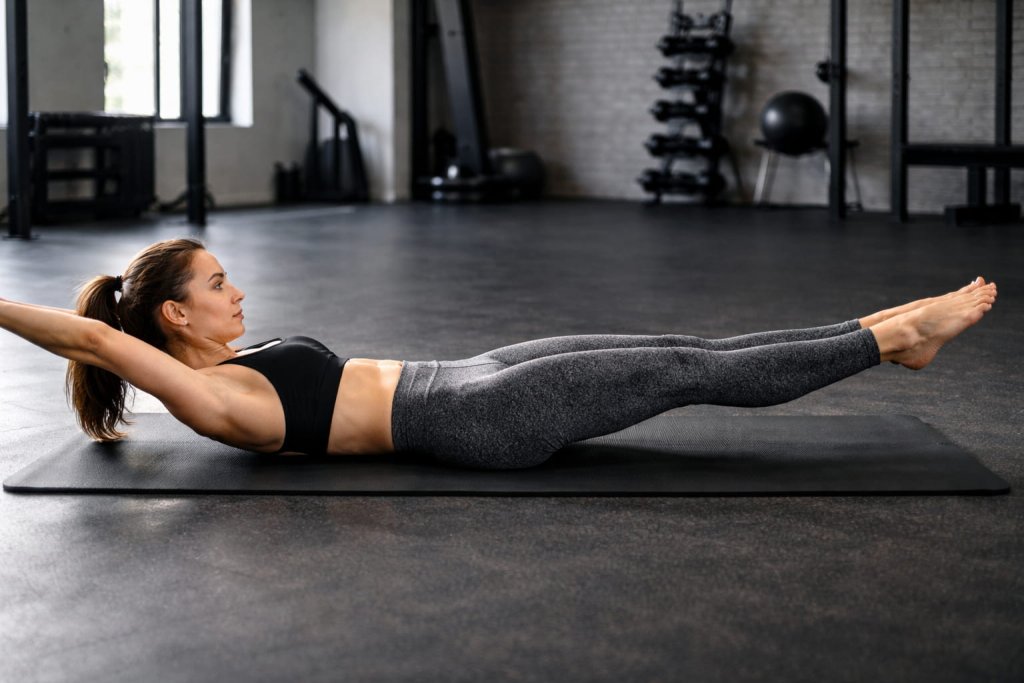
The hollow hold exercise is an isometric core movement where you keep your lower back pressed into the floor while holding your arms and legs off the ground. It trains full-body bracing and “anti-extension” control.
Understanding the hollow hold matters because many people lose core tension as lever length increases. This guide explains proper setup, common mistakes, and safe progressions so you can build real core control without strain.
What Is the Hollow Hold Exercise
The hollow hold (also called a hollow body hold) is a gymnastics-style core drill that teaches trunk stability by coordinating rib position, pelvic control, and abdominal tension while the limbs act as long levers.
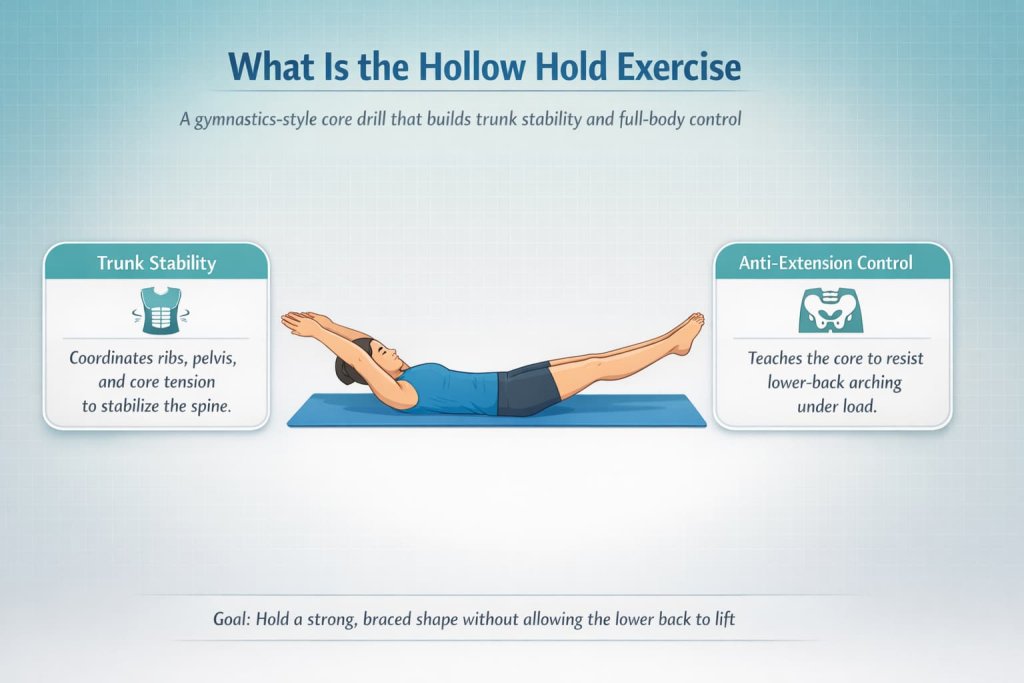
In simple terms, your goal is to hold a strong, braced shape without allowing your lower back to arch.
How to Do the Hollow Hold Exercise With Proper Form
Use a mat and focus on control rather than max effort.
How to do it:
- Lie on your back with knees bent and feet flat.
- Gently exhale and draw your ribs down while lightly tucking the pelvis so your lower back presses into the floor.
- Lift your shoulders slightly, keeping the neck long.
- Raise one leg, then the other, keeping knees bent at first.
- Straighten the legs gradually, lowering them only as far as you can without losing back contact.
- Breathe slowly and maintain steady tension.
Coaching cues emphasize that if your lower back lifts or discomfort appears, the variation is too advanced and should be scaled.
Muscles Worked in the Hollow Hold Exercise
The hollow hold primarily activates the abdominal wall, including deeper stabilizing muscles responsible for trunk control.
Key muscle groups involved:
- Abdominals (deep and superficial)
- Obliques
- Hip flexors and quadriceps
- Spinal stabilizers working isometrically
Hollow Hold Variations (Regressions and Progressions)
Below are the most effective hollow hold exercise variations, organized from easier to more challenging. Each option follows a progression-based approach so you can build core stability without losing lower-back control.
1. Tuck Hollow Hold (Beginner Regression)
Why it works:
Bending the knees shortens the lever, reducing stress on the lower back while teaching proper rib-down bracing and pelvic control.
Muscles worked:
Abdominals, obliques, deep core stabilizers
How to do it:
- Lie on your back with knees bent and feet off the floor
- Press your lower back gently into the mat
- Lift shoulders slightly while keeping the neck relaxed
- Hold steady tension without arching the back
Trainer Tip:
If you feel your hip flexors more than your abs, bring knees closer to your chest and refocus on slow breathing.
2. Tabletop Hollow Hold (Controlled Regression)
Why it works:
This variation increases demand slightly while still limiting lever length, making it ideal for learning sustained trunk control.
Muscles worked:
Abdominals, obliques, hip flexors, spinal stabilizers
How to do it:
- Lie on your back with hips and knees bent to 90 degrees
- Flatten your lower back into the floor
- Lift shoulders just off the mat
- Maintain position while breathing calmly
Trainer Tip:
Think “ribs down, belly tight” rather than pulling your legs higher.
3. One-Leg Extended Hollow Hold (Intermediate Progression)
Why it works:
Extending one leg increases lever length on one side, challenging anti-extension control without doubling the load.
Muscles worked:
Abdominals, obliques, hip flexors, quads
How to do it:
- Start in a tabletop hollow position
- Extend one leg while keeping the other bent
- Keep the lower back pressed into the floor
- Switch sides between sets
Trainer Tip:
Alternate legs every set to avoid side-to-side imbalances.
4. Full Hollow Hold (Advanced Progression)
Why it works:
Extending both legs maximizes lever length, requiring high levels of core tension and spinal control.
Muscles worked:
Abdominals, obliques, hip flexors, quads, spinal stabilizers
How to do it:
- Lie on your back and press your lower back into the floor
- Lift both legs straight and lower them only as far as you can control
- Raise shoulders slightly off the mat
- Hold steady without losing back contact
Trainer Tip:
Stop the set the moment your lower back lifts—quality matters more than hold time.
5. Hollow Hold With Arms Overhead (Highest Progression)
Why it works:
Adding arms overhead lengthens the lever from both ends, creating the greatest demand on full-body bracing.
Muscles worked:
Abdominals, obliques, hip flexors, shoulders, upper back stabilizers
How to do it:
- Assume a full hollow hold position
- Extend arms overhead, keeping ribs down
- Maintain lower-back contact and steady breathing
- Hold with controlled tension
Trainer Tip:
If form breaks, bring arms forward before bending the knees—regress one variable at a time.
Choose the hardest variation you can hold without losing lower-back contact.
| Level | Variation | Focus | Target Hold |
|---|---|---|---|
| Beginner | Tuck hollow | Basic bracing | 10–20 sec |
| Easy | Tabletop hollow | Pelvis control | 10–30 sec |
| Moderate | One-leg extended | Gradual lever load | 10–30 sec |
| Advanced | Full hollow | Full anti-extension | 10–40 sec |
| Max | Arms overhead | Highest trunk demand | 10–30 sec |
Why the Hollow Hold Exercise Builds Core Stability
The hollow hold exercise builds core stability by teaching your body to resist spinal movement while maintaining full-body tension. Instead of bending the spine, the core works to hold a strong, controlled position.
Key reasons it improves stability:
- Trains anti-extension control by preventing lower-back arching
- Reinforces proper rib and pelvis alignment for effective bracing
- Develops isometric core strength that carries over to planks, lifts, and bodyweight skills
- Encourages controlled breathing while maintaining trunk tension
By training the core to stabilize rather than move, the hollow hold helps support stronger posture, safer movement patterns, and better overall body control.
Hollow Hold Exercise Benefits
A properly performed hollow hold develops core stabilization—the ability to resist unwanted movement and maintain control under load. That’s why it’s frequently used in bodyweight training, gymnastics conditioning, and strength programs.
People commonly notice:
- Better rib and pelvis control during movement
- Improved endurance for planks, pull-ups, and hanging exercises
- Greater awareness of neutral trunk positioning
Research on trunk stability published through PubMed Central supports the importance of anti-extension control for efficient force transfer and spinal positioning.
Common Hollow Hold Exercise Mistakes
Letting the lower back arch
This is the most frequent form breakdown and usually means the legs are too low.
Flaring the ribs
When the ribs lift, trunk tension drops. Research summarized by PubMed Central highlights the importance of rib–pelvis alignment for spinal stability.
Excessive neck tension
If your neck strains, reduce the difficulty or briefly rest your head between sets.
Holding your breath
Steady breathing is part of maintaining control. If breathing stops, reduce hold time.
How to Program the Hollow Hold Exercise
Short, controlled holds tend to be most effective.
Practical programming:
- Beginners: 3–5 sets of 10–20 seconds
- Intermediate: 3–5 sets of 20–40 seconds
- Strength sessions: early as a bracing primer
- Accessory work: after compound lifts
Progress by increasing time first, then making the lever longer.
Who Should Be Cautious With Hollow Holds
Use caution or choose alternatives if you:
- Cannot keep your lower back pressed down even in easy variations
- Experience sharp or increasing low-back discomfort
- Have restrictions advised by a clinician
In these cases, dead bugs or basic planks may be more appropriate starting points.
Best Alternatives to the Hollow Hold Exercise
If hollow holds feel uncomfortable or difficult to control, these alternatives still train core stabilization and anti-extension strength with reduced lever stress. Each option emphasizes controlled positioning rather than spinal movement.
1. Dead Bug Exercise
Why it works:
The dead bug trains anti-extension control while keeping the spine supported against the floor. It allows you to practice bracing and limb movement without excessive load on the lower back.
Muscles worked:
Abdominals, deep core stabilizers, obliques, hip flexors
How to do it:
- Lie on your back with arms extended toward the ceiling and hips and knees bent to 90 degrees
- Press your lower back gently into the floor
- Extend one arm and the opposite leg while keeping the back flat
- Return to the start and alternate sides slowly
Trainer Tip:
Move as slowly as possible and stop the limb before your lower back loses contact with the floor.
2. Forearm Plank
Why it works:
The forearm plank builds full-body isometric tension in a shorter lever position compared with hollow holds, making it easier to maintain spinal alignment.
Muscles worked:
Abdominals, obliques, glutes, shoulders, spinal stabilizers
How to do it:
- Place forearms on the floor with elbows under shoulders
- Extend legs behind you and lift knees off the ground
- Keep ribs down and glutes lightly engaged
- Hold a straight line from head to heels
Trainer Tip:
Shorter, high-quality holds are more effective than long sets with poor form.
3. Bear Plank Hold
Why it works:
The bear plank challenges core stability while keeping the knees closer to the ground, reducing lever length and joint stress.
Muscles worked:
Abdominals, obliques, shoulders, hip stabilizers
How to do it:
- Start on hands and knees with shoulders over wrists
- Lift knees a few inches off the floor
- Maintain a neutral spine with steady breathing
- Hold without shifting weight side to side
Trainer Tip:
If shaking starts immediately, raise the hips slightly or shorten the hold time.
FAQs
Is a hollow hold the same as a hollow body hold
Yes. The terms are used interchangeably in fitness and gymnastics contexts.
How long should I hold a hollow hold
Most people start with 10–20 seconds and build to 20–40 seconds before progressing.
Why does my lower back lift off the floor
This usually happens when the legs are too low or fatigue sets in, a point emphasized in coaching breakdowns.
Should I feel this in my hip flexors
Some hip flexor engagement is normal, but excessive dominance suggests the variation is too difficult.
Are hollow holds good for abs
Yes. They train the abs to stabilize the trunk and resist extension, which carries over to many compound movements.
Can beginners do the hollow hold exercise
Yes, as long as they start with tuck or tabletop variations and prioritize form.
How often should I do hollow holds
Two to four times per week works well when volume and technique are controlled.
Conclusion
The hollow hold exercise is simple in appearance but highly demanding in execution. When done correctly, it builds real core stability that supports strength training, posture, and body control. Choose a variation you can hold with perfect form, progress gradually, and focus on quality over duration.
References
- Core stability training for injury prevention (Bliven & Anderson, 2013):Research overview explaining core stability, neutral alignment, and load transfer concepts that match your “core stability” section.
- Effects of core strength training on core stability (Hsu et al., 2018):Experimental study supporting the idea that structured core training can improve measured stability outcomes.
- Core training and performance: a systematic review with meta-analysis (Rodríguez-Perea et al., 2023): Meta-analysis summarizing how core training influences performance-related variables (useful for benefits and programming logic).
- A comparison between core stability exercises and muscle thickness using two activation maneuvers (Tsartsapakis et al., 2024): Research comparing trunk stability exercises and activation strategies (relevant to your bracing and technique discussion).
- Relation between core strength, core stability, and athletic performance (Schulte et al., 2025): Recent paper discussing how core strength and stability relate to performance, aligning with your “stability” framing.