
The reverse crunch exercise is a core-strengthening movement that focuses on controlled pelvic movement to build stronger abdominal muscles, especially the lower portion of the rectus abdominis. Unlike traditional crunches, it lifts the hips rather than the shoulders, which helps reduce neck strain and improves core control.
Understanding how to perform the reverse crunch correctly matters because small form mistakes can shift the workload to the hip flexors or lower back. When done properly, it is a safe, equipment-free exercise suitable for home workouts, gym routines, and beginner-to-intermediate core programs.
What Is the Reverse Crunch Exercise?
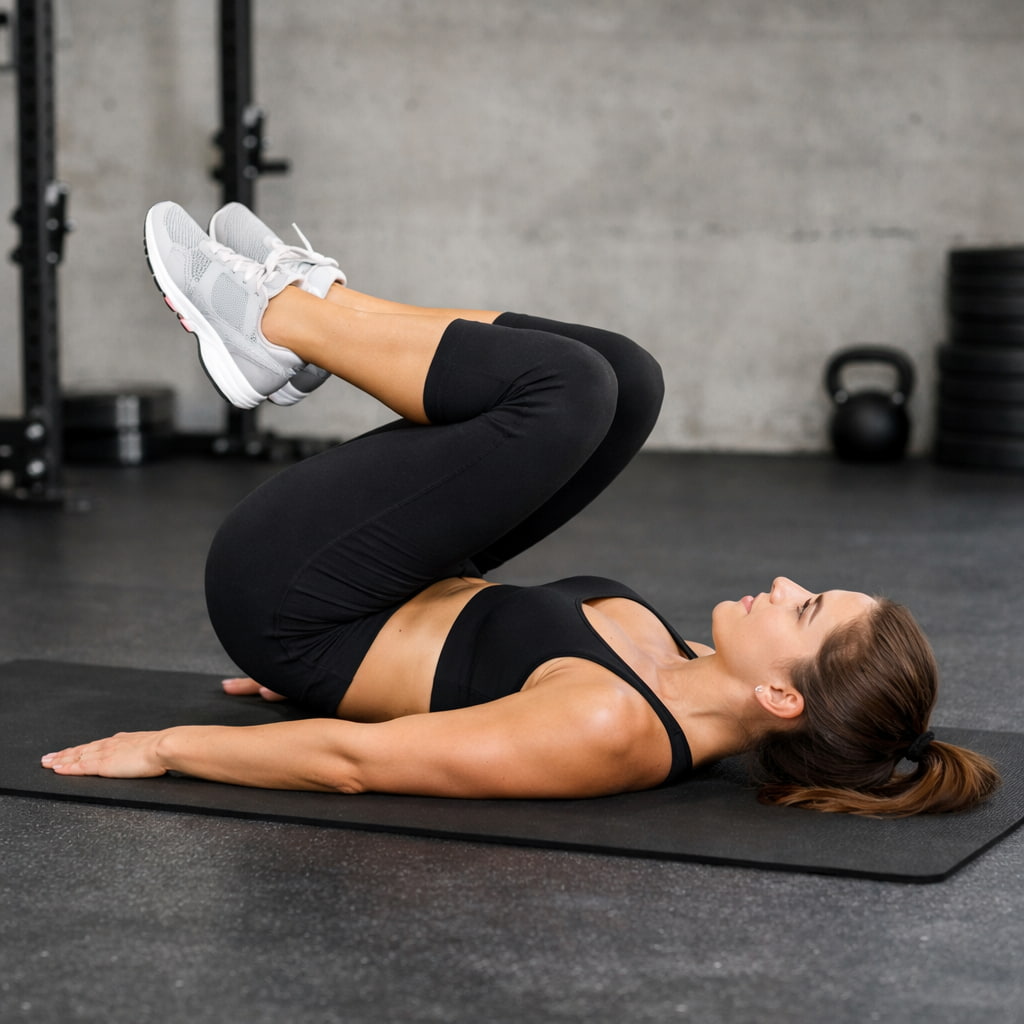
The reverse crunch exercise is a bodyweight abdominal movement performed lying on your back. Instead of curling your upper spine, you draw your knees toward your chest and gently lift your pelvis off the floor using your abs.
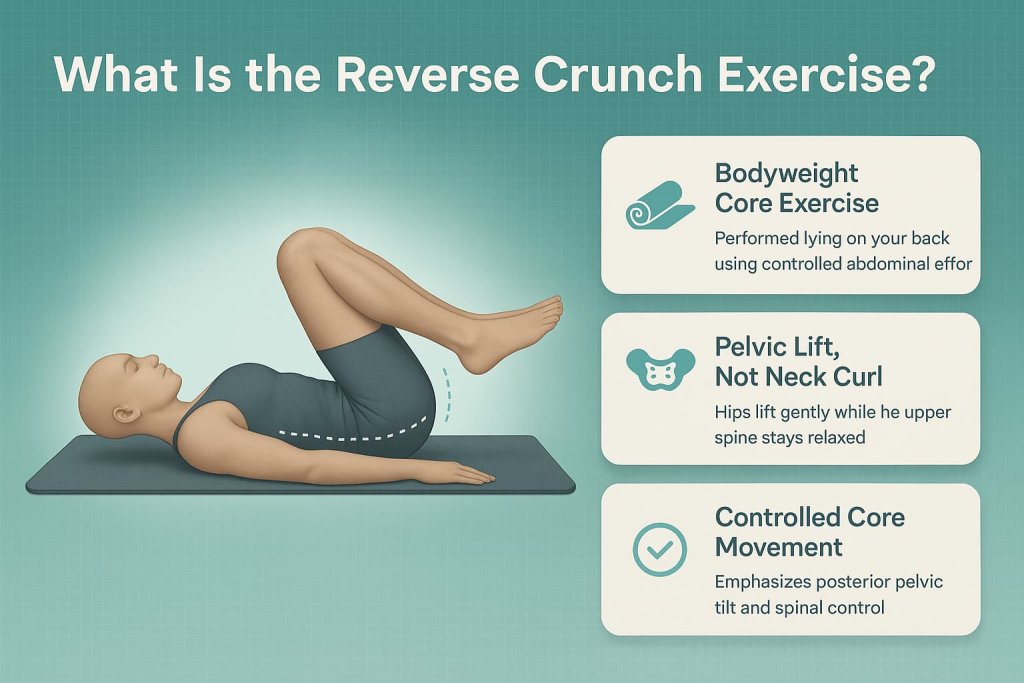
Fitness professionals and organizations such as the American Council on Exercise (ACE) include reverse crunches in core programs because they emphasize posterior pelvic tilt and controlled spinal movement, which are key elements of effective abdominal training.
How to Do the Reverse Crunch Exercise Correctly
How to do it
- Lie flat on your back with arms at your sides, palms down.
- Bend your knees and lift your feet so hips and knees are at about 90 degrees.
- Gently brace your core as if preparing for a cough.
- Exhale and slowly curl your pelvis upward, lifting your hips slightly off the floor.
- Focus on pulling your rib cage toward your pelvis, not swinging your legs.
- Pause briefly at the top.
- Lower your hips back down with control and repeat.
Move slowly. The range of motion is small, but the muscular effort should be noticeable.
Reverse Crunch Exercise Variations
Once you have mastered proper reverse crunch form and can control pelvic movement without momentum, variations allow you to scale the difficulty up or down. These options help you progress safely while keeping tension where it belongs—on the abdominal muscles, not the lower back or hip flexors.
1. Bent-Knee Reverse Crunch (Reduced Range)
Why it works:
Bending the knees shortens the lever arm, which reduces strain and makes it easier to initiate movement from the abs. This variation is ideal for beginners or anyone rebuilding core control.
How to do it:
- Lie on your back with knees bent and feet lifted.
- Bring knees directly over hips at about 90 degrees.
- Brace your core gently.
- Exhale and curl your pelvis upward just a few inches.
- Pause briefly, then lower with control.
Trainer Tip:
Think “tilt the pelvis,” not “lift the legs.” If your thighs move more than your hips, reduce the range further.
2. Reverse Crunch With Heels Tapping the Floor
Why it works:
Allowing the heels to lightly touch the floor between reps limits momentum and reinforces core re-bracing on every repetition.
How to do it:
- Start in the standard reverse crunch position.
- Lower your legs until heels gently touch the floor.
- Re-brace your core before the next rep.
- Curl the pelvis upward smoothly.
- Lower back down with control.
Trainer Tip:
The heel tap should be soft and quiet. If you hear impact, you are losing control.
3. Straight-Leg Reverse Crunch
Why it works:
Straightening the legs increases leverage, which raises the demand on the abdominal muscles and challenges pelvic control more aggressively.
How to do it:
- Lie on your back with legs extended upward.
- Keep knees soft but mostly straight.
- Brace your core and exhale.
- Curl your pelvis upward without swinging the legs.
- Lower slowly, maintaining abdominal tension.
Trainer Tip:
If your lower back arches during the descent, return to the bent-knee version until control improves.
4. Slow Tempo Reverse Crunch
Why it works:
Slowing down the lowering phase increases time under tension, improving muscular control and core endurance without adding reps.
How to do it:
- Perform a standard reverse crunch.
- Lift the pelvis smoothly on the way up.
- Lower the hips over 3–4 seconds.
- Maintain steady breathing throughout the rep.
Trainer Tip:
Count the lowering phase out loud if needed. Tempo control is more important than rep count.
5. Reverse Crunch With Stability Ball Between Knees
Why it works:
Squeezing a stability ball adds adductor engagement and improves neuromuscular coordination, helping reinforce full-core bracing.
How to do it:
- Place a stability ball between your knees.
- Gently squeeze the ball to activate the legs.
- Brace your core and curl the pelvis upward.
- Lower slowly while maintaining the squeeze.
Trainer Tip:
Use light pressure on the ball. Over-squeezing can distract from abdominal control.
Muscles Worked by the Reverse Crunch Exercise
The reverse crunch primarily engages the abdominal wall, with assistance from nearby stabilizers.
Primary muscles involved
- Rectus abdominis (entire muscle, often felt more in the lower region)
- Transverse abdominis (deep core stabilizer)
Secondary muscles involved
- Obliques (for pelvic control and stability)
- Hip flexors (assist, but should not dominate)
According to ACE, abdominal exercises should aim to maximize abdominal activation while minimizing excessive hip-flexor involvement, which is why slow, controlled reps are emphasized.
Reverse Crunch Exercise Benefits
Reverse crunches offer several evidence-supported benefits when performed with proper technique.
- May help improve core strength and trunk control
- Reduces neck and upper-spine strain compared to traditional crunches
- Supports better pelvic stability and posture awareness
- Useful for home workouts since no equipment is required
- Can be progressed or regressed easily for different fitness levels
Harvard Health notes that controlled core exercises play an important role in supporting spinal stability and overall functional movement.
Breathing and Core Bracing During Reverse Crunches
Proper breathing and core bracing help keep tension on the abs and reduce stress on the lower back.
- Exhale as you curl the pelvis upward to engage the deep core muscles.
- Inhale as you lower with control.
- Lightly brace the abs as if preparing to cough, without holding your breath.
- Keep ribs down and the lower back gently pressed toward the floor.
If breathing feels restricted, the brace is too strong.
Common Reverse Crunch Mistakes to Avoid
Many people turn the reverse crunch into a momentum-based leg swing. Avoid these common errors:
- Swinging the legs instead of lifting the pelvis
- Using speed rather than controlled movement
- Lifting too high and rolling the mid-back off the floor
- Arching the lower back during the lowering phase
- Holding your breath instead of breathing steadily
ACE emphasizes that quality of movement matters more than rep count for abdominal exercises.
How Many Reverse Crunches Should You Do?
There is no single perfect number, but general programming guidelines include:
- Beginners: 2–3 sets of 8–10 controlled reps
- Intermediate: 3–4 sets of 10–15 reps
- Advanced: Use tempo, pauses, or variations instead of excessive reps
The American College of Sports Medicine (ACSM) recommends focusing on controlled technique and gradual progression rather than rushing volume.
Who Should Avoid or Modify Reverse Crunches
Reverse crunches are not suitable for everyone without adjustments.
- People with active or worsening lower-back pain
- Those with recent spinal injury or surgery
- Anyone who cannot control pelvic tilt without arching the lower back
Modify instead of avoiding by:
- Reducing range of motion
- Using bent knees instead of straight legs
- Slowing the tempo
Stop the exercise if pain occurs and consult a qualified professional if symptoms persist.
Are Reverse Crunches Safe for Lower Back Pain?
For many people, reverse crunches are well tolerated because they avoid repeated neck flexion. However:
- Keep movements slow and pain-free
- Stop if you feel sharp lower-back discomfort
- Avoid excessive pelvic lift
- Seek professional guidance if you have a history of spinal injury
The American College of Physicians recognizes exercise and physical therapy as first-line approaches for many non-specific back pain cases, but exercises should always be individualized.
Reverse Crunch Exercise FAQs
Do reverse crunches really target lower abs?
They activate the entire rectus abdominis. You may feel them more in the lower region due to pelvic movement, but true isolation of “lower abs” is not anatomically possible.
Are reverse crunches better than regular crunches?
They are different. Reverse crunches reduce neck strain and emphasize pelvic control, while traditional crunches emphasize upper spinal flexion.
Can beginners do reverse crunches?
Yes. Start with bent knees and a small range of motion, focusing on control.
Do reverse crunches burn belly fat?
No exercise burns fat in one specific area. Fat loss depends on overall calorie balance and activity level.
Can I do reverse crunches every day?
Light core activation can be done frequently, but muscles still benefit from rest. Two to four sessions per week is typical.
Do reverse crunches require equipment?
No. They are a bodyweight exercise suitable for home workouts.
Conclusion
The reverse crunch exercise is a simple yet effective way to strengthen your core while minimizing neck strain and improving pelvic control. When performed slowly and correctly, it can be a valuable addition to both beginner and advanced abdominal routines.
If you are building a balanced core program, combine reverse crunches with stability, anti-rotation, and functional movements for the best long-term results.
References
- ACE Study PDF: New Study Puts the Crunch on Ineffective Ab Exercises
- Mandroukas et al. 2022: Surface EMG Activity of Upper vs Lower Rectus Abdominis During Ab Exercises (PMC)
- Oliva-Lozano et al. 2020: Core Muscle Activity During Physical Fitness Exercises (Systematic Review, PMC)
- Harvard Health: The Real-World Benefits of Strengthening Your Core
- Harvard Health: Taking Aim at Belly Fat (Spot Reduction Clarification)
- American College of Physicians: Noninvasive Treatments for Acute, Subacute, and Chronic Low Back Pain (Guideline)