
Walking lunges are a step-forward lunge variation where you “walk” forward each rep, training single-leg strength, balance, and lower-body endurance. Done with clean technique, they’re one of the most effective leg exercises you can do with just bodyweight or a pair of dumbbells.
Walking lunges look simple, but small form mistakes (step length, knee tracking, trunk position) can change what you feel and how your joints handle the load. This guide shows you exactly how to do walking lunges with strong, safe mechanics, then gives you the best variations and programming options.
What are walking lunges
A walking lunge is a forward lunge performed continuously: you step forward, lower under control, stand up through the front leg, then bring the back leg through into the next step.
Compared with stationary lunges, walking lunges typically:
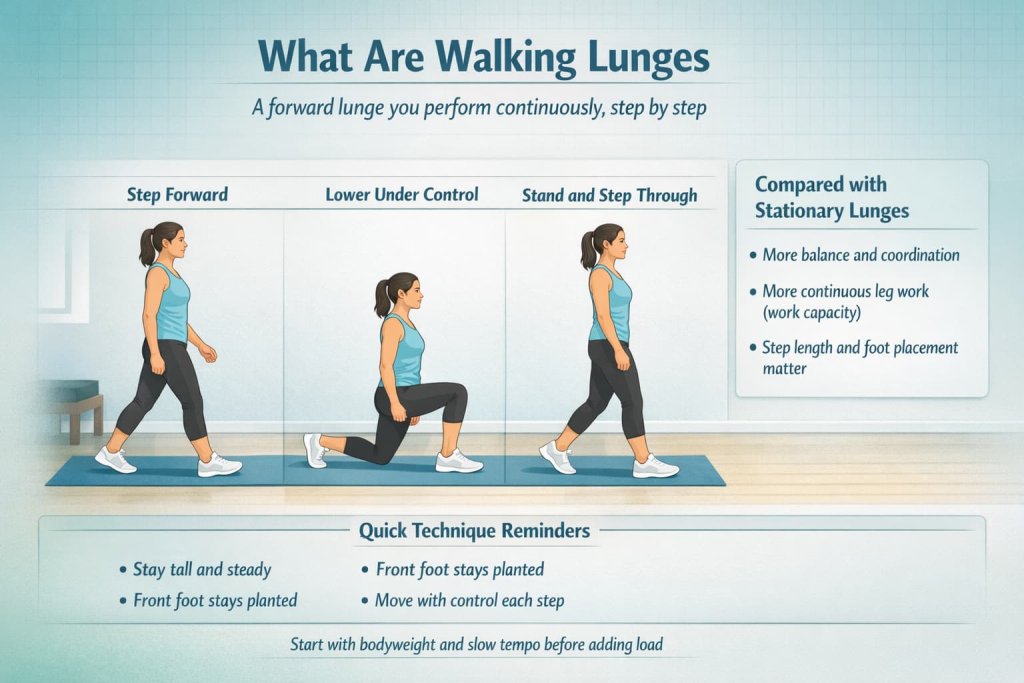
- Add a balance and coordination challenge because you’re moving forward each rep
- Build more “work capacity” in the legs because you maintain tension longer
- Make step length and foot placement matter more for comfort and control
For a clear baseline on lunge mechanics, the American Council on Exercise (ACE) outlines the key lunge positions you’ll use in a walking lunge.
How to do walking lunges with perfect form
How to do it:
- Stand tall with feet hip-width apart and brace your core.
- Step forward far enough to keep your front heel down as you lower.
- Lower under control until both knees bend comfortably (use “about 90 degrees” as a guide, not a rule).
- Keep your torso tall and your hips square as you descend.
- Push through the whole front foot to stand up (think heel + midfoot).
- Bring the back leg through and step straight into the next rep.
- Repeat for the planned number of steps per leg.
Trainer Tip: Make your steps “quiet.” If your feet slam the floor or you drop fast into the bottom, slow down and shorten the range slightly until every rep is controlled.
Best walking lunge variations and when to use them
Pick a walking lunge variation based on your goal and how stable you feel with each step. Start with bodyweight for control, then add load or change the hold position to shift emphasis and challenge.
1. Bodyweight walking lunge
How to do it:
- Follow the main walking lunge steps above.
- Use a slower tempo (2–3 seconds down) to build control.
- Pause briefly at the bottom if balance is your limiter.
Why it works: Bodyweight reps let you master step length, knee tracking, and balance before adding load.
Muscles worked: Glutes, quads, hamstrings, calves, core stabilizers.
Trainer Tip: If balance is tough, reduce range slightly and focus on “steady feet” rather than deep reps.
2. Dumbbell walking lunge
How to do it:
- Hold dumbbells at your sides with shoulders relaxed.
- Keep the weights still (avoid swinging) as you step and stand.
- Maintain the same controlled tempo you used with bodyweight.
Why it works: It’s the simplest way to progressively overload walking lunges while keeping the movement pattern natural.
Muscles worked: Glutes, quads, hamstrings, grip/upper back stabilizers, core.
Trainer Tip: If your torso tips forward, the load is too heavy or your steps are too long. Reduce weight first.
3. Front-loaded walking lunge (goblet or front rack)
How to do it:
- Hold one dumbbell/kettlebell at chest level (goblet) or two dumbbells at shoulders (front rack).
- Brace your core harder to keep ribs down and torso tall.
- Step and lower with the same “two tracks” foot placement.
Why it works: Front-loading increases trunk bracing demands and often helps people stay more upright.
Muscles worked: Quads, glutes, core stabilizers, upper back.
Trainer Tip: Keep elbows slightly forward and the weight close to your chest to avoid upper-back fatigue taking over.
4. Glute-focused walking lunge (cue-based)
How to do it:
- Take a slightly longer step than usual (still controlled, heel stays down).
- Keep a tall torso and sit your hips “down and back” slightly as you lower.
- Push through heel + midfoot and squeeze the glute as you stand.
Why it works: Step length and intent can shift where you feel the work, and coaching resources often emphasize strategies to enhance glute recruitment in single-leg patterns, including guidance from the National Strength and Conditioning Association (NSCA).
Muscles worked: Glutes (high emphasis), hamstrings, quads, adductors, core.
Trainer Tip: Don’t chase extra-long steps if you lose balance or your front heel lifts. Control beats range.
Benefits of walking lunges
Walking lunges are popular for good reasons:
- Build single-leg strength that carries over to sports and daily life
- Train glutes and quads together while challenging hip and core stability
- Improve balance and coordination because each rep includes a controlled step and transition
- Work well with minimal equipment (bodyweight, dumbbells, or a weighted vest)
- Scale easily by changing step length, tempo, or load
Muscles worked in walking lunges
Walking lunges primarily train:
- Glutes (especially glute max for hip extension as you stand up)
- Quadriceps (knee extension on the front leg)
- Hamstrings (assist hip extension and stabilize the knee/hip)
- Adductors (help control the leg and pelvis)
- Calves and foot/ankle stabilizers
- Core and trunk stabilizers (to resist tipping or twisting)
Research on lunge variations shows walking lunges are commonly associated with strong quadriceps involvement, and load/carry position can influence muscle demands and stability requirements, as discussed in research available through PubMed Central (PMC).
Walking lunges form checklist
Use this quick checklist before you start:
- Tall posture, ribs stacked over hips
- Front foot stays planted (no rocking onto toes)
- Knee tracks in line with the middle toes (no collapsing inward)
- Controlled lower and controlled stand (no “drop” into the bottom)
- Smooth transition into the next step without wobbling
Common walking lunge mistakes and quick fixes
Mistake 1: Step is too short
What it looks like: front knee travels far forward, heel wants to lift, you feel it mostly in the knee.
Fix: take a slightly longer step and keep the front heel heavy.
Mistake 2: Knee caves inward
What it looks like: front knee collapses toward the big toe line or inside it.
Fix: think “knee over middle toes,” and lightly drive the knee outward while keeping the whole foot planted.
Mistake 3: Wobbling side-to-side
What it looks like: hips shift, torso tilts, feet land on a “tightrope.”
Fix: walk on two tracks (feet under hips, not directly in front of each other). Slow the transition.
Mistake 4: Falling forward at the torso
What it looks like: you hinge a lot and lose the tall posture.
Fix: reduce load, keep ribs stacked over hips, and brace like you’re about to cough.
Mistake 5: Pushing off the back toes too much
What it looks like: you spring forward and lose control.
Fix: stand up by pushing the floor away with the front leg first, then step through smoothly.
Sets, reps, and programming for walking lunges
How you program walking lunges depends on your goal:
For strength and muscle
- 3–5 sets of 8–12 total steps per leg
- Rest 60–120 seconds
- Add load slowly (dumbbells) when your balance and control stay consistent
For endurance and conditioning
- 2–4 sets of 12–20 total steps per leg
- Rest 30–60 seconds
- Keep form strict; stop sets early if knees cave or you start wobbling
Simple progression plan
- Week 1–2: bodyweight, slower tempo, fewer steps
- Week 3–4: add light dumbbells
- Week 5+: increase load or steps, not both at the same time
If you’re building a general fitness plan, it helps to pair lunges with overall activity guidelines, and the CDC explains a simple target: regular aerobic activity plus muscle-strengthening work on 2 or more days per week.
Walking lunges for knees, hips, and lower back safety
Walking lunges are usually well tolerated when form and load match your current capacity, but they’re not the best choice for everyone on every day.
Consider swapping to a more stable variation (split squat, stationary lunge, or reverse lunge) if you:
- Can’t keep the front heel down
- Can’t control knee tracking
- Feel sharp pain (not just effort) in the knee, hip, or back
- Lose balance often, even with slower reps
Warm-up for walking lunges
A quick warm-up that improves lunge comfort:
- 30–60 seconds of easy marching or brisk walking
- 6–8 bodyweight squats to a comfortable depth
- 6–8 reverse lunges per side (slow and controlled)
- 10–20 seconds of calf rocks (gentle ankle mobility)
Then do 1 lighter “practice set” of walking lunges before your working sets.
FAQs about walking lunges
Are walking lunges better than stationary lunges?
They’re not “better,” just different. Walking lunges add a bigger balance and transition challenge, while stationary lunges make it easier to stay stable and load heavier.
What muscles do walking lunges work most?
Most people feel them in the quads and glutes, with hamstrings and adductors assisting and stabilizing.
How many walking lunges should I do?
A common starting point is 2–3 sets of 8–10 steps per leg with bodyweight. Build from there by adding steps or light dumbbells once every rep stays controlled.
Why do I lose balance during walking lunges?
Usually it’s foot placement (too narrow like a tightrope), rushing the transition, or stepping too long. Walk on “two tracks,” slow down, and keep the trunk braced.
Should my knee go past my toes?
It can, depending on your body proportions and step length. The more important cues are: heel stays down, knee tracks with your toes, and the rep stays controlled.
Can I do walking lunges if I have knee pain?
If lunges aggravate pain, scale first: shorter range, slower tempo, bodyweight only, or switch to a more stable lunge variation. If pain persists, get guidance from a qualified professional.
Are walking lunges good for fat loss?
They can support fat loss as part of a full plan because they build muscle and raise effort, but results depend on your overall activity and nutrition habits.
Conclusion
Walking lunges are a high-value leg exercise because they build strength, glute-and-quad development, and real-world balance in one movement. Start with bodyweight, master step length and knee tracking, then add dumbbells or front-loading as you get steadier. Keep reps controlled, stop sets before form breaks down, and progress one variable at a time.
References
- Farrokhi, S., Pollard, C. D., Souza, R. B., Chen, Y.-J., Reischl, S., & Powers, C. M. (2008). Trunk position influences the kinematics, kinetics, and muscle activity of the lead lower extremity during the forward lunge exercise. Journal of Orthopaedic & Sports Physical Therapy. PubMed
- Riemann, B. L., Lapinski, S., Smith, L., & Davies, G. J. (2012). Biomechanical analysis of the anterior lunge during 4 external-load conditions. Journal of Athletic Training. PubMed Central (PMC)
- Park, S. (2016). Comparative analysis of lunge techniques: forward, reverse, and walking lunge. Conference Proceedings Archive. University of Konstanz Open Journal Systems
- Ratamess, N. A., et al. (2009). American College of Sports Medicine position stand: progression models in resistance training for healthy adults. Medicine & Science in Sports & Exercise. PubMed