
Hip labral tear exercises are movements designed to reduce pain, improve hip stability, and strengthen the muscles that protect your hip joint. They help support the labrum by improving mechanics around the hip and reducing unnecessary stress on irritated tissue.
Understanding how to strengthen the hip safely is important because labral tears often cause groin pain, clicking, catching, or instability. Controlled, PT-approved exercises may help improve mobility, strengthen the glutes and core, and restore functional movement—especially when combined with guidance from a physical therapist.
Below, you’ll find 10 safe, beginner-friendly exercises, key precautions, a warm-up routine, safety guidelines, and answers to common questions.
Why Hip Labral Tear Exercises Matter
Hip labral tear exercises matter because they help:
- Reduce joint stress by strengthening the hip stabilizers.
- Improve pelvic control and gait mechanics.
- Support the labrum by improving the way the hip loads.
- Reduce symptoms like clicking, catching, and pinching (when exercises are kept pain-free).
- Build strength in the glutes, core, and deep hip muscles, which commonly weaken when hip pain develops.
Most reputable orthopedic and PT resources emphasize that glute strengthening + core stability are essential for reducing mechanical irritation around the labrum.
10 Best Hip Labral Tear Exercises for Pain Relief and Safe Strengthening
These exercises strengthen the glutes, core, and deep hip stabilizers to reduce joint stress and improve movement control. Each movement is designed to be safe, pain-free, and supportive for people managing a hip labral tear.
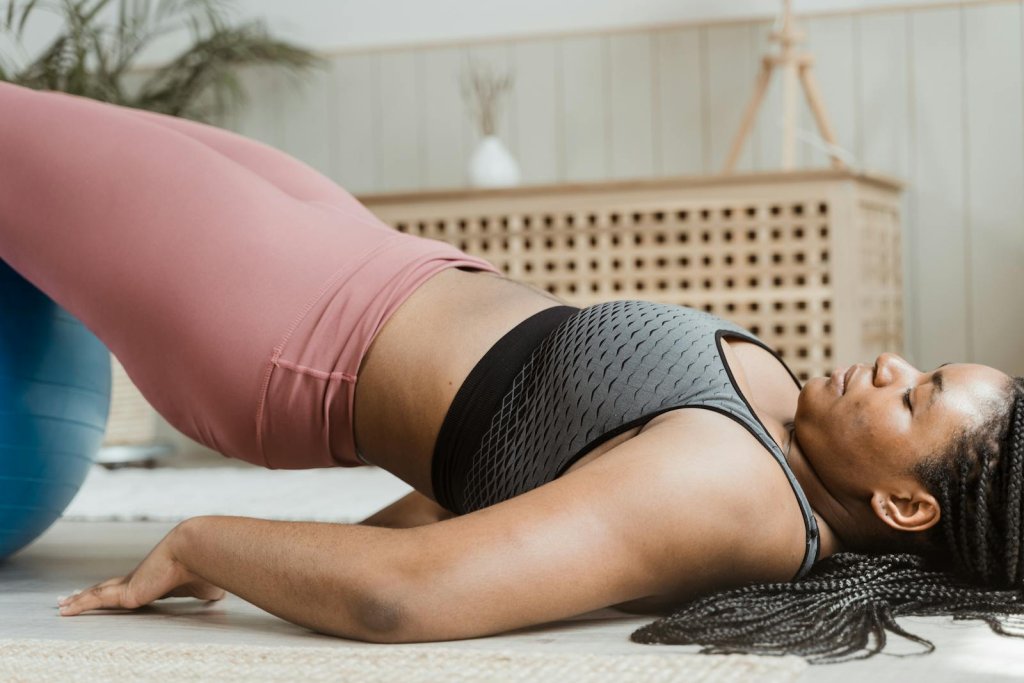
1. Glute Bridge
Why it works:
This exercise strengthens the gluteus maximus, which reduces the load placed on the hip joint and helps stabilize the pelvis during walking and standing. Strong glutes decrease anterior hip stress, which is especially important when the labrum is irritated.
Muscles worked:
Gluteus maximus, hamstrings, deep hip stabilizers, lower-back stabilizers.
How to do it:
- Lie on your back with knees bent and feet hip-width apart.
- Engage your core by gently drawing your ribs downward.
- Press through your heels and lift your hips until your body forms a straight line from shoulders to knees.
- Hold the top position for 1–2 seconds without letting your lower back arch.
- Lower slowly with full control.
Trainer Tip:
If you feel the work in your lower back instead of your glutes, move your feet slightly closer to your body.
2. Clamshell
Why it works:
Clamshells activate the gluteus medius and deep rotators, which improve lateral hip stability and help control femoral internal rotation—two key factors in reducing stress on the labrum.
Muscles worked:
Gluteus medius, gluteus minimus, deep external rotators.
How to do it:
- Lie on your side with knees bent at roughly 45 degrees.
- Keep feet stacked and together.
- Without rolling your hips backward, lift the top knee a few inches.
- Pause briefly and lower slowly.
- Keep the motion small and controlled.
Trainer Tip:
Place a hand on the top hip to ensure it stays still—you should feel the work in the side glute, not your lower back.
3. Side-Lying Hip Abduction
Why it works:
This movement strengthens the outer hip muscles that stabilize the pelvis when you stand or walk. Better lateral hip strength reduces inward knee collapse, which can aggravate hip labral symptoms.
Muscles worked:
Gluteus medius, gluteus minimus, TFL (minimally).
How to do it:
- Lie on your side with bottom leg bent for support.
- Straighten the top leg and point toes slightly forward.
- Lift the leg toward the ceiling without rotating outward.
- Lower slowly while keeping tension in the side hip.
Trainer Tip:
If you feel the TFL working more than the glute, move your leg slightly behind your body before lifting.
4. Dead Bug
Why it works:
Improves core stability and pelvic control, which reduces unnecessary movement at the hip joint. A stable pelvis decreases the mechanical load placed on the labrum during daily activities.
Muscles worked:
Deep core (transverse abdominis), hip flexors (light activation), spinal stabilizers.
How to do it:
- Lie on your back with arms up and knees bent at 90 degrees.
- Press your lower back gently into the floor.
- Lower the opposite arm and leg toward the floor without letting your back lift.
- Return to the start and alternate sides slowly.
Trainer Tip:
Move slowly and keep breathing—if your back arches, reduce the range.
5. Standing Hip Abduction (Band Optional)
Why it works:
This standing version strengthens the glute medius in a functional position, helping improve stability during walking, stair climbing, and single-leg movements.
Muscles worked:
Gluteus medius, gluteus minimus, lateral hip stabilizers.
How to do it:
- Stand tall holding a wall or chair.
- Keep toes pointed forward and lift the working leg outward.
- Avoid leaning your torso.
- Lower the leg slowly under control.
Trainer Tip:
Use only light resistance—too much tension can cause pinching in the front of the hip.
6. Quadruped Hip Extension (Kickback)
Why it works:
Strengthens the gluteus maximus without forcing the hip into deep flexion or rotation. This helps protect the labrum while improving hip extension strength.
Muscles worked:
Gluteus maximus, core stabilizers, deep hip stabilizers.
How to do it:
- Start on hands and knees with a neutral spine.
- Brace your core and lift one leg straight back without arching your lower back.
- Pause briefly at the top.
- Lower with control and switch sides.
Trainer Tip:
Keep your pelvis square—avoid rotating or lifting the hip on the working side.
7. Modified Side Plank (Knees Bent)
Why it works:
Targets the lateral core and hip stabilizers that control pelvic alignment. Reducing excessive pelvic drop helps decrease strain on the hip labrum during walking.
Muscles worked:
Obliques, quadratus lumborum, gluteus medius.
How to do it:
- Lie on your side with knees bent and elbow directly under your shoulder.
- Lift your hips until your body forms a straight line from shoulder to knee.
- Hold 10–20 seconds and lower gently.
Trainer Tip:
If your shoulder feels stressed, push your forearm firmly into the floor to activate the core more effectively.
8. Supported Single-Leg Balance
Why it works:
Enhances hip and pelvis stability by training the glute medius and deep stabilizers to maintain alignment during single-leg stance. This reduces stress on the hip when walking or climbing stairs.
Muscles worked:
Gluteus medius, deep hip stabilizers, core stabilizers.
How to do it:
- Stand tall near a wall or sturdy surface.
- Shift weight onto one leg and lift the opposite foot slightly.
- Keep hips level and torso upright.
- Hold 10–20 seconds, then switch sides.
Trainer Tip:
If your hip drops or your knee caves inward, lightly touch the wall or shorten the hold time.
9. Mini Squat (Pain-Free Range)
Why it works:
Strengthens the legs and glutes without placing the hip into deep flexion, helping rebuild functional strength while protecting the labrum.
Muscles worked:
Quadriceps, glutes, core stabilizers.
How to do it:
- Stand with feet shoulder-width apart.
- Sit back into a shallow squat—only go as low as is pain-free.
- Keep knees aligned with toes.
- Return to standing slowly.
Trainer Tip:
If you feel pinching in the front of the hip, shorten the depth or slightly widen your stance.
10. Hip Flexor Isometric (Standing)
Why it works:
Strengthens the hip flexors without forcing the hip into deep flexion, helping improve stability and decreasing irritation around the anterior hip joint.
Muscles worked:
Iliopsoas, rectus femoris, deep hip stabilizers.
How to do it:
- Stand tall and lift one knee a few inches.
- Hold the position for 5–10 seconds without pain.
- Lower and repeat on the other side.
- Keep movements slow and controlled.
Trainer Tip:
Focus on maintaining tall posture—leaning back increases hip joint stress.
Safety Guidelines Before You Start Hip Labral Tear Exercises
Follow these guidelines before beginning:
- Stay in a pain-free range—avoid sharp clicking, catching, or pinching.
- Avoid deep hip flexion (e.g., deep squats, knees-to-chest) if it increases symptoms.
- Limit FADIR position (hip flexion, adduction, internal rotation), which can worsen symptoms in some people.
- Start slow and progress gradually—begin with light resistance or bodyweight only.
- Avoid high-impact activities like running or jumping during flare-ups.
- Use a stable surface for balance exercises.
- Consult a medical provider if you experience locking, giving way, or persistent worsening pain.
What to Avoid With Hip Labral Tears
- Deep squats
- High-impact workouts during flare-ups
- Stretching into pain
- Twisting movements that cause catching
- Heavy lifting requiring end-range hip flexion
- Sitting cross-legged for long periods if it worsens symptoms
When to Avoid Hip Labral Tear Exercises
Certain symptoms mean you should stop exercising immediately and avoid continuing until evaluated by a professional.
Stop right away if you feel:
- Sharp pinching or catching in the front of the hip
- Mechanical locking or the hip “getting stuck”
- Sudden giving way or instability
- Pain radiating into the groin or leg
- Numbness, tingling, or unusual weakness
Avoid exercising temporarily if:
- You’re in a flare-up with sharp or worsening pain
- Clicking becomes painful during movement
- Pain lasts longer than 24–48 hours after a session
- You can’t stay in a pain-free range, even with light modifications
When to See a Doctor or Physical Therapist
Seek professional guidance if you notice:
- Persistent clicking, catching, or locking
- Pain lasting longer than 4–6 weeks
- Giving way or instability
- Pain radiating into the groin or thigh
- Difficulty walking, standing, or performing daily activities
Orthopedic evaluation may include X-ray or MRI arthrogram. Many clinicians recommend 6–8 weeks of PT before considering surgical options unless severe mechanical symptoms are present.
FAQ
1. Can hip labral tears heal with exercise?
Most tears do not fully “heal,” but exercises may significantly reduce pain and improve hip function.
2. Should these exercises hurt?
No. Sharp pinching, catching, or clicking means the movement should be modified or stopped.
3. How often should I do these exercises?
Most people benefit from 2–3 sessions per week of strength work, progressing gradually.
4. Are these exercises safe if I have FAI?
Yes, as long as you avoid positions that reproduce impingement and stay in a pain-free range.
5. Can exercise help me avoid surgery?
Many patients improve enough with PT to avoid surgery, but results vary.
6. What if my hip keeps catching even with exercises?
Stop and seek evaluation—mechanical catching should be assessed by a specialist.
Conclusion
Hip labral tear exercises can support stability, reduce pain, and improve overall hip function when performed correctly and consistently. By strengthening the glutes, core, and deep hip stabilizers, you help protect the labrum and improve daily movement patterns. Begin slowly, avoid painful ranges, and work with a healthcare professional if symptoms persist.
References
- Mayo Clinic – Hip labral tear: Diagnosis & treatment
- Cleveland Clinic – Hip Labral Tear: Symptoms & Treatment
- Johns Hopkins Medicine – Hip Labral Tear
- Matache BA et al. – Management of Labral Tears in the Hip: A Consensus Statement (2025)
- University of Utah – Physical Therapy Prescription: Non-operative Hip Labral Tear
- Children’s Hospital of Philadelphia – Non-operative Femoral Acetabular Impingement / Labral Tear Protocol
- AAOS OrthoInfo – Hip Conditioning Program (Hip Rehab Exercises)