
If you’re looking for exercises for hip pain, the good news is that gentle stretching and strengthening can help reduce stiffness, improve mobility, and support the hip joint. Understanding the right movements matters because hip pain often comes from tight muscles, weak glutes, poor mobility, or irritation from daily habits like sitting too long.

These exercises support hip strength, flexibility, and stability. They’re safe for most adults, require no equipment, and follow guidance. If your pain is severe or from injury, always confirm with a doctor before starting any new routine.
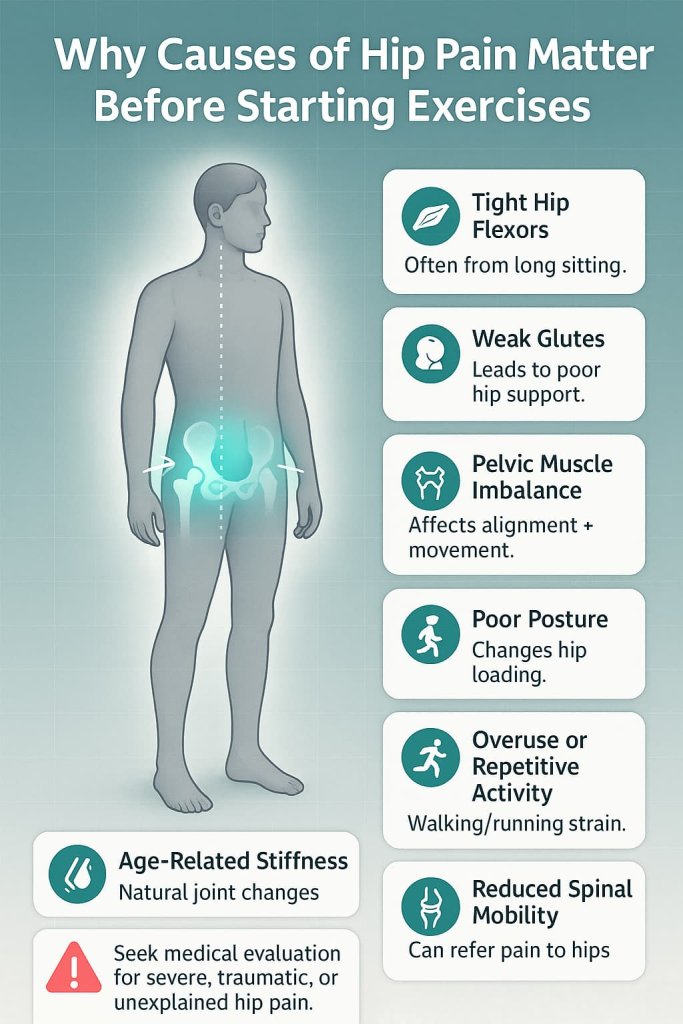
Why Causes of Hip Pain Matter Before Starting Exercises
Understanding what causes hip pain is important because not all hip discomfort comes from the same source. Some hip pain is related to tight muscles, some comes from weakness or imbalance, and other times it is due to joint irritation, posture issues, or overuse. Knowing the cause helps you choose the safest exercises and avoid movements that may worsen your symptoms.
Common contributors to hip pain include:
- Tight hip flexors from prolonged sitting
- Weak glutes or hip stabilizers
- Muscle imbalances around the pelvis
- Poor posture or gait patterns
- Overuse from walking, running, or repetitive activity
- Age-related stiffness or joint changes
- Reduced mobility in the spine or pelvis
Exercises can support mobility, reduce stiffness, and strengthen surrounding muscles, but only when chosen according to the underlying cause. If your hip pain is severe, linked to trauma, or accompanied by symptoms like swelling or numbness, always seek medical evaluation before exercising.
The 16 Best Exercises for Hip Pain Relief
These beginner-friendly exercises are designed to ease stiffness, strengthen key hip muscles, and improve daily movement comfort. Perform each one slowly, stay pain-free, and choose the variations that feel best for your body.
1. Knee-to-Chest Stretch (Single Leg)
Why it works:
This stretch reduces tightness in the glutes and lower back—two major areas that often refer pain into the hip. By gently opening the posterior chain, it helps decrease pressure around the hip joint and improves movement comfort.
Muscles worked:
Gluteus maximus, lower back (erector spinae), deep rotators of the hip.
How to do it:
- Lie flat on your back with both legs extended.
- Bend one knee and gently pull it toward your chest with both hands.
- Keep your opposite leg relaxed on the floor.
- Hold 20–30 seconds, then switch sides.
- Repeat 2–4 times per leg.
Trainer Tip:
Relax your shoulders and keep your head supported—avoid pulling too aggressively.
2. Double Knee-to-Chest Stretch
Why it works:
Opening both hips at once helps release tension in the lower back and pelvic region. This position can ease general hip tightness and improve spine mobility.
Muscles worked:
Lower back muscles, glutes, deep hip stabilizers.
How to do it:
- Lie on your back and bring both knees toward your chest.
- Gently wrap your arms around your shins.
- Hold 20–30 seconds.
- Repeat 2–3 times.
Trainer Tip:
If this position strains your lower back, perform the single-leg version instead.
3. Figure-4 Stretch (Piriformis Stretch)
Why it works:
This stretch targets the piriformis and deep glute muscles, which often contribute to hip or sciatic-type discomfort. It reduces tightness that can cause pain during walking or sitting.
Muscles worked:
Piriformis, gluteus medius, gluteus minimus, outer hip muscles.
How to do it:
- Lie on your back with knees bent.
- Cross your right ankle over your left knee.
- Pull the left thigh gently toward your chest.
- Hold for 20–30 seconds per side.
- Switch and repeat.
Trainer Tip:
Keep your hips square—avoid twisting your torso or lifting one hip.
4. Seated Hamstring Stretch
Why it works:
Tight hamstrings can limit hip joint mobility and increase strain on the hips. Stretching the back of the thigh helps reduce pulling sensations and improves functional movement.
Muscles worked:
Hamstrings, calves (secondary), lower back (light involvement).
How to do it:
- Sit with one leg extended and the other bent.
- Lean forward from your hips, reaching toward your foot.
- Keep your spine long.
- Hold 20–30 seconds, then switch sides.
- Repeat 2–3 times.
Trainer Tip:
Avoid rounding your back—focus on hinging at the hips.
5. Hip Flexor Stretch (Half-Kneeling)
Why it works:
This stretch reduces tightness in the hip flexors, which commonly stiffen from long periods of sitting. Loosening them helps improve posture and reduce front-hip pain.
Muscles worked:
Iliopsoas, rectus femoris, quadriceps, anterior hip tissues.
How to do it:
- Kneel on one knee with the other foot in front (90° angle).
- Gently shift forward until you feel a stretch in your front hip.
- Keep your torso upright.
- Hold 20–30 seconds each side.
Trainer Tip:
Tuck your pelvis slightly (“tailbone forward”) to deepen the stretch without arching your back.
6. IT Band / Outer Hip Stretch
Why it works:
This stretch targets the outer hip, thigh, and IT band area—common sources of lateral hip discomfort. It helps improve flexibility in tissues that often become tight from walking, running, or standing.
Muscles worked:
Tensor fasciae latae (TFL), gluteus medius, outer thigh/IT band region.
How to do it:
- Stand tall and cross one foot behind the other.
- Lean sideways toward the front leg.
- Hold 20–30 seconds.
- Switch sides and repeat.
Trainer Tip:
Keep both hips facing forward—avoid rotating your torso.
7. Glute Bridge
Why it works:
Strengthens the glutes—the primary stabilizers of the hip joint. More glute strength reduces pressure on the hips and lower back.
Muscles worked:
Gluteus maximus, hamstrings, core stabilizers.
How to do it:
- Lie on your back with knees bent and feet flat.
- Push through your heels to lift your hips upward.
- Hold 1–2 seconds at the top.
- Lower with control.
- Perform 8–12 reps.
Trainer Tip:
Avoid arching your lower back—focus on squeezing your glutes at the top.
8. Clamshells
Why it works:
Targeting the gluteus medius helps stabilize the pelvis and reduce stress on the hip joint during walking and standing.
Muscles worked:
Gluteus medius, gluteus minimus, deep hip rotators.
How to do it:
- Lie on your side with hips stacked and knees bent.
- Keeping feet together, lift your top knee upward.
- Pause, then lower.
- Perform 10–15 reps per side.
Trainer Tip:
Avoid rolling your hips backward—motion should come from the hip, not the torso.
9. Side-Lying Hip Abduction
Why it works:
Strengthens the outer hip muscles that control pelvic alignment. This improves stability and reduces irritation during daily movements.
Muscles worked:
Gluteus medius, gluteus minimus, TFL.
How to do it:
- Lie on your side with legs straight and stacked.
- Lift the top leg slightly above hip height.
- Lower slowly.
- Perform 10–15 reps per side.
Trainer Tip:
Point your toes forward—not upward—to avoid shifting the work to your hip flexors.
10. Side-Lying Hip Adduction
Why it works:
Strengthens the inner thigh muscles, which balance the hips and help prevent instability.
Muscles worked:
Adductor longus, brevis, magnus, gracilis.
How to do it:
- Lie on your side.
- Cross your top leg over the bottom leg.
- Lift your bottom leg upward.
- Perform 10–12 controlled reps.
Trainer Tip:
Move slowly and stay within a comfortable range of motion.
11. Prone Hip Extension
Why it works:
Strengthens the hip extensors, improves posture, and supports hip alignment during walking and standing.
Muscles worked:
Gluteus maximus, hamstrings, spinal stabilizers.
How to do it:
- Lie face down with legs extended.
- Lift one leg a few inches off the floor.
- Pause briefly, then lower.
- Perform 8–12 reps per side.
Trainer Tip:
Keep your pelvis still—avoid arching your lower back to lift the leg.
12. Standing Hip Flexion
Why it works:
Helps strengthen the hip flexors, which support walking mechanics and improve leg lifting strength.
Muscles worked:
Iliopsoas, rectus femoris, lower abdominals (secondary).
How to do it:
- Stand tall holding a chair for balance.
- Lift one knee toward your chest.
- Lower with control.
- Perform 10–12 reps per leg.
Trainer Tip:
Avoid swinging—lift with controlled muscle effort.
13. Standing Hip Abduction
Why it works:
Improves lateral hip stability—essential for balance, posture, and pelvic alignment.
Muscles worked:
Gluteus medius, gluteus minimus, TFL.
How to do it:
- Hold a chair for support.
- Lift one leg out to the side, keeping it straight.
- Lower slowly.
- Perform 10–15 reps per side.
Trainer Tip:
Do not lean your torso—keep your spine straight.
14. Standing Hip Extension
Why it works:
Strengthens the muscles behind the hip to improve gait mechanics and support overall hip function.
Muscles worked:
Gluteus maximus, hamstrings, deep hip stabilizers.
How to do it:
- Hold a chair with both hands.
- Extend one leg backward without arching your back.
- Lower slowly.
- Perform 10–12 reps per side.
Trainer Tip:
Tighten your core to avoid leaning forward or arching.
15. Sit-to-Stand (Chair Squats)
Why it works:
Builds functional strength for everyday tasks like sitting, standing, climbing, and bending. Reduces hip pressure by improving glute and quad strength.
Muscles worked:
Glutes, quadriceps, hamstrings, core.
How to do it:
- Sit on a sturdy chair.
- Stand up without pushing off with your hands.
- Lower back down slowly.
- Perform 8–12 reps.
Trainer Tip:
Push through your heels to activate your glutes more effectively.
16. Gentle Side Steps or Mini Band Walks
Why it works:
Strengthens the lateral hip muscles that improve side-to-side stability and reduce hip irritation during walking.
Muscles worked:
Gluteus medius, gluteus minimus, TFL, outer thigh.
How to do it:
- Stand with knees slightly bent.
- Step sideways 10–12 steps.
- Repeat in the opposite direction.
- Add a light band around your legs for progression.
Trainer Tip:
Keep your hips level—avoid swaying or rotating your torso.
How Often Should You Do These Hip Pain Exercises?
For best results, stretch daily and strengthen your hips 2–3 days per week.
Use this simple schedule:
- Mobility/stretches: Daily, 20–30 seconds each
- Strength exercises: 2–3 times weekly, 8–12 reps
- Light cardio: Most days (walking, cycling, swimming)
If soreness lasts more than 24 hours, reduce intensity.
Safety Guidelines & When to Stop
Keep movements slow and pain-free. Use support when needed and avoid forcing range of motion.
Stop immediately and seek medical care if you notice:
- Sudden or severe pain
- Inability to bear weight
- Pain after a fall
- Swelling, redness, or warmth in the hip
- Numbness or tingling down the leg
- Fever or feeling unwell
If you have hip arthritis or past hip surgery, check with your doctor before starting a new routine.
FAQ
1. Can exercises really help hip pain?
Yes. Research shows that stretching and strengthening help reduce stiffness and improve mobility.
2. Should I exercise if my hip hurts?
Light movement is typically better than rest, unless pain is severe or from injury.
3. How long before I see results?
Most people notice improvement within 2–4 weeks of consistent practice.
4. Can these exercises help hip arthritis?
They may support mobility and strength, but always check with a doctor first.
5. What should I avoid if I have hip pain?
High-impact jumping, deep squats, and any movement that causes sharp pain.
6. Are walking and cycling good for hip pain?
Yes—both improve circulation and reduce stiffness.
7. When should I stop exercising?
Stop if you feel sharp pain, numbness, or symptoms that worsen after exercise.
Conclusion
Regular, gentle exercise can support hip mobility, reduce stiffness, and strengthen the muscles that protect your hips. Start slowly, stay consistent, and focus on pain-free movement. If your hip pain persists or worsens, consult your doctor or a licensed physical therapist for personalized guidance.
Take action today: Try 3–4 of these exercises now and build your own simple daily hip pain relief routine.
References
- Teirlinck CH et al. – Effect of exercise therapy in patients with hip osteoarthritis: a systematic review and meta-analysis (2023)
- Bannuru RR et al. – OARSI guidelines for the non-surgical management of knee, hip, and polyarticular osteoarthritis (2019)
- Kolasinski SL et al. – 2019 American College of Rheumatology/Arthritis Foundation guideline for the management of osteoarthritis of the hand, hip, and knee (2020)
- American Academy of Orthopaedic Surgeons (AAOS) – Hip Conditioning Program (OrthoInfo)
- Arthritis Foundation – Hip & Buttock Exercises