
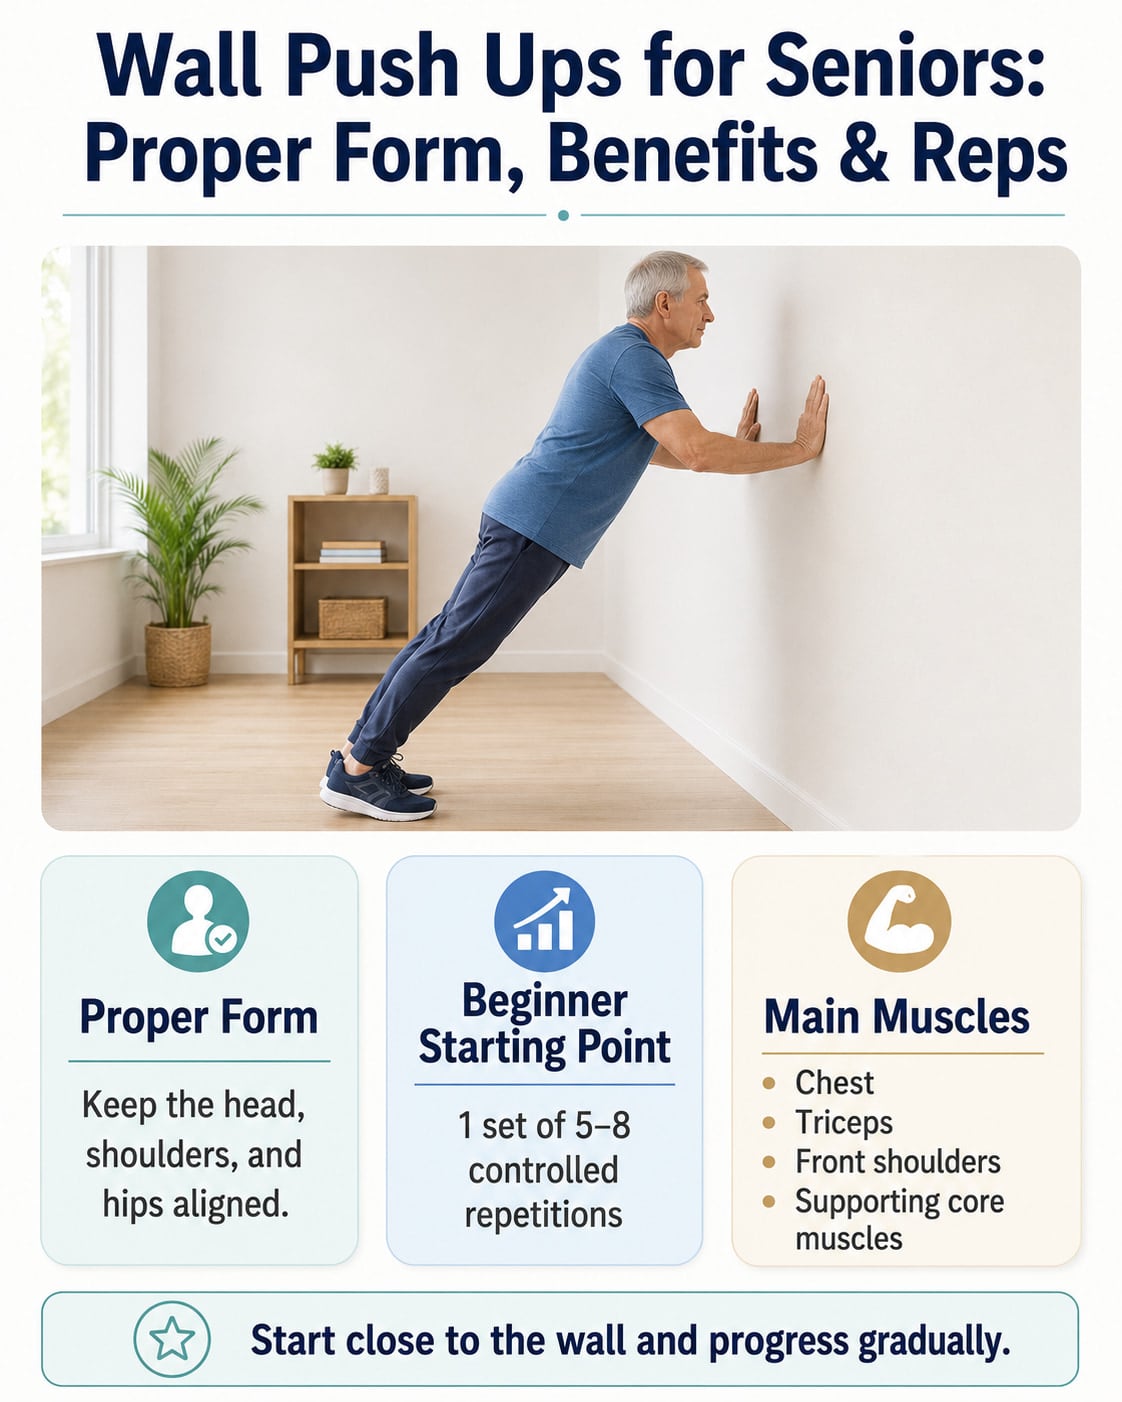
Wall push ups for seniors are an accessible upper-body strength exercise that works the chest, arms, shoulders, and supporting core muscles without requiring you to get down on the floor. Begin with a solid wall, use a comfortable body angle, and try one set of 5–8 slow repetitions before gradually doing more.
Wall push-ups can be especially useful for beginners, older adults returning to exercise, and anyone who finds floor push-ups too difficult. However, they should be part of a balanced routine that also includes lower-body strength, pulling exercises, aerobic activity, and balance practice.
The Centers for Disease Control and Prevention recommends that adults aged 65 and older include muscle-strengthening and balance activities each week, along with appropriate aerobic activity.
Wall Push-Ups for Seniors at a Glance
| Category | Details |
|---|---|
| Exercise type | Standing bodyweight strength exercise |
| Best for | Beginners, home workouts, and people who prefer not to exercise on the floor |
| Primary muscles | Chest and triceps |
| Supporting muscles | Front shoulders, core, and muscles around the shoulder blades |
| Equipment | A solid wall and nonslip floor |
| Beginner starting point | 1 set of 5–8 repetitions |
| General working range | 1–3 sets of 5–12 repetitions |
| Rest | Approximately 45–90 seconds between sets |
| Frequency | About 2 nonconsecutive days per week |
| Easier option | Stand closer to the wall or use a smaller movement |
| Harder option | Stand farther away or progress to a sturdy countertop |
What Are Wall Push-Ups?
A wall push-up is a modified push-up performed in a standing position. Instead of supporting your body on your hands and feet on the floor, you place your hands against a wall and move your body toward and away from it.
The wall supports some of your body weight, making this variation less demanding than a floor push-up. The more upright your body remains, the easier the movement generally feels.
According to the Mayo Clinic, wall push-ups use body weight as resistance and train the chest and triceps while requiring the abdominal muscles to help maintain a straight body position.
Are Wall Push-Ups Good for Seniors?
Wall push-ups can be a good exercise for many seniors because they:
- Require no gym equipment
- Do not require kneeling or getting down on the floor
- Can be adjusted to different strength levels
- Train useful upper-body pushing strength
- Allow beginners to practice controlled push-up mechanics
The 2026 resistance-training update from the American College of Sports Medicine reports that bodyweight exercises and home-based routines can support improvements in strength and physical function. It also emphasizes that training should be individualized according to a person’s abilities, goals, enjoyment, and safety.
Wall push-ups are not a complete exercise program by themselves. They mainly train the upper-body pushing muscles. Seniors also need movements for the legs, hips, back, abdominal area, and pulling muscles, as well as separate balance and aerobic activities.
How to Do Wall Push-Ups With Proper Form
Step-by-Step Instructions
- Face the wall.
Stand approximately one arm’s length away with your feet about hip-width apart. - Position your hands.
Place both palms flat against the wall at approximately chest or shoulder height. Keep the hands shoulder-width apart or slightly wider, with the fingers pointing upward. - Set your posture.
Keep your head, shoulders, hips, and feet in one long line. Gently tighten your abdominal muscles without holding your breath. - Bend your elbows.
Slowly move your chest toward the wall. Allow the elbows to angle slightly downward and backward rather than flaring directly out to the sides. - Keep your body together.
Your shoulders and hips should move toward the wall at the same time. Avoid bending only at the waist. - Use a comfortable depth.
Move as close to the wall as you can while keeping your body aligned and the movement comfortable. - Push away slowly.
Press through both palms and straighten your arms until you return to the starting position. Do not forcefully snap or lock the elbows. - Repeat with control.
Complete the planned repetitions without bouncing, rushing, or allowing your posture to change.
The NHS similarly recommends standing at arm’s length, keeping the back straight, keeping the elbows closer to the sides, and moving slowly in both directions.
How to Breathe
- Inhale as you move toward the wall.
- Exhale as you push away.
- Continue breathing throughout the repetition.
- Do not hold your breath while pressing.
Simple Form Cue
Think:
“Head, shoulders, and hips move together.”
This helps prevent the hips from drifting forward or the lower back from arching.
Benefits of Wall Push Ups for Seniors
Builds Upper-Body Pushing Strength
Wall push-ups strengthen muscles used when pushing a door, moving an object away from the body, or supporting yourself with your arms.
They are less demanding than floor push-ups, but they can still provide meaningful resistance when performed through a comfortable range with controlled technique.
Provides an Accessible Starting Point
Getting onto and up from the floor can be difficult for people with limited mobility, reduced leg strength, or balance concerns. Wall push-ups allow you to train while standing.
They can also help you learn how to keep your head, trunk, and hips aligned before progressing to a lower surface.
Strengthens the Chest and Arms
The chest muscles move the upper arms toward the center of the body, while the triceps straighten the elbows as you push away from the wall.
These muscles work together during every wall push-up repetition.
Encourages Core Control
Your abdominal and trunk muscles help prevent your lower back from arching and your hips from moving toward the wall ahead of your shoulders.
Wall push-ups are not primarily a core exercise, but maintaining a straight body position requires continuous trunk control.
Can Be Adjusted Easily
You can make wall push-ups easier by standing closer to the wall or reducing the depth. You can make them harder by moving your feet farther back, slowing the movement, or progressing to a stable countertop.
This flexibility allows you to increase the challenge gradually instead of making a sudden jump to floor push-ups.
Requires Little Space or Equipment
All you need is a clear area, a solid wall, and a nonslip surface. This makes wall push-ups practical for home workouts and short activity sessions.
Wall Push-Ups Muscles Worked
Primary Muscles
Pectoralis major: The large chest muscle helps move your upper arms as you press away from the wall.
Triceps: Located at the back of the upper arms, the triceps straighten your elbows during the pushing phase.
Supporting Muscles
Front deltoids: The muscles at the front of the shoulders assist with the pressing movement.
Core muscles: The abdominal and other trunk muscles help maintain a straight body position.
Shoulder-blade stabilizers: Muscles around the shoulder blades help control the position of the upper back and shoulders.
Forearms and hands: These areas support pressure through the palms and help keep your hands stable against the wall.
The chest and triceps produce most of the pushing force. The supporting muscles help keep the shoulders, trunk, and hands controlled.
What You Need Before Starting
Choose an open section of wall that is strong, flat, and free of decorations or objects that could move.
You should also have:
- A dry, nonslip floor
- Stable, supportive footwear
- Enough space to step backward safely
- Comfortable clothing that does not restrict your arms
- A sturdy chair nearby when additional standing support is needed before or after the set
Avoid using a door unless you are certain it cannot open. Do not press against a movable divider, lightweight furniture, unstable table, or rolling surface.
How Many Wall Push-Ups Should Seniors Do?
There is no single repetition target that suits every senior. Your current strength, exercise experience, balance, joint comfort, and health conditions all affect an appropriate starting level.
The NHS suggests attempting 3 sets of 5–10 wall press-ups. General guidance from the American Heart Association states that one set of 8–12 repetitions can be sufficient for many strength exercises. Seniors who are new to exercise may need to begin below these amounts.
Practical Sets and Reps
| Current ability | Suggested starting amount |
|---|---|
| New to exercise or easily fatigued | 1 set of 5–8 reps |
| Beginner with comfortable form | 1–2 sets of 5–10 reps |
| Regular exerciser | 2–3 sets of 8–12 reps |
| Exercise feels consistently easy | 2–3 sets of 10–15 reps, then consider a harder variation |
These are starting ranges, not strict requirements. Five well-controlled repetitions are more useful than 15 rushed repetitions with poor alignment.
Rest Between Sets
Rest for approximately 45–90 seconds between sets. Take longer when needed to restore comfortable breathing and steady posture.
How Hard Should a Set Feel?
The final few repetitions should require effort, but you should still be able to:
- Maintain a straight body position
- Move at a controlled speed
- Breathe normally
- Keep both hands firmly against the wall
- Complete the repetitions without joint pain
You do not need to continue until you are physically unable to perform another repetition. The 2026 ACSM guidance notes that training to complete muscular failure is not necessary for the average healthy adult.
How Often Should Seniors Do Wall Push-Ups?
A practical starting frequency is two nonconsecutive days per week.
For example:
- Monday and Thursday
- Tuesday and Friday
- Wednesday and Saturday
The CDC recommends muscle-strengthening activity on at least two days each week, while the American Heart Association recommends allowing recovery between workouts for the same muscle groups.
A few gentle practice repetitions may be appropriate on another day, but challenging sets do not need to be performed daily.
How to Make Wall Push-Ups Easier
Stand Closer to the Wall
Moving your feet closer makes your body more upright and reduces the amount of body weight supported by your arms.
Use a Smaller Range
Bend your elbows only as far as you can while maintaining a comfortable shoulder position.
Perform Fewer Repetitions
Start with 3–5 repetitions when 5–8 feels too difficult. Add one repetition only when your current amount feels controlled.
Use a Wider Foot Position
Placing your feet slightly wider may provide a more stable standing base. Keep both feet flat and avoid an excessively wide stance.
Slow Down
Moving slowly can make it easier to recognize and correct posture changes before you lose control.
How to Make Wall Push-Ups Harder
Move Your Feet Farther Back
A greater body angle places more resistance through the arms. Move back only a small amount at a time.
Lower More Slowly
Take approximately 2–3 seconds to move toward the wall, pause briefly, and then push away under control.
Add Repetitions
Gradually work toward the top of your chosen repetition range. Do not add repetitions when your form is already deteriorating.
Pause Near the Wall
Hold the lowest comfortable position for one or two seconds before pressing away.
Progress to a Countertop Push-Up
Once 2–3 sets of 12–15 wall push-ups feel easy, consider using a solid countertop. A lower surface increases the percentage of body weight supported by your arms.
Check that the surface cannot move and that your feet will not slide. Avoid using unstable tables, rolling furniture, or lightweight chairs.
Common Wall Push-Up Mistakes
| Mistake | Why it matters | How to correct it |
|---|---|---|
| Hips move toward the wall first | Reduces trunk control | Move the shoulders and hips together |
| Lower back arches | Changes body alignment | Gently brace the abdominal muscles |
| Head reaches forward | May strain the neck | Keep the head aligned with the spine |
| Elbows flare straight outward | May feel uncomfortable at the shoulders | Angle the elbows slightly down and back |
| Hands are too high | Can increase shoulder demand | Place the hands around chest or shoulder height |
| Movements are rushed | Reduces control | Lower and press at a steady speed |
| Elbows snap straight | Places unnecessary stress on the joints | Finish with controlled arm extension |
| Breath is held | Can make the exercise unnecessarily strenuous | Exhale while pushing away |
| Feet are too far back | Makes alignment difficult | Move closer to the wall |
What to Do if Your Wrists or Shoulders Feel Uncomfortable
Wall push-ups should create muscular effort, but they should not cause sharp, worsening, or persistent joint pain.
For wrist discomfort:
- Stand closer to the wall.
- Reduce the depth.
- Spread the fingers comfortably.
- Keep pressure distributed across the palms instead of pressing only through the heel of each hand.
For shoulder discomfort:
- Move the hands slightly lower.
- Keep the elbows angled down and back.
- Use a smaller range.
- Avoid allowing the shoulders to rise toward the ears.
Stop the exercise when these adjustments do not resolve the discomfort. Wall push-ups should not be used as a treatment for unexplained shoulder, elbow, wrist, or hand pain.
Safety Tips for Wall Push-Ups
Get individualized guidance before beginning when you have:
- A recent operation or upper-body injury
- A recent heart event or stroke
- Significant shoulder, elbow, wrist, or hand problems
- Frequent dizziness, fainting, or balance loss
- A condition that affects safe standing
- Instructions to limit upper-body weight-bearing exercise
- Uncertainty about whether the movement suits your abilities
Start slowly when you have been inactive. MedlinePlus advises stopping exercise and seeking help when activity causes pain, extreme shortness of breath, dizziness, or other concerning symptoms.
Stop exercising if you develop:
- Chest pain or pressure
- Dizziness or faintness
- Unusual or extreme shortness of breath
- Nausea
- Sudden weakness
- Loss of balance
- New, sharp, or worsening pain
Seek urgent medical assistance for severe or persistent symptoms.
How to Include Wall Push-Ups in a Senior Workout
Wall push-ups train only part of the body. A balanced routine should also include exercises for the legs, hips, back, abdominal area, and balance.
A simple strength session might include:
- A short warm-up with easy walking or marching
- Wall push-ups
- Chair sit-to-stands
- Supported heel raises
- A rowing or pulling exercise
- An appropriate balance activity
The CDC recommends working all major muscle groups rather than relying on one exercise. It also lists balance activity separately from muscle-strengthening exercise.
Frequently Asked Questions
How many wall push-ups should a senior do?
A senior who is new to the exercise can begin with one set of 5–8 repetitions. Gradually progress toward 1–3 sets of 5–12 repetitions when the movement remains comfortable and controlled.
The correct number is the amount you can perform without losing alignment, rushing, holding your breath, or developing pain.
Are wall push-ups suitable for people over 70 or 80?
Age alone does not determine whether an exercise is suitable. Many people over 70 or 80 may be able to perform wall push-ups, while others may need a smaller range or individualized guidance.
Current mobility, strength, balance, joint comfort, and medical conditions are more important than chronological age.
Can seniors do wall push-ups every day?
Gentle practice may be possible, but challenging sets generally do not need to be performed every day. Two nonconsecutive strength sessions per week are a reasonable starting point.
Allow additional recovery when the chest, arms, or shoulders remain noticeably sore.
Do wall push-ups improve balance?
Wall push-ups require you to remain steady while standing, but they are mainly an upper-body strength exercise. They should not replace dedicated balance activities.
Seniors should include separate balance practice suited to their abilities, such as supported single-leg standing or heel-to-toe walking when appropriate.
How far should I stand from the wall?
Start approximately one arm’s length away. Move closer when the exercise feels difficult or your hips and back lose alignment.
Move slightly farther away only when you can complete your repetitions with stable feet and controlled posture.
Are wall push-ups safe for shoulder arthritis?
They may be comfortable for some people, but shoulder arthritis affects people differently. Use a pain-free range, keep the elbows from flaring widely, and stop if the movement causes new or worsening pain.
A physical therapist or other qualified healthcare professional can recommend an appropriate pressing variation when shoulder symptoms affect exercise.
When should I progress from the wall to a countertop?
Consider progressing when you can perform approximately 2–3 sets of 12–15 wall push-ups with controlled form and no joint discomfort.
Use a solid countertop that cannot move. Begin with fewer countertop repetitions because the lower surface will make the exercise more demanding.
Conclusion
Wall push ups for seniors offer a practical way to train the chest, arms, shoulders, and supporting core muscles from a standing position. They require little space, no gym equipment, and can be adjusted as strength improves.
Start with five slow repetitions, keep your body aligned, and stop the set before your technique deteriorates. As the exercise becomes easier, gradually add repetitions or move to a slightly more challenging body angle.
References
- Centers for Disease Control and Prevention (CDC) — Older Adults: Adding Activity Recommendations
- American College of Sports Medicine (ACSM) — ACSM Publishes Updated Resistance Training Guidelines
- Mayo Clinic — Modified Push-Up: Wall Push-Up Demonstration
- NHS — Strength Exercises: Wall Press-Up
- American Heart Association — Strength and Resistance Training Exercise
- MedlinePlus — Exercise for Older Adults