
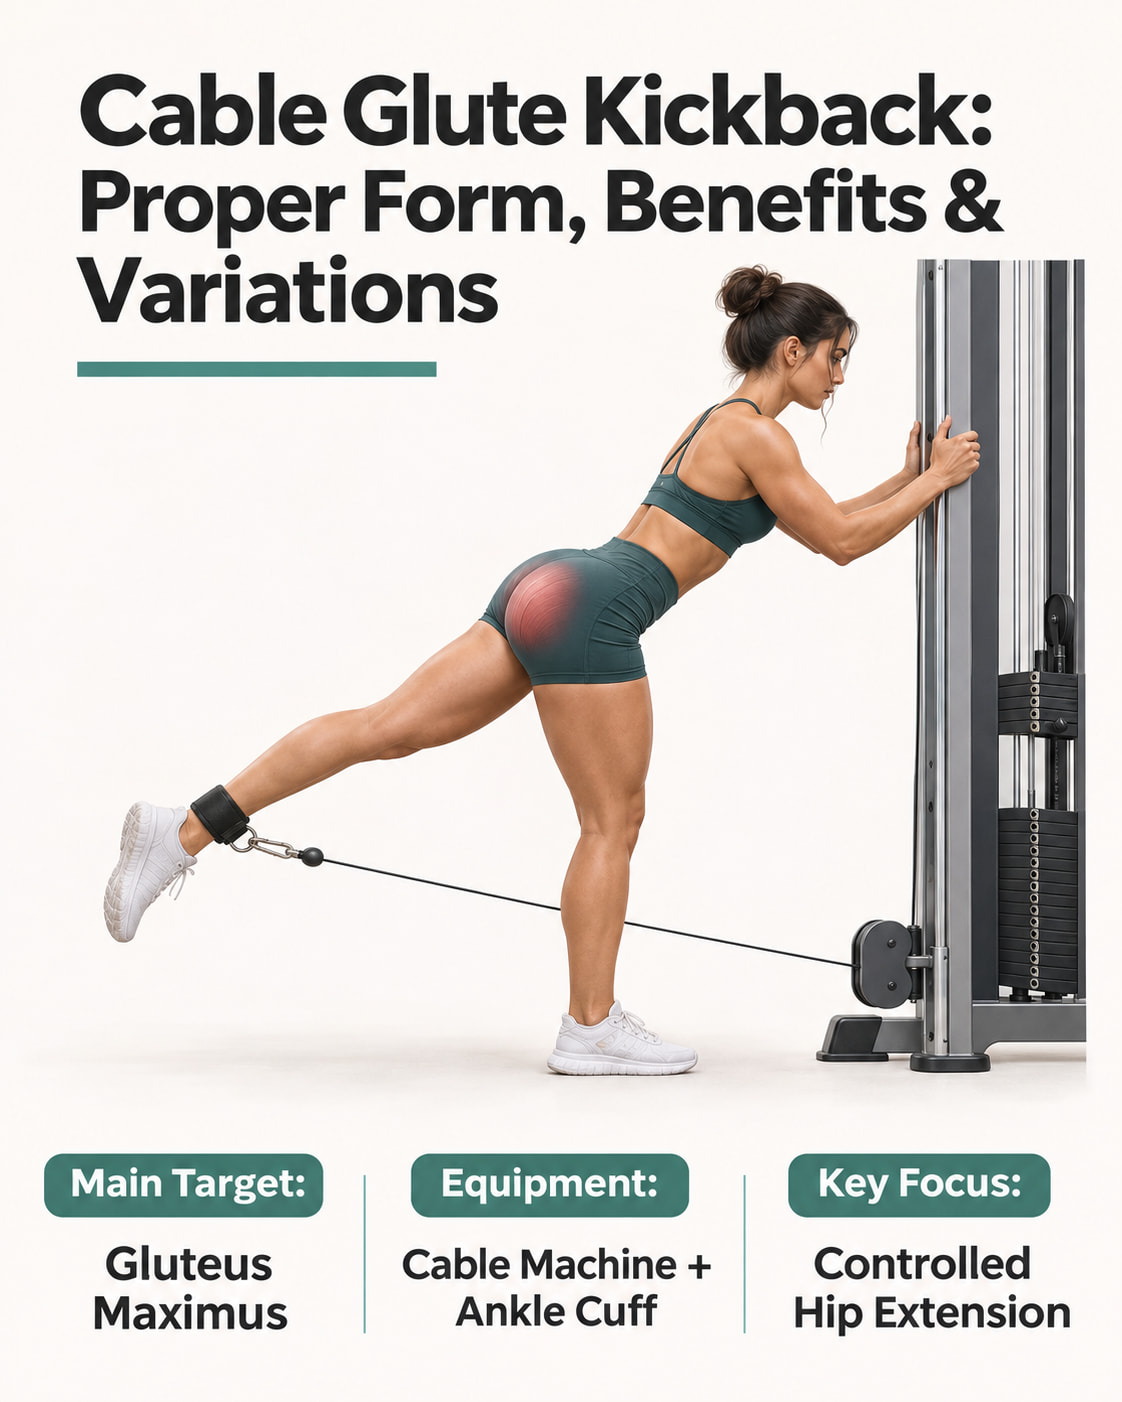
A cable glute kickback trains your glutes by moving one thigh backward against cable resistance. Its main target is the gluteus maximus, and it can contribute to glute strength and muscle growth as part of a progressively challenging resistance-training program.
The most useful form cue is simple: move at the hip without gaining extra height by arching your lower back. A controlled repetition may look smaller than an exaggerated kick, but the goal is hip movement—not getting your foot as high as possible. ACE’s hip-extension guidance uses this same principle to define a manageable range of motion.
What Muscles Do Cable Glute Kickbacks Work?
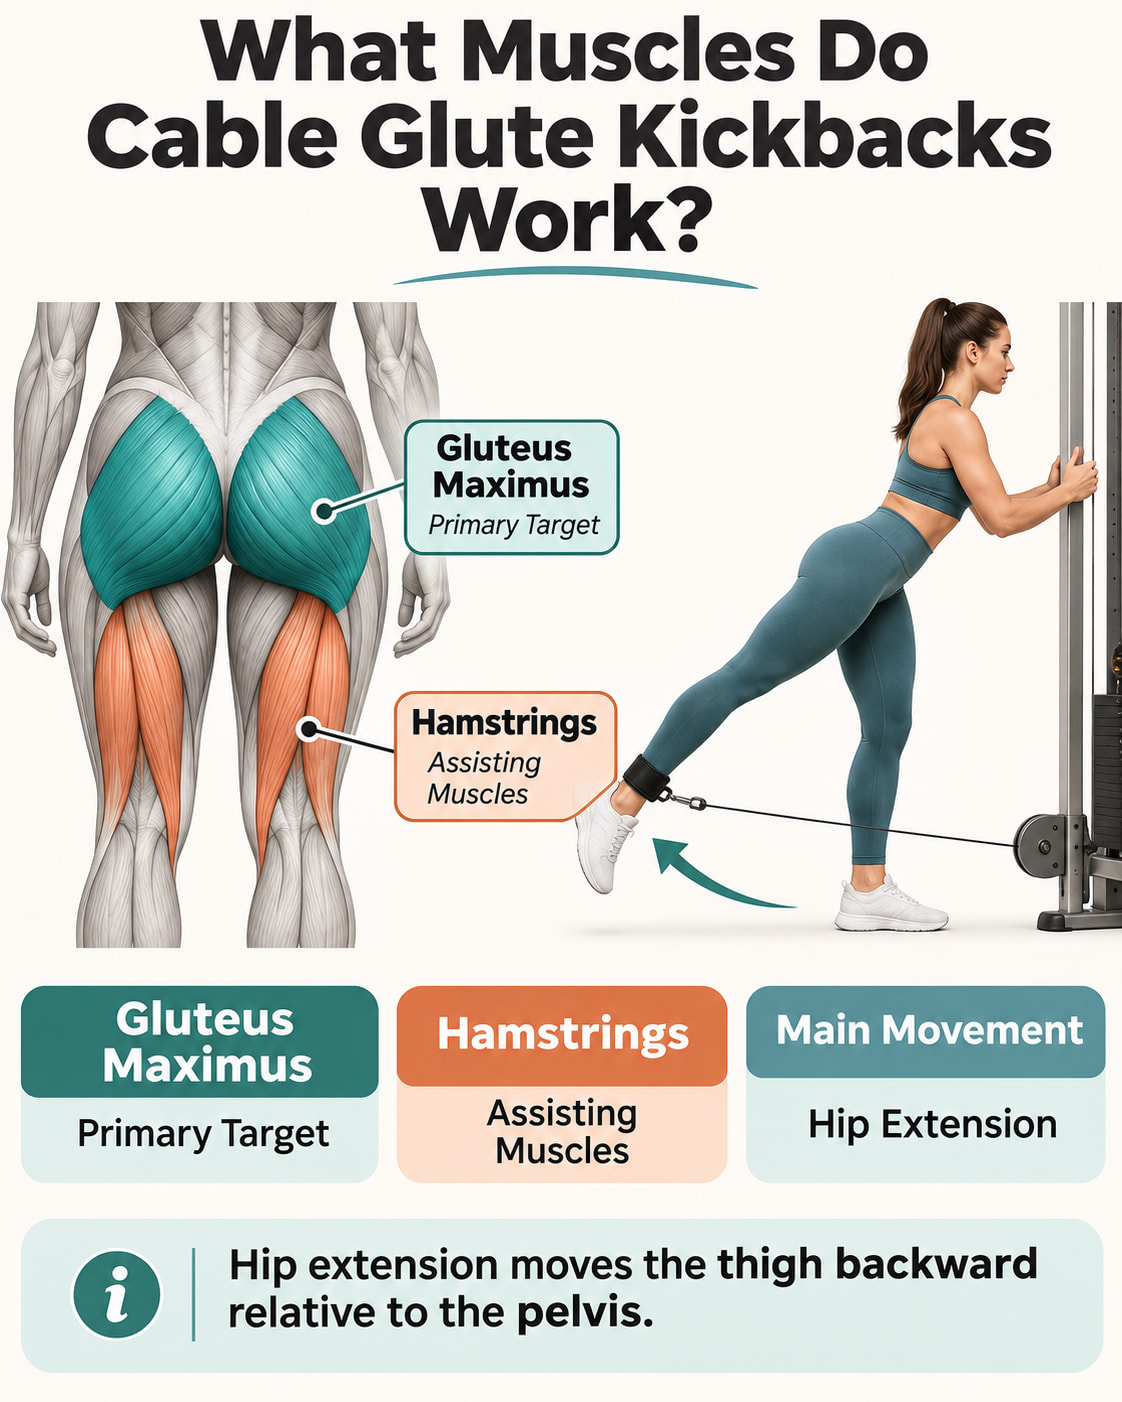
The main target is the gluteus maximus, the large buttock muscle responsible for much of hip extension—the action of moving your thigh backward relative to your pelvis. This differs from hip abduction, which moves your leg out to the side. The American Council on Exercise explains these different gluteal functions.
Your hamstrings can assist with hip extension, so a kickback does not isolate the glutes completely. A 2022 study of 15 resistance-trained women recorded activity in both the gluteus maximus and a hamstring muscle during cable kickbacks. Feeling some hamstring effort does not, by itself, mean you are doing the exercise incorrectly.
How to Do a Cable Glute Kickback With Proper Form
You will need an adjustable cable machine, a purpose-built ankle cuff, and a stable handhold. ACE’s single-leg cable-extension instructions recommend a low pulley, a securely attached cuff, and support from the machine or a fixed pole.
Before lifting, warm up with several minutes of comfortable movement and perform a light practice set. Mayo Clinic’s weight-training guidance recommends five to 10 minutes of brisk walking or another aerobic activity before resistance exercise.
Set Up the Cable Machine
Set the pulley near floor level and select a light resistance. Secure the ankle cuff and its connection before stepping into position.
Face the machine and hold a fixed support. Keep your standing knee slightly bent and hinge forward comfortably at your hips. Brace your abdomen gently, keeping your back in a natural position rather than deliberately rounding or arching it. PureGym’s cable-kickback tutorial demonstrates this supported, forward-hinged setup.
Perform the Movement
- Settle your stance. Keep your weight over the supporting foot and your pelvis facing the machine.
- Move the working thigh backward. Exhale as you press back against the cable. Maintain a slight, reasonably consistent bend in the working knee.
- Stop before your back or pelvis takes over. End the backward movement when going farther would require arching, twisting, or swinging your torso.
- Pause briefly. Hold the position without forcing your leg higher.
- Return under control. Inhale as your leg comes forward to the starting position. Do not let the cable pull you into a rushed return.
- Finish the set, then switch sides. Let the weight stack settle before adjusting the cuff.
These cues combine the controlled movement in PureGym’s instructions with ACE’s range-of-motion guidance and Mayo Clinic’s breathing recommendations.
You do not need to copy someone else’s exact torso angle. ACE describes a more upright version, while PureGym demonstrates a forward hinge. Use a position that lets you maintain support and move at the hip without repeatedly changing your back position. Neither guide establishes one angle as best for muscle growth.
Benefits of Cable Glute Kickbacks
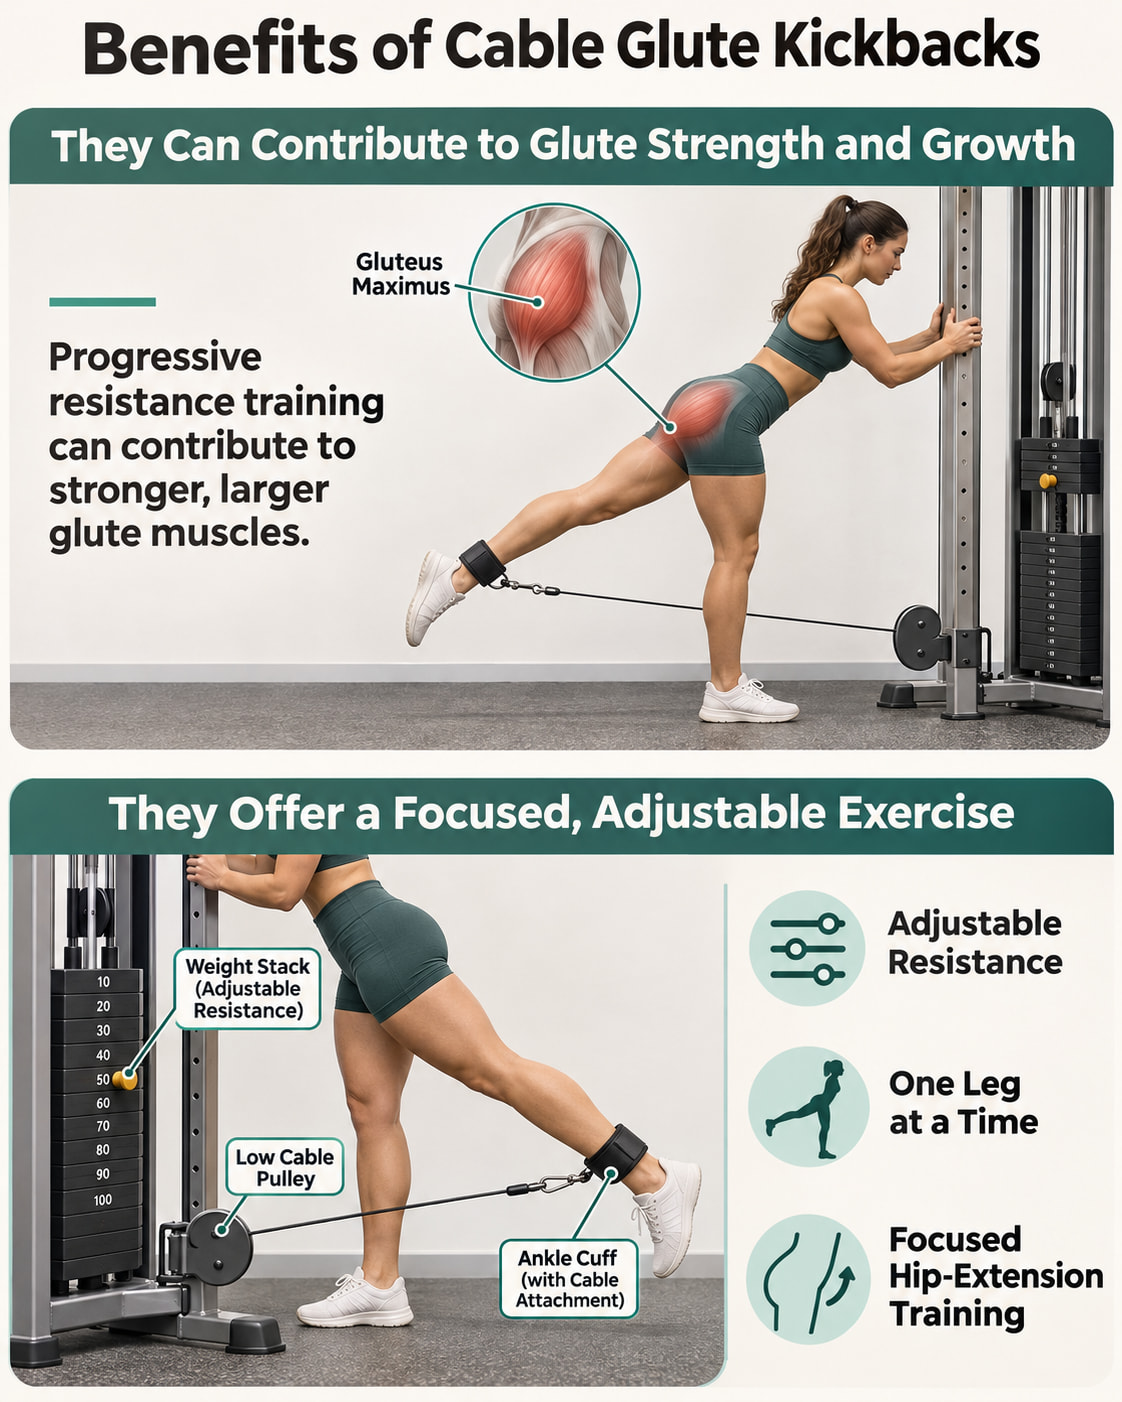
They Can Contribute to Glute Strength and Growth
There is some direct training evidence for cable hip extension—not just research measuring muscle activity during individual repetitions.
The published abstract of a 2026 study in the Journal of Strength and Conditioning Research reports that 17 young adults completed 10 weeks of twice-weekly cable training. Each participant trained one leg with hip extension and the other with hip abduction. Cable hip extension increased gluteus maximus size and hip-extension strength.
That supports cable hip extension as a useful training option. However, this small study does not establish the best kickback technique, predict an individual’s results, or show that kickbacks outperform squats or hip thrusts; those exercises were not the comparison.
They Offer a Focused, Adjustable Exercise
The cable setup lets you select resistance and train one side at a time. As a practical use of that setup, you can record each side’s repetitions separately and add a manageable amount of hip-extension work to your routine. It does not automatically diagnose or correct a muscle imbalance.
Kickbacks are an option, not a requirement. The American College of Sports Medicine’s 2026 resistance-training guidance emphasizes consistent participation and individualized training rather than one indispensable exercise or type of equipment.
Common Cable Kickback Mistakes and How to Fix Them
Use the following checks when the movement becomes difficult to control. They apply the stable-back, controlled-range principles in the ACE hip-extension guide and PureGym’s kickback instructions.
| What you notice | What to change |
|---|---|
| Your lower back arches as your leg rises | End the repetition earlier. Reduce the resistance when needed. |
| You need a swing to start each repetition | Lower the weight and begin from a still position. |
| Your pelvis turns as the leg moves backward | Shorten the range and keep your pelvis facing forward. |
| The cable pulls your leg forward abruptly | Slow the return; use less resistance when you cannot control it. |
| Your torso rocks with every repetition | Reestablish your hand support and keep your torso angle steady. |
What If You Feel It More in Your Hamstrings?
Some hamstring involvement is expected because those muscles also help extend the hip. The cable-kickback research measuring muscle activity does not support treating hamstring effort as proof that the glutes are inactive.
As a practical form check, try a lighter set and focus on moving your thigh while keeping your knee angle and torso position consistent. Rather than chasing a stronger burning sensation, look for a movement you can repeat without swinging.
Back pain is different from ordinary muscular effort. Stop a painful set rather than trying to “activate” your glutes more forcefully. Mayo Clinic advises stopping an exercise that causes pain.
How Many Sets and Reps Should You Do?
The following is an example starting prescription for a generally healthy beginner, not a clinically tested cable-kickback program or a universal muscle-growth formula.
| Training detail | Example starting point |
|---|---|
| Practice | One light set per side |
| Working sets | 1–2 sets per side |
| Repetitions | 12–15 per set |
| Effort | Finish with about 2–3 controlled repetitions still possible |
| Rest | Approximately 60–120 seconds before repeating the same leg; longer when needed |
| Frequency | Two nonconsecutive days per week |
This example draws on Mayo Clinic’s general beginner guidance and the ACSM resistance-training recommendations. The exact combination is a practical starting point, not evidence that this rep range is uniquely effective.
“Two or three repetitions still possible” means you stop while you could probably perform a few more repetitions with the same technique. Repetitions that would require swinging or arching do not count. You do not have to reach complete muscular failure to benefit from resistance training.
Choose Weight by Control, Not a Target Number
Start with resistance that allows you to complete the planned repetitions smoothly. When you can consistently reach the top of your range without changing technique, increase the resistance by the smallest available increment. Reduce it again when control deteriorates. This follows Mayo Clinic’s advice to increase weight gradually while preserving form.
For example, you might begin with 12 controlled repetitions per side, gradually reach 15, and then increase the resistance while returning to fewer repetitions within your chosen range.
Fit Kickbacks Into Your Existing Workout
For a simple arrangement, perform kickbacks after the main exercises in your lower-body session. A workout that already includes squats, split squats, or hip thrusts does not necessarily need a large additional kickback workload.
Count kickbacks as part of your overall glute training. ACSM’s discussion of higher weekly volume for muscle growth concerns total work for a muscle group—not a requirement to perform that volume in every individual exercise. Adjust the amount to your experience, other training, and recovery.
Cable Glute Kickback Variations and Alternatives
The first option changes the cable exercise. The other two offer equipment-free ways to practice hip extension; they are alternatives, not identical replacements.
Bent-Knee Cable Kickback
As a variation, use more bend in the working knee and maintain that bend as your thigh moves backward. Start light enough that the cable does not pull you into repeatedly straightening the knee.
Knee position can change hip-extensor muscle activity. However, a 2013 study investigating different knee angles tested 20 healthy participants during lying, maximal hip-extension contractions—not a standing cable-kickback training program. It does not prove that a bent-knee cable version produces better glute growth. Treat knee bend as a variation to explore, not a way to eliminate all hamstring involvement.
Bodyweight Donkey Kick
Start on your hands and knees, with hands beneath shoulders and knees beneath hips. Keeping one knee bent, lift that thigh behind you while holding your trunk steady. Lower it under control, complete your repetitions, and switch sides.
ACE calls this a quadruped bent-knee hip extension. Its key instruction is to limit leg height before the lower back begins to sag or arch.
For an introductory practice set, try 8–12 slow repetitions per side, stopping earlier when you lose control. This is a suggested practice dose, not a research-established equivalent to weighted kickbacks.
Glute Bridge
Lie on your back with your knees bent and feet flat. Tighten your abdomen gently, then lift your hips until your shoulders, hips, and knees form a line, without forcing an arch through your lower back. Lower slowly.
Mayo Clinic’s bridge instructions describe this setup. Because you are lying down with both feet supported, it is a practical alternative when you would rather avoid the standing cable setup.
An introductory example is one set of 8–12 controlled repetitions. Keep breathing, and stop before technique deteriorates.
When to Modify or Stop the Exercise
Stop if kickbacks cause pain. Do not respond to hip, knee, or lower-back pain by increasing the weight or forcing more range. For a movement you cannot control comfortably, ask a qualified trainer to check the setup. Persistent or recurring pain warrants advice from a healthcare professional. Mayo Clinic recommends both stopping painful exercise and getting qualified help with lifting technique.
For your next session, focus on one repeatable standard: the same supported stance, the same controlled hip movement, and no extra swing as the set gets harder. Build from there rather than making heavier weight or a higher kick the immediate goal.
This content is for informational purposes only and not medical advice.