
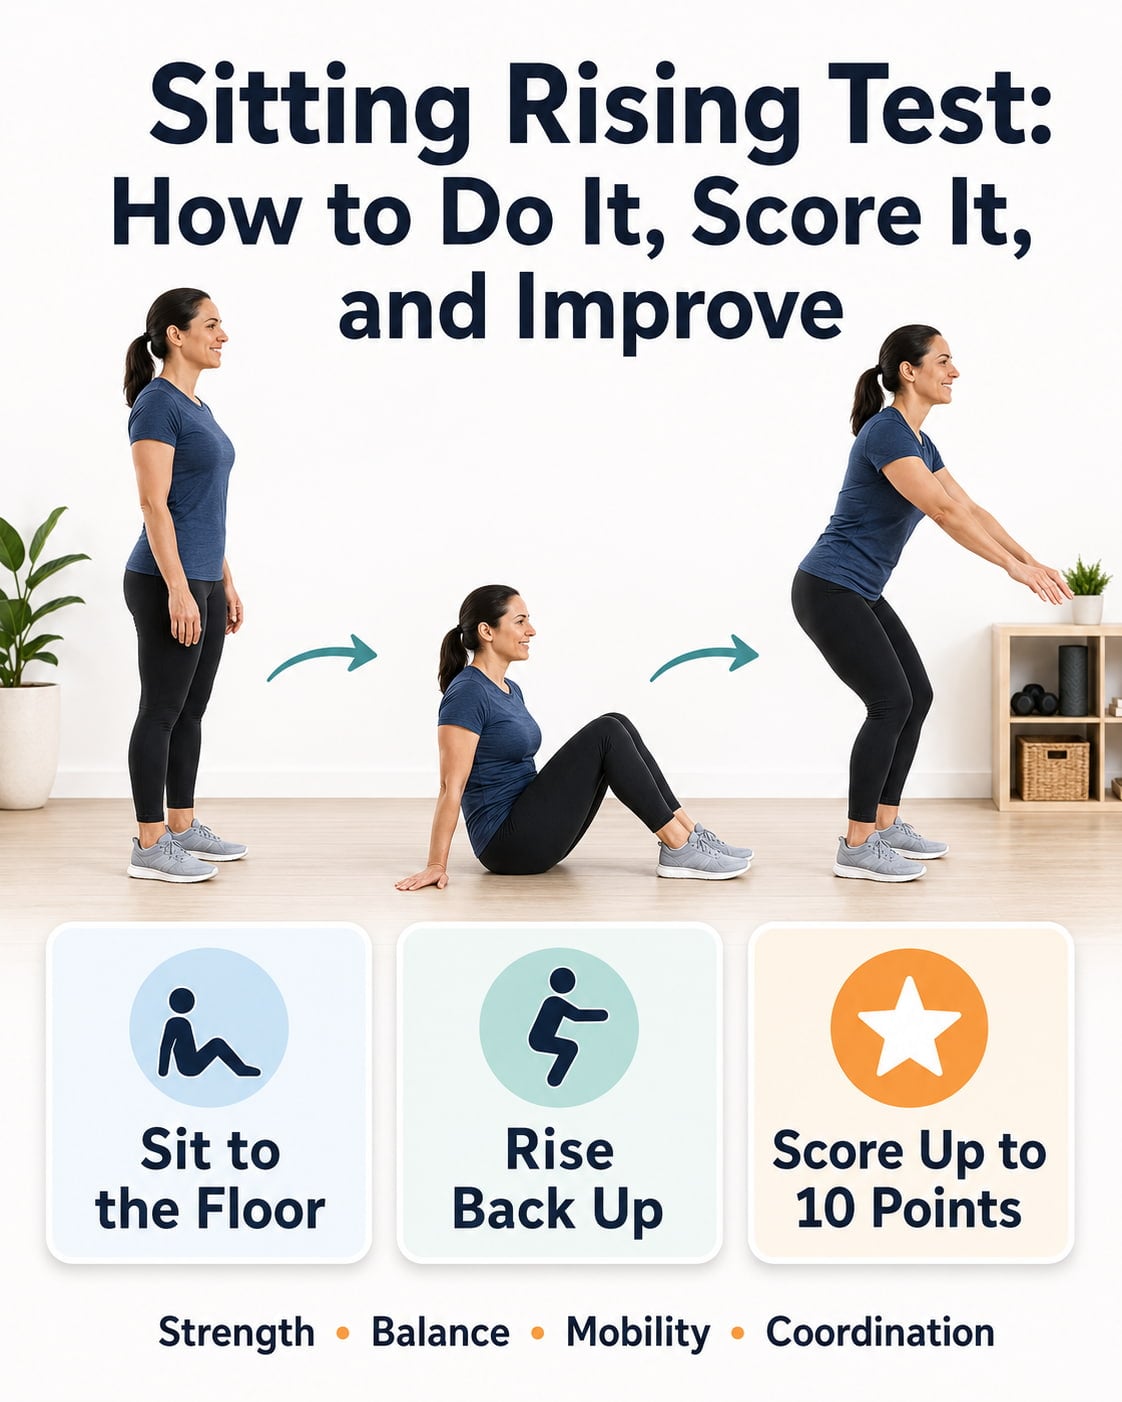
The Sitting Rising Test is an untimed assessment of how well you can lower yourself from standing to the floor and return to standing. You start with 5 points for sitting and 5 points for rising. Each hand, knee, forearm, or other support used removes 1 point, while a visible loss of balance removes half a point.
Add the sitting and rising scores to get a total out of 10. A higher score means you completed the floor transfer with fewer supports and better control. However, the result is only a snapshot of functional fitness. It does not diagnose a health condition or reveal how long you will live.
What Is the Sitting Rising Test?
The Sitting Rising Test, commonly written as the Sitting-Rising Test or SRT, evaluates your ability to sit on the floor and stand back up with as little assistance as safely possible.
Unlike a chair sit-to-stand test, the SRT starts from a standing position and requires you to sit completely on the floor. It is not timed, and you do not receive extra points for moving quickly.
The movement brings several physical abilities together:
- Lower-body strength and power
- Hip, knee, and ankle mobility
- Balance and stability
- Coordination and movement control
- The ability to manage your body weight
This makes the test useful as a simple functional assessment, but it also means a low score cannot identify one specific weakness.
What Does the Sitting Rising Test Measure?
The SRT does not isolate a single muscle or fitness quality. Instead, it shows how several abilities work together during a challenging everyday movement.
Lower-Body Strength and Power
Your quadriceps, glutes, hamstrings, calves, and hip muscles help control the descent and drive you back to standing. Rising from the floor usually requires more strength and power than standing from a chair.
Mobility and Flexibility
Your hips, knees, and ankles must move through relatively large ranges of motion. Limited ankle movement, stiff hips, or difficulty bending a knee may change how you sit or force you to use additional support.
Balance and Coordination
You must control your center of mass while moving between standing and the floor. A wobble or sudden hand placement may indicate that balance or coordination made the movement more difficult.
Body Weight Relative to Strength
Body size alone does not determine the result. However, moving a heavier body may require more strength, particularly when rising from the floor.
The SRT does not directly measure cardiovascular endurance, aerobic fitness, bone density, or body-fat percentage.
Before You Try the Test: Safety First
Do not attempt an unsupported floor transfer simply to obtain a higher score. Using support is better than risking a fall.
Consider having another person nearby or getting professional guidance when you:
- Are unsure whether you can reach the floor and stand safely
- Have frequent falls or significant balance problems
- Currently feel dizzy, lightheaded, or unusually weak
- Have acute hip, knee, ankle, or back pain
- Recently had surgery, a fracture, or a serious injury
- Have a neurological or medical condition affecting movement
- Have been advised to avoid kneeling or floor transfers
Use a sturdy chair, countertop, railing, or trained helper during practice when necessary. External support affects the standard score, but safety should always take priority.
Stop immediately if the movement causes sharp pain, chest discomfort, severe shortness of breath, or dizziness. Seek urgent medical care for severe or sudden symptoms.
How to Do the Sitting Rising Test
What You Need
For the standard test, use:
- A flat, non-slippery floor
- An open area measuring approximately 6.5 × 6.5 feet
- Clothing that allows unrestricted movement
- Bare feet, as used in the research protocol
- An observer when possible
Avoid performing the test in slippery socks. A mat may make kneeling more comfortable, but a thick or unstable mat can change your balance and make the score less comparable.
Step-by-Step Instructions
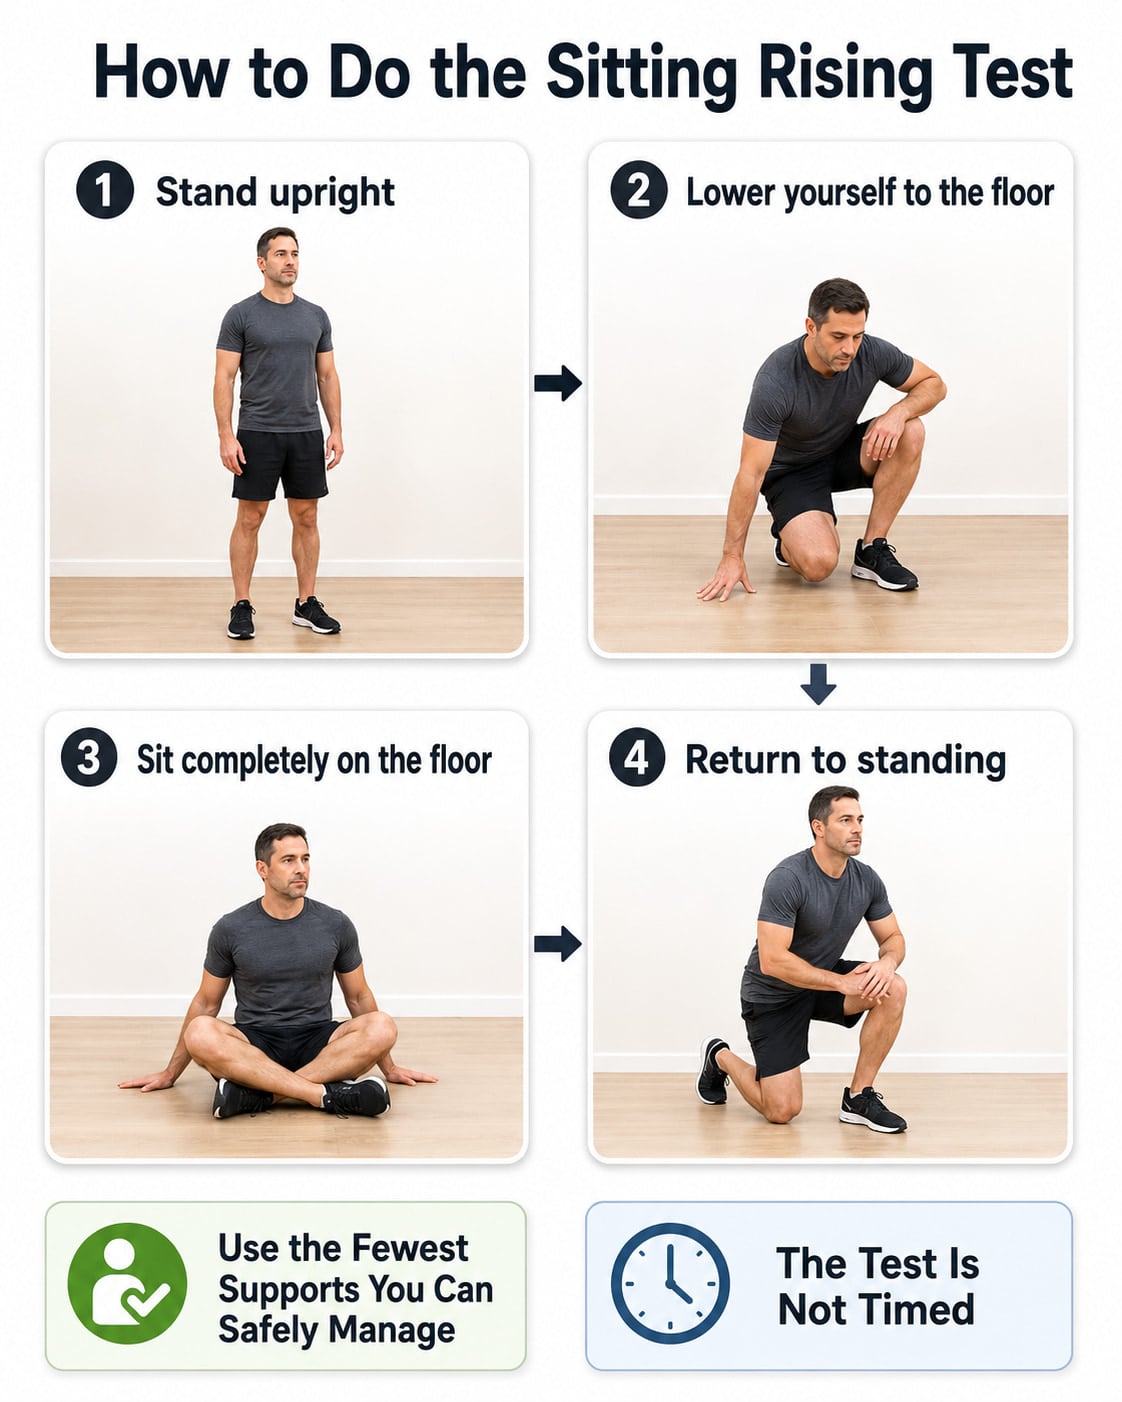
- Stand in the center of the open area.
Begin upright with enough space around you to move freely. - Choose a comfortable foot position.
There is no required stance width. Crossing your legs during the movement is allowed. - Lower yourself to the floor.
Sit completely on the floor using the fewest supports you believe you need. Move at a controlled pace rather than trying to be fast. - Settle into a seated position.
Make sure you have completed the sitting phase before attempting to rise. - Return to standing.
Use the fewest supports you can safely manage. Do not rush or use momentum that causes you to lose control. - Record every support.
Note each hand, forearm, knee, side of the leg, or hand-on-knee support used during sitting and rising. - Record any visible instability.
A clear wobble, stumble, or partial loss of balance creates a half-point deduction.
The standard instruction is to perform the movement without worrying about speed and to use the minimum support you believe is necessary. Crossing the legs is permitted.
How to Score the Sitting Rising Test
Score the sitting and rising phases separately.
- Sitting starts at 5 points.
- Rising starts at 5 points.
- Add the two partial scores for a maximum total of 10 points.
Use the following deductions for each phase:
| Action or event | Score effect |
|---|---|
| Complete the phase without support or instability | No deduction |
| Use one hand for support | −1 point |
| Use one forearm for support | −1 point |
| Use one knee for support | −1 point |
| Use the side of one leg for support | −1 point |
| Place a hand on a knee to help push or control the movement | −1 point |
| Show a visible wobble or partial loss of balance | −0.5 point |
| Cannot complete the phase without furniture, a wall, or another person | Score 0 for that phase |
Multiple supports create multiple deductions. For example, using one hand and one knee during the rising phase removes 2 points from the rising score.
The same support also counts separately when used during both phases. Using one hand while sitting and one hand while rising removes 1 point from each partial score, or 2 points from the total.
The standard scoring system allows half-point results from 0 to 10.
Sitting Rising Test Scoring Examples
Example 1: No support
- Sitting: No support or instability = 5
- Rising: No support or instability = 5
- Total score: 10
Example 2: Hand, knee, and instability
- Sitting: Uses one hand = 4
- Rising: Uses one knee and visibly wobbles = 3.5
- Total score: 7.5
Example 3: External support during rising
- Sitting: No support = 5
- Rising: Cannot stand without pulling on a chair = 0
- Total score: 5
Needing external help does not automatically make the entire composite score 0. Only the phase that cannot be completed without external assistance receives 0.
What Does Your Sitting Rising Test Score Mean?
A higher score means you used fewer supports and showed better control during that attempt. It does not necessarily mean that every person with the same score has the same strength, mobility, balance, or health status.
Researchers have grouped scores into the following ranges for analysis:
| Total score | General description |
|---|---|
| 10 | Both phases completed without support or visible instability |
| 8.5–9.5 | Small deductions for one support or mild instability |
| 8 | Two total points deducted, such as one support during each phase |
| 4.5–7.5 | Several supports, instability, or greater difficulty with one phase |
| 0–4 | Substantial difficulty, many supports, or inability to complete a phase independently |
These ranges are descriptive research categories, not diagnostic grades. They should not be treated as universal definitions of excellent, average, or poor fitness.
What Is a Good Sitting Rising Test Score?
There is no single score that every healthy adult must achieve.
A score of 10 is the maximum, but age, joint mobility, pain, previous injuries, body proportions, health conditions, and familiarity with floor sitting can all affect performance. Reference research has also found that scores vary by age and sex.
A practical interpretation is:
- Higher scores generally show greater independence and control.
- A lower score identifies an opportunity for further assessment or training.
- A sudden decline may be more meaningful than one isolated result.
- The sitting and rising partial scores can be more useful than the total alone.
For example, a sitting score of 5 and rising score of 2 suggests that standing from the floor creates most of the difficulty. That information can help guide exercise selection.
Does the Sitting Rising Test Predict Longevity?
The SRT is sometimes promoted online as a test that predicts how long you will live. That description is misleading.
A 2025 observational study published in the European Journal of Preventive Cardiology followed 4,282 adults ages 46 to 75 for a median of 12.3 years. Lower SRT scores were associated with higher natural and cardiovascular mortality. After researchers adjusted for age, sex, body mass index, and several health conditions, participants scoring 0–4 had approximately 3.8 times the risk of natural death and 6 times the risk of cardiovascular death compared with those scoring 10.
Those findings do not mean that a low score causes early death or that a specific result can predict an individual’s lifespan.
The study was observational, so it could identify an association but not prove cause and effect. Participants were volunteers at a private clinic in Brazil, many came from higher socioeconomic and educational groups, and people with physical limitations that could interfere with the test were excluded. The researchers also could not fully account for previous or current exercise habits.
The most reasonable conclusion is that the SRT reflects several physical abilities associated with health and independence. It should be considered alongside medical history, activity level, aerobic fitness, strength, and other functional assessments.
Researchers have not yet established whether raising an SRT score through training directly extends lifespan.
Why Might Your Score Be Lower?
A lower result can have several possible explanations.
Limited Leg Strength or Power
You may have enough strength for normal walking but not enough to rise from a low floor position without pushing through a hand or knee.
Restricted Ankle or Hip Mobility
Limited ankle bending can make it difficult to keep your balance as you lower or rise. Hip stiffness may prevent you from using a comfortable cross-legged, kneeling, or side-sitting position.
Balance or Coordination Difficulty
You may have adequate strength but struggle to control weight shifts or organize the sequence of movements.
Pain or Joint Sensitivity
Knee, hip, ankle, or back pain may cause you to avoid certain positions or use additional support.
Limited Floor-Transfer Experience
Someone who rarely sits on the floor may score lower simply because the movement pattern is unfamiliar. Technique can improve even before major changes in strength occur.
Body Weight Relative to Available Strength
A person may need greater leg and trunk strength to control and lift a larger body mass.
Because the test combines several abilities, it cannot determine why your result is low. A physical therapist or qualified healthcare professional can assess the underlying cause.
How to Improve Your Sitting Rising Test Score
The best approach is to improve the abilities involved in the movement rather than repeatedly attempting a maximum-effort test.
Exercise may improve strength, balance, mobility, and floor-transfer skill, but no single SRT-specific program has been proven best for everyone.
1. Chair Sit-to-Stand
This exercise builds the leg strength needed to rise from a low position.
How to do it:
- Sit near the front of a stable chair.
- Place your feet approximately hip-width apart.
- Lean your torso slightly forward.
- Push through both feet and stand.
- Sit back down slowly and under control.
Start with 2 sets of 6–12 repetitions. Use the armrests or place your hands on your thighs when necessary. Progress by using less hand support or choosing a slightly lower chair.
2. Supported Squat
A supported squat improves leg strength while allowing you to practice lowering your hips under control.
How to do it:
- Hold a sturdy counter, railing, or chair back.
- Stand with your feet in a comfortable position.
- Push your hips back and bend your knees.
- Lower only as far as you can without pain.
- Press through your feet to return to standing.
Perform 2–3 sets of 6–10 repetitions.
Do not force a deep squat. Controlled, pain-free movement matters more than depth.
3. Low Step-Up
Step-ups strengthen each leg separately and improve weight shifting.
How to do it:
- Face a low step with a railing or stable support nearby.
- Place one foot fully on the step.
- Push through that foot to step up.
- Lower yourself slowly.
- Complete the repetitions before changing legs.
Perform 2 sets of 6–10 repetitions per side.
Begin with a low step. Increase the height only after you can control both the upward and downward phases.
4. Ankle Rock
Better ankle mobility may make it easier to lower your body while keeping your balance.
How to do it:
- Stand facing a wall or counter.
- Place one foot slightly forward.
- Keep the heel down as you move the knee forward over the toes.
- Return to the starting position.
- Move only through a comfortable range.
Perform 8–12 controlled repetitions per side.
The heel should remain on the floor, and the movement should not cause pinching or sharp pain.
5. Tandem Balance Hold
This exercise challenges balance with less risk than repeatedly attempting an unsupported floor transfer.
How to do it:
- Stand beside a counter.
- Place one foot directly or almost directly in front of the other.
- Keep your posture upright.
- Hold the position while keeping a hand near the support.
Hold for 20–30 seconds, then switch which foot is in front. Complete 2 rounds per side.
Make the stance wider when the heel-to-toe position feels too difficult.
6. Supported Floor-Transfer Practice
Floor-transfer practice helps you develop a safe, repeatable movement strategy.
Use a sturdy chair or couch and a padded surface for your knees.
One possible sequence is:
- Hold the chair and step one foot backward.
- Lower that knee onto the padded surface.
- Bring the other knee down or shift into a side-sitting position.
- Sit fully on the floor.
- Return to kneeling.
- Bring one foot forward into a half-kneeling position.
- Push through the front foot and use the chair as needed to stand.
Practice 2–5 controlled transfers, resting between attempts.
There is no requirement to use a particular route. Some people find a cross-legged strategy easier, while others prefer side-sitting or half-kneeling. A physical therapist can help identify the safest option when joint pain, weakness, or balance problems limit the movement.
How Often Should You Practice?
A practical starting schedule is:
- Strength exercises on 2–3 nonconsecutive days per week
- Short balance exercises on several days per week
- Supported floor-transfer practice 1–3 days per week, when safe
- At least one rest day between challenging leg-strength sessions
Older adults should generally include aerobic, muscle-strengthening, and balance activities in their weekly routines, adjusting activity to their abilities and health conditions.
Progress gradually. First improve control and repetitions. Then reduce hand support, use a slightly lower surface, or increase the movement range. Change only one factor at a time.
Do not remove support until you can complete the current version without pain, excessive effort, or loss of balance.
When Should You Repeat the Test?
Repeating the test every day is unnecessary and may encourage you to use a risky technique simply to gain a point.
A practical retesting interval is approximately every 4–6 weeks after consistent strength, balance, mobility, or floor-transfer practice. Try to keep the conditions similar each time:
- Use the same floor surface
- Wear similar clothing
- Use the same scoring rules
- Test at a similar time of day
- Have the same observer when possible
Record the sitting and rising scores separately. You may improve one phase before the total score changes significantly.
Alternatives When a Floor Test Is Not Appropriate
Do not attempt the SRT when reaching the floor is unsafe. Other functional tests may be more suitable.
30-Second Chair Stand
This test records how many complete stands you can perform from a chair in 30 seconds. It focuses more directly on lower-body strength and endurance.
Five-Times Sit-to-Stand Test
This test measures how long it takes to stand up and sit down five times. A clinician may use it to assess functional leg strength and movement speed.
Timed Up and Go Test
This assessment combines standing from a chair, walking, turning, and sitting down. It may provide useful information about general mobility and balance.
These tests are not interchangeable with the Sitting Rising Test and use different scoring systems.
When to Seek Professional Assessment
Consider speaking with a physical therapist, physician, or other qualified professional when:
- You cannot get up from the floor without substantial assistance
- Your ability to stand from the floor has recently worsened
- One side feels noticeably weaker than the other
- You repeatedly lose your balance
- Pain prevents you from bending a hip, knee, or ankle
- You have experienced recent falls
- Dizziness or numbness affects the movement
- You are unsure how to practice safely
Difficulty rising from the floor is not automatically a medical emergency. However, a sudden change in strength, balance, coordination, or sensation deserves prompt medical attention.
Frequently Asked Questions
Is the Sitting Rising Test timed?
No. The standard Sitting Rising Test is not timed. Moving faster does not improve your score. The goal is to complete each phase with the fewest supports and without losing balance.
Can you cross your legs during the Sitting Rising Test?
Yes. Crossing your legs while sitting or rising is allowed under the standard protocol and does not create a deduction by itself.
Does using one hand remove one point or two points?
Using one hand during one phase removes 1 point from that phase. If you use a hand while sitting and again while rising, each use is scored separately, resulting in a total deduction of 2 points.
Can you use a chair or wall?
Use a chair or wall whenever it is necessary for safety. Under standard scoring, if you cannot complete a phase without external assistance from furniture, a wall, or another person, that phase receives 0 points.
Which muscles does the Sitting Rising Test use?
The movement mainly involves the quadriceps, glutes, hamstrings, calves, hip muscles, and trunk muscles. The exact demand changes according to whether you use a cross-legged, kneeling, squatting, or side-sitting strategy.
Is the Sitting Rising Test suitable for seniors?
Some older adults can perform the test safely, but it is not appropriate for everyone. Seniors with significant balance difficulty, pain, recent surgery, frequent falls, or uncertainty about floor transfers should use supervision or choose a chair-based assessment.
Does a low score mean you are unhealthy?
No. A low score does not diagnose poor health or a specific condition. It may reflect strength, mobility, balance, pain, body size, technique, or unfamiliarity with sitting on the floor.
Can exercise improve the score?
Strength, balance, mobility, and floor-transfer practice may improve the physical abilities involved. However, researchers have not established one ideal exercise program for improving SRT scores, and individual results vary.
The Bottom Line
The Sitting Rising Test provides a quick look at your ability to move between standing and the floor. Start with 5 points for sitting and 5 for rising, subtract 1 point for each support and half a point for visible instability, and add the partial scores for a total out of 10.
A higher score shows that you completed the task with fewer supports, but the result is not a diagnosis or personal longevity prediction. Use the score to identify areas for improvement, practice strength and balance consistently, and choose safety over an unsupported attempt whenever you are unsure.