
The right stationary bike resistance level is the setting that produces your target effort while allowing you to pedal smoothly with stable posture and controlled breathing. There is no universal number that works for everyone because resistance scales vary among bike brands and models.

For most steady cardio workouts, aim for an effort of 5–6 out of 10. You should be able to talk but not sing. Beginners can start around 3–5 out of 10, while challenging intervals may reach 7–9 out of 10 for people who are ready for vigorous exercise.
Instead of copying another rider’s resistance number, use your perceived effort, breathing, cadence, heart rate, and form to find the appropriate setting.
Stationary Bike Resistance Levels: Quick Guide
The CDC’s exercise-intensity guidance classifies moderate activity as approximately 5–6 on a 0–10 effort scale. Vigorous activity begins around 7–8. During moderate exercise, you can usually talk but not sing. During vigorous exercise, you may only be able to say a few words before pausing for breath.
| Workout purpose | Target effort | How the resistance should feel | Breathing and form cue |
|---|---|---|---|
| Warm-up | 1–3 out of 10 | Light but not completely unloaded | Easy breathing and smooth pedaling |
| Recovery ride | 1–3 out of 10 | Very light and comfortable | Normal conversation is easy |
| Beginner steady ride | 3–5 out of 10 | Light to moderate | You can speak in full sentences |
| Moderate cardio | 5–6 out of 10 | Noticeably challenging but sustainable | You can talk but not sing |
| Endurance workout | 4–6 out of 10 | Steady and manageable for an extended period | Cadence and posture remain consistent |
| Hill interval | 6–8 out of 10 | Heavy but controlled | Short phrases are possible |
| Vigorous interval | 7–9 out of 10 | Hard to very hard | Only a few words are possible |
These ranges describe effort, not specific console numbers. Your moderate resistance might be level 4 on one bike and level 35 on another.
What Do Stationary Bike Resistance Levels Mean?
Resistance controls how much force you must apply to turn the pedals. Increasing resistance makes each pedal stroke feel heavier. Reducing it makes the pedals easier to turn.
Resistance is only one part of workout intensity. Your effort also changes with:
- Pedaling speed or cadence
- Workout duration
- Interval length
- Body position
- Fitness level
- Fatigue
- The bike’s resistance system
For example, pedaling quickly against moderate resistance may produce a harder cardiovascular workout than pedaling slowly against that same setting. Similarly, heavy resistance at a slow cadence may fatigue your leg muscles before your breathing becomes especially difficult.
Magnetic and Electromagnetic Resistance
Magnetic bikes use magnets to create resistance near the flywheel. Depending on the model, you may adjust the resistance with a knob, console button, or connected application.
These bikes commonly offer numbered levels. However, the number of levels and the workload produced by each one vary considerably.
Friction Resistance
Friction bikes press a pad against the flywheel. Turning the knob changes the pressure between the pad and flywheel.
These bikes may offer continuously adjustable resistance rather than fixed numbered levels. A small knob adjustment can sometimes produce a noticeable change.
Air Resistance
Air bikes use a fan or flywheel that encounters more air resistance as it turns faster. Pedaling harder and faster generally increases both the resistance and the power required.
On these bikes, cadence has a particularly strong effect on workout difficulty.
Are Exercise Bike Resistance Levels Standardized?
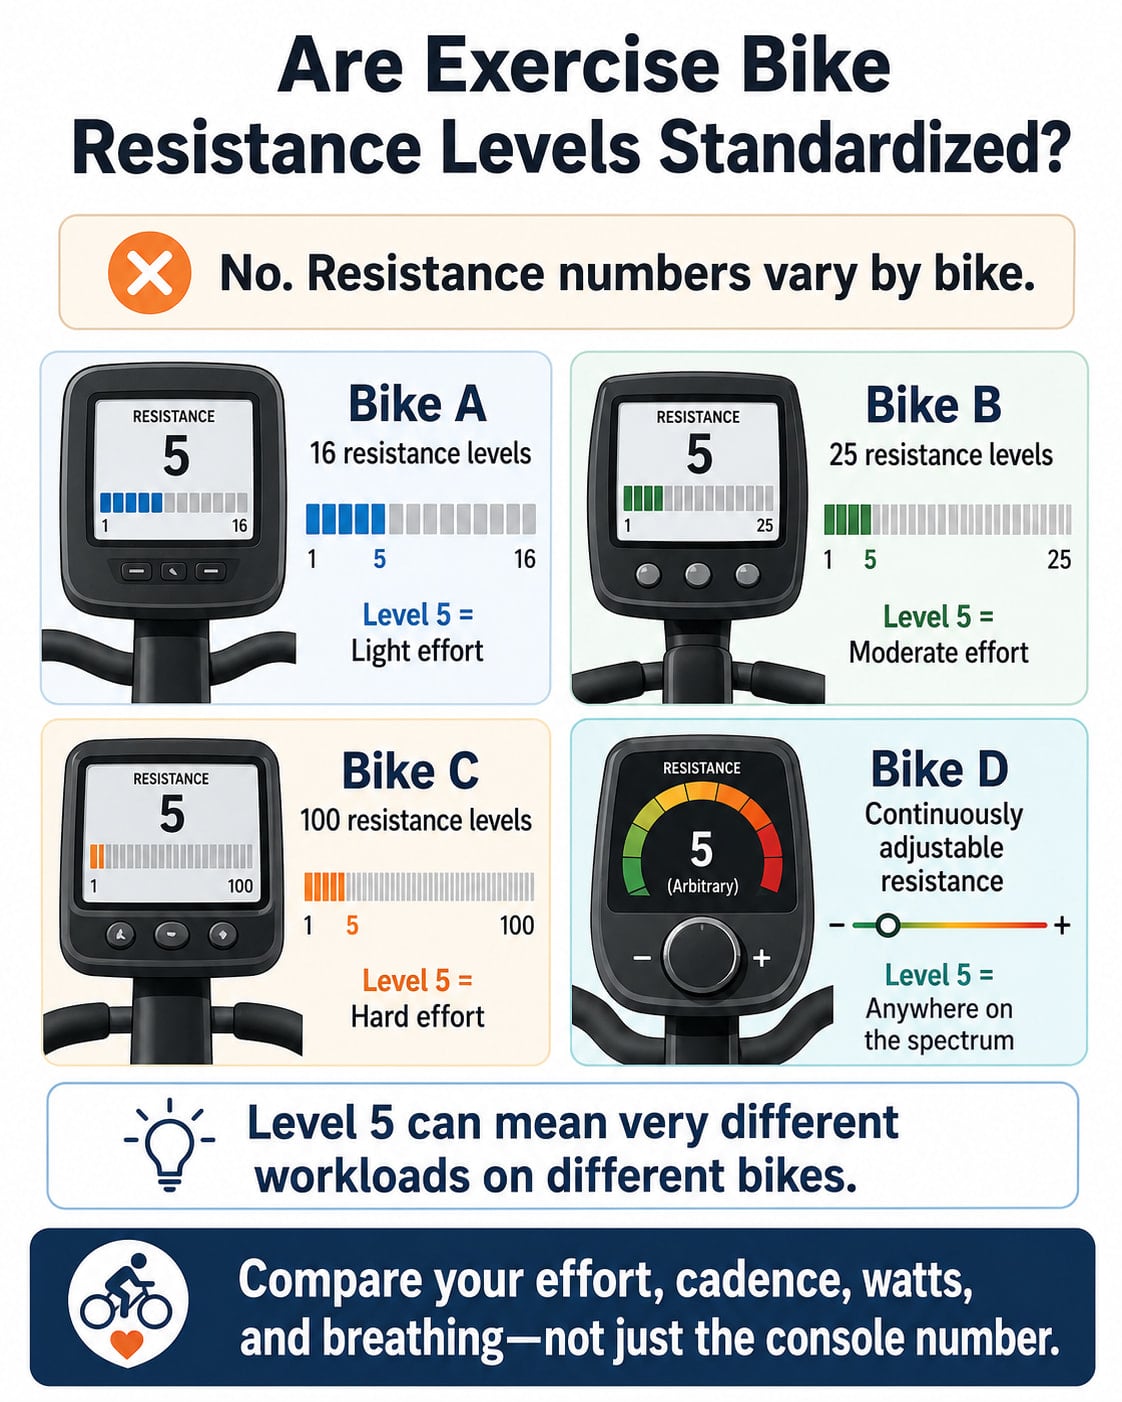
No. Stationary bike resistance levels are not standardized across machines.
Current Schwinn specifications provide a clear example:
| Stationary bike | Resistance scale |
|---|---|
| Schwinn 130 upright bike | 16 levels |
| Schwinn 230 or 290 recumbent bike | 25 levels |
| Schwinn IC4 indoor cycling bike | 100 levels |
| Schwinn IC3 indoor cycling bike | Infinitely variable resistance |
The official Schwinn IC4 specifications list 100 magnetic resistance levels, while other bikes from the same manufacturer use 16, 25, or infinitely variable resistance.
This means level 5 can represent:
- Half of the range on a 10-level bike
- One-quarter of the range on a 20-level bike
- A very light setting on a 100-level bike
- Nothing at all on a bike without numbered levels
Resistance can also feel different between two bikes with the same number of levels because of differences in flywheel design, calibration, maintenance, and resistance technology.
How to Find the Right Resistance in Five Steps
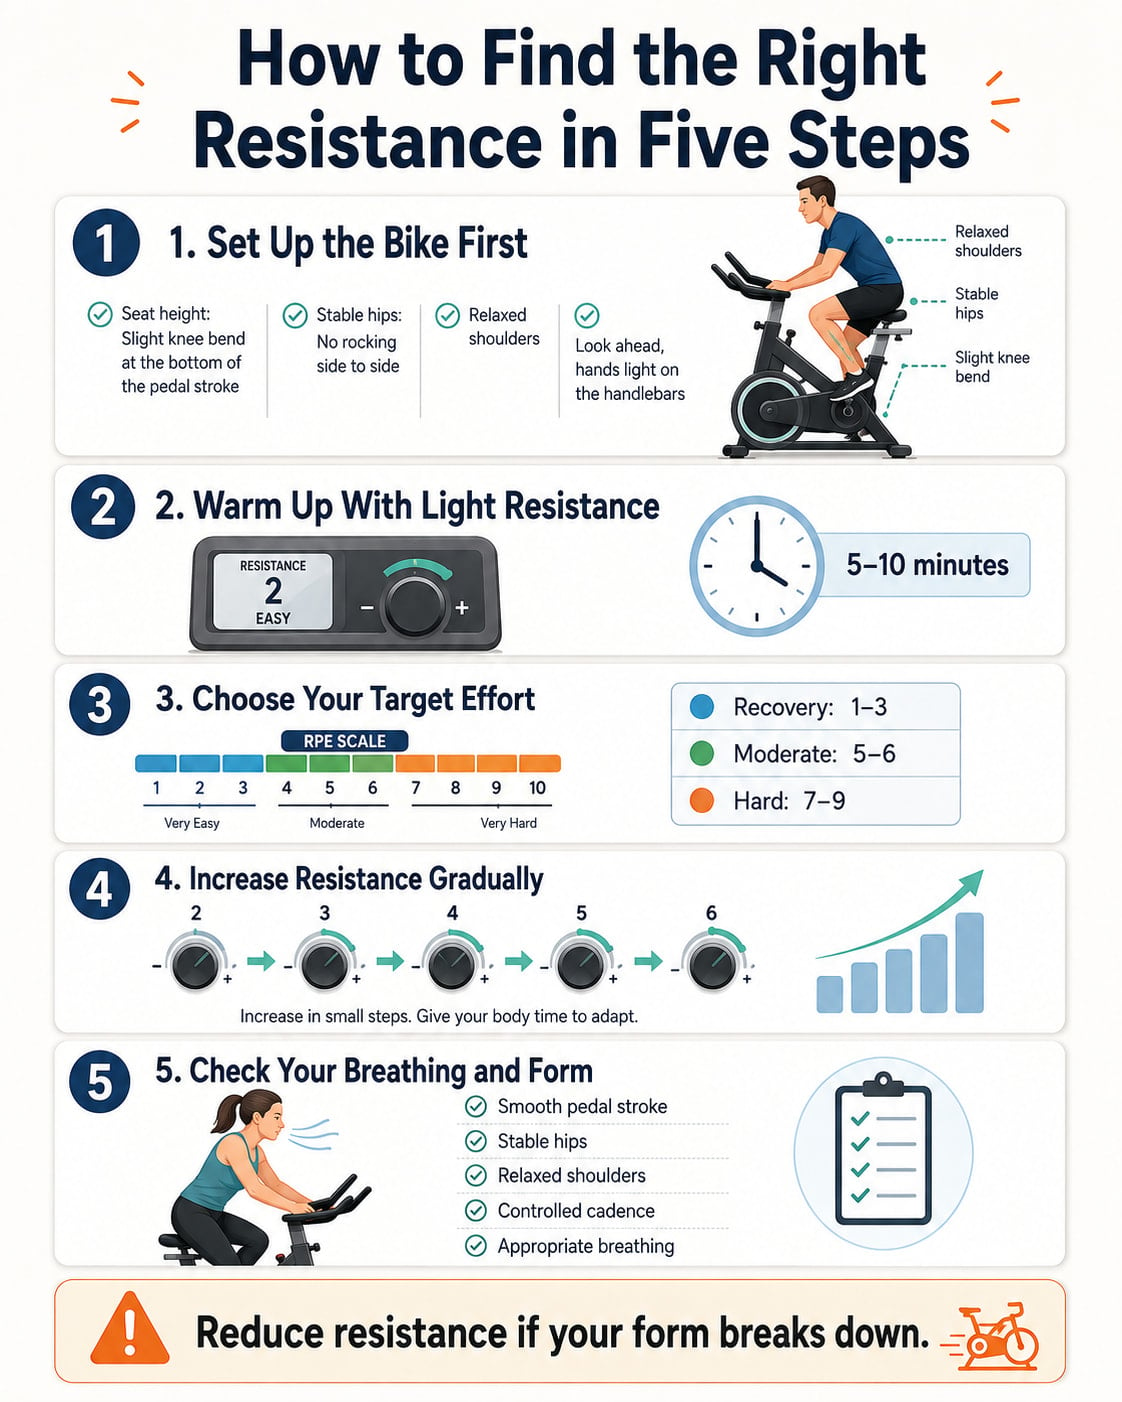
1. Set Up the Bike First
Adjust the seat before evaluating the resistance. At the bottom of the pedal stroke, your knee should remain slightly bent rather than fully locked.
Your hips should stay level instead of rocking from side to side. Keep your feet secure on the pedals, shoulders relaxed, and hands light on the handlebars.
Poor bike setup can cause discomfort and make a manageable resistance feel unnecessarily difficult. Research reviews identify saddle height, saddle position, cadence, power, and foot position as factors that can influence knee mechanics during cycling.
2. Warm Up With Light Resistance
Begin with 5–10 minutes of easy cycling. Use enough resistance to maintain control, but keep the effort around 1–3 out of 10.
The American Heart Association recommends warming up for 5–10 minutes by performing the planned activity at a slower, easier pace.
3. Choose Your Target Effort
Decide what type of workout you are doing before increasing the resistance.
For example:
- Recovery: 1–3 out of 10
- Easy exercise: 3–4 out of 10
- Moderate cardio: 5–6 out of 10
- Hard interval: 7–9 out of 10
Without a target, it is easy to make every workout too easy or turn every session into an unnecessarily hard effort.
4. Increase Resistance Gradually
Add one small level or a slight turn of the resistance knob. Pedal for 30–60 seconds before deciding whether to add more.
Continue until you reach your target effort without losing control of your posture or cadence.
5. Check Your Breathing and Form
The correct setting should match the intended workout while allowing you to:
- Keep your hips stable
- Maintain a smooth pedal stroke
- Keep your knees tracking naturally
- Avoid pulling excessively on the handlebars
- Maintain the planned cadence
- Complete the planned interval or workout duration
Reduce the resistance when you must twist your torso, rock your hips, strain through each revolution, or slow far below the intended cadence.
What Stationary Bike Resistance Level Should You Use?
Resistance for Beginners
Beginners should generally start with light-to-moderate resistance at approximately 3–5 out of 10 effort.
The pedals should not feel completely loose. You should feel consistent pressure beneath your feet, but you should not need to force the pedals around.
A suitable beginner resistance allows you to:
- Speak in full sentences
- Pedal continuously for the planned time
- Maintain relaxed shoulders
- Avoid bouncing or rocking
- Finish feeling like you could have continued a little longer
Start near the lower end of your particular bike’s range, then increase the setting in small increments. Federal physical-activity guidance advises inactive people to “start low and go slow” by beginning with lower-intensity activity and gradually increasing duration and frequency.
Resistance for Moderate Cardio
For moderate cardiovascular exercise, use a resistance that produces an effort of 5–6 out of 10.
Your breathing should be noticeably faster, but you should still be able to talk. You should not be able to sing comfortably.
The resistance should feel substantial enough that you are working against the pedals, but not so heavy that your cadence declines continuously.
This level is appropriate for many steady workouts lasting approximately 20–60 minutes, depending on your fitness, health, and experience.
Resistance for Endurance Workouts
Endurance rides typically work best at a sustainable effort of 4–6 out of 10.
Use enough resistance to create steady cardiovascular and muscular work without causing your legs to fail early. You should be able to maintain a consistent cadence and posture for most of the session.
Your resistance may be too high for an endurance workout when:
- Your quadriceps fatigue within the first few minutes
- Your cadence keeps falling
- You repeatedly need to stop pedaling
- Your hips begin rocking
- The workout feels like a continuous hill climb
Endurance develops through consistent, sustainable work. Using the highest resistance you can tolerate is not necessary.
Resistance for Weight Management
There is no special “fat-burning” resistance level.
The most useful resistance is one that helps you perform regular, sufficiently long workouts at a moderate or vigorous intensity. Total activity, workout duration, nutrition, recovery, and long-term consistency matter more than selecting one console number.
As of August 2026, the current Physical Activity Guidelines for Americans recommend 150–300 minutes of moderate-intensity aerobic activity or 75–150 minutes of vigorous aerobic activity per week for the most health benefits. Adults should also complete muscle-strengthening activity on at least two days per week.
You can accumulate that activity through steady cycling, intervals, or a combination of both.
Resistance for Hill Workouts
For a simulated hill, increase the resistance until the pedals feel heavy while your movement remains controlled. Aim for approximately 6–8 out of 10 effort.
The Spinning program commonly uses 60–80 RPM for simulated climbs and 80–110 RPM for flat-road riding. These are indoor-cycling reference ranges, not mandatory targets for every upright or recumbent bike.
Use the indoor-cycling cadence guidance from Spinning as a general reference rather than a rigid rule.
Lighten the resistance when you cannot keep the pedals moving smoothly or must use exaggerated upper-body movement to complete each revolution.
Resistance for HIIT
High-intensity interval training alternates hard work with easier recovery.
During a hard interval, resistance and cadence should combine to produce an effort of approximately 7–9 out of 10. During recovery, reduce the effort to approximately 1–3 out of 10.
A simple interval pattern is:
- 30 seconds hard
- 90 seconds easy
- Repeat four to six times
The hard resistance should challenge you without causing uncontrolled pedaling or a breakdown in posture. Beginners should first become comfortable with steady cycling before adding repeated vigorous intervals.
Resistance for Recovery Rides
Recovery rides should feel genuinely easy. Use light resistance at approximately 1–3 out of 10 effort.
Keep the pedals moving fluidly without turning the ride into another demanding workout. You should be able to breathe comfortably and carry on a normal conversation.
Recovery cycling is not the time to chase high resistance, maximum calories, or personal records.
Resistance for Joint-Sensitive Exercise
Use low power and a comfortable cadence rather than forcing a heavy, slow gear. However, there is no single cadence or resistance prescription that protects every rider’s knees.
A 2012 instrumented-knee study found relatively low knee-joint forces during cycling, with the lowest forces occurring at low power, higher cadence, and greater seat height. More recent 2026 research found that knee loading is more complex: crank torque was strongly associated with instantaneous loading, while power and cadence influenced cumulative exposure differently.
The practical takeaway is to avoid excessive power and heavy grinding. Use a comfortable cadence, proper bike setup, and individualized guidance when you have knee osteoarthritis, persistent pain, or a history of surgery.
How Cadence Changes the Right Resistance
Cadence is how quickly you pedal, measured in revolutions per minute or RPM.
Resistance and cadence work together:
- Higher resistance requires more force per pedal stroke.
- Higher cadence increases the number of pedal revolutions completed each minute.
- Increasing either variable can make the workout harder.
- Increasing both at once can raise the workload quickly.
Concept2 demonstrates this relationship by having riders hold the same cadence while changing the BikeErg damper setting and observing the resulting change in watts. It also notes that workout intensity does not depend on RPM alone.
A common mistake is to focus only on resistance. For example, two riders can use the same resistance setting but produce different power because one is pedaling faster.
When Cadence Is Too Fast for the Resistance
Your resistance may be too low when:
- Your hips bounce in the saddle
- The pedals appear to run away from your feet
- Your legs move faster than you can control
- You cannot maintain pressure through the pedal stroke
- You exceed your planned cadence without reaching the target effort
Add a small amount of resistance and reassess your control.
When Resistance Is Too Heavy for the Cadence
Your resistance may be too high when:
- Your cadence falls sharply
- You must rock your hips or twist your torso
- You pull hard on the handlebars
- Each pedal stroke feels like a maximum-effort push
- You cannot sustain the interval
- You feel sharp or increasing joint pain
Reduce the resistance until your movement becomes controlled again.
Resistance Levels vs Watts, Heart Rate, and RPE
A resistance number provides limited information by itself. Combining several metrics gives you a clearer picture of workout intensity.
| Metric | What it measures | Main benefit | Main limitation |
|---|---|---|---|
| Resistance level | The bike’s selected setting | Easy to adjust and repeat on the same bike | Not standardized across bikes |
| Cadence | Pedal revolutions per minute | Shows pedaling speed | Does not show how much force you are applying |
| Watts | External cycling power | More objective than a resistance number | Display accuracy and calibration vary |
| Heart rate | Your cardiovascular response | Helps monitor internal effort | Affected by medication, heat, stress, sleep, and fitness |
| RPE | Your perceived effort | Works on almost any bike | Subjective |
| Talk test | How easily you can speak | Simple and equipment-free | Less precise during short intervals |
Using Heart Rate
The American Heart Association’s target heart-rate guidance places moderate intensity at approximately 50%–70% of estimated maximum heart rate and vigorous intensity at approximately 70%–85%.
The common maximum-heart-rate estimate is 220 minus age, but this is only a general guide. Individual responses vary.
Medications that affect heart rate can make standard zones less useful. In that situation, perceived exertion and the talk test may provide more practical feedback, although individualized medical guidance may still be necessary.
Using Watts
Watts measure how much external power you are producing. They are generally more useful than a resistance number when tracking progress on the same accurately measuring bike.
The 2024 Adult Compendium of Physical Activities assigns progressively higher energy costs to increasing stationary-bike power:
| Stationary cycling workload | Compendium value |
|---|---|
| 25–30 watts | 3.5 METs |
| 60 watts | 5.0 METs |
| 90–100 watts | 6.0 METs |
| 126–150 watts | 8.0 METs |
| 151–199 watts | 10.3 METs |
These values describe standardized activity costs, not personalized workout prescriptions. The same wattage can feel easy to an experienced cyclist and very difficult to a beginner.
Signs Your Stationary Bike Resistance Is Too Low
Resistance may be too low for the planned workout when:
- You feel almost no pressure beneath your feet
- Your hips bounce as cadence increases
- The pedals move faster than you can control
- You cannot reach the intended effort despite pedaling quickly
- Your feet lose smooth contact with the pedals
- You finish a planned hard interval feeling completely unchallenged
Low resistance is appropriate for warm-ups and recovery. It becomes a problem only when it prevents you from reaching the goal of the workout or maintaining control.
Signs Your Stationary Bike Resistance Is Too High
Resistance may be too high when:
- Your cadence drops immediately
- Your hips rock with every pedal stroke
- Your torso twists from side to side
- You grip or pull the handlebars forcefully
- Your knees stop tracking naturally
- You cannot sustain the planned effort
- You experience sharp, worsening, or persistent joint pain
A hard workout should feel difficult, but difficulty should come from controlled effort—not poor movement.
How to Increase Stationary Bike Resistance Safely
Increase resistance gradually rather than making large jumps.
A practical progression is:
- Establish a comfortable workout duration.
- Maintain consistent form and cadence.
- Add one small resistance increase during part of the ride.
- Keep the rest of the workout unchanged.
- Repeat the setting once it feels manageable.
- Add another small increase only when needed.
Avoid increasing resistance, cadence, interval length, and total workout duration all at once. Changing one variable at a time makes it easier to understand how your body responds.
Keep at least some rides easy. Performing every workout at a high resistance can limit recovery and make consistent training harder.
A 20-Minute Resistance-Finder Workout
Use this session to identify useful settings on your particular bike.
| Time | Effort | Instructions |
|---|---|---|
| 0–5 minutes | 2–3 out of 10 | Use light resistance and establish a smooth cadence |
| 5–10 minutes | 4–5 out of 10 | Add resistance until you feel steady, moderate leg pressure |
| 10–11 minutes | 6–7 out of 10 | Add resistance while keeping your posture stable |
| 11–12 minutes | 2–3 out of 10 | Reduce resistance and recover |
| 12–13 minutes | 6–7 out of 10 | Repeat the controlled hard effort |
| 13–14 minutes | 2–3 out of 10 | Recover |
| 14–15 minutes | 6–7 out of 10 | Complete one final hard effort |
| 15–20 minutes | 1–3 out of 10 | Gradually reduce resistance and cool down |
Record the resistance number, cadence, and watts used at each effort. These personal reference points are more useful than another rider’s settings.
Common Resistance-Level Mistakes
Treating the Console Number as Universal
Level 10 is not automatically advanced, and level 5 is not automatically moderate. Always interpret the number within the range and design of your bike.
Using Almost No Resistance at High Speed
Fast pedaling without enough tension may cause bouncing and poor pedal control. Add enough resistance to keep the movement stable.
Grinding at Heavy Resistance
Heavy resistance is not always more effective. When cadence becomes extremely slow and form deteriorates, reduce the load.
Copying an Instructor’s Exact Setting
An instructor’s number may not translate to your bike. Match the requested effort, cadence, and riding position instead.
Chasing the Console’s Calorie Estimate
Calorie displays are estimates. Focus on consistent workouts, duration, power when available, and your overall activity pattern.
Ignoring Bike Fit
Seat position can affect comfort and knee mechanics. Correct your setup before assuming resistance is the only cause of discomfort.
When to Stop Exercising
Stop cycling if you experience chest pain, dizziness, faintness, severe or unusual shortness of breath, or symptoms that feel medically concerning. Seek appropriate medical assistance rather than attempting to push through them.
Consult a qualified healthcare professional before beginning vigorous cycling when you have an uncontrolled health condition, are recovering from surgery, or have been advised to limit physical activity.
Frequently Asked Questions
What resistance level should a beginner use on a stationary bike?
A beginner should use a light-to-moderate resistance that feels approximately 3–5 out of 10. You should feel some tension beneath your feet while remaining able to speak in full sentences and maintain stable posture.
The exact number depends on the bike. Start near the lower end of its range and increase gradually.
Is level 5 a good resistance on an exercise bike?
Level 5 may be suitable on some bikes, but the number is meaningless without knowing the full resistance scale and how the machine is calibrated.
Level 5 is halfway on a 10-level bike but only 5% of the range on a 100-level bike. Judge the setting by your effort, breathing, cadence, and form.
What stationary bike resistance should I use for weight loss?
Use a resistance that allows you to accumulate regular moderate-to-vigorous activity. For steady workouts, that commonly means an effort of 5–6 out of 10.
There is no single fat-loss resistance level. Long-term weight change depends on your overall energy balance, nutrition, activity, sleep, and consistency.
Is high resistance better than pedaling faster?
Neither approach is automatically better.
Higher resistance increases the force required per pedal stroke. Faster cadence increases the number of pedal revolutions. Both can raise workout intensity, and different combinations serve different goals.
Use moderate resistance with a sustainable cadence for endurance. Use heavier controlled resistance for simulated hills, and use faster cadence or more resistance for intervals depending on the workout.
Does high stationary bike resistance build leg muscle?
Heavy cycling resistance can challenge the quadriceps, glutes, hamstrings, and calves and support muscular endurance. However, stationary cycling should not automatically replace progressive strength training when increasing maximal strength or muscle size is the primary goal.
Can high resistance hurt your knees?
Excessive resistance may contribute to discomfort when it causes heavy crank torque, very slow grinding, poor knee tracking, or loss of posture. Bike setup, prior injuries, training volume, cadence, and individual joint health also matter.
Reduce the resistance if you feel sharp or worsening knee pain. Persistent pain should be evaluated by an appropriate healthcare professional.
How often should I change resistance during a workout?
You can leave resistance steady during an endurance ride or change it repeatedly during hills and intervals.
Adjust it whenever necessary to maintain the intended effort. Fatigue may make the same setting feel harder later in the workout, so reducing the level is appropriate when needed to preserve form.
Conclusion
The best stationary bike resistance level is not a universal console number. It is the setting that matches your workout goal while allowing controlled cadence, stable posture, and appropriate breathing.
Use an effort of 3–5 out of 10 when beginning, 5–6 for moderate steady cardio, and 7–9 for challenging intervals when vigorous exercise is appropriate for you. Adjust the resistance whenever your effort moves outside the target range or your form begins to deteriorate.
On your next ride, spend the warm-up identifying your easy, moderate, and hard settings. Record those numbers so you can build workouts around your own bike and fitness level.
References
- American Heart Association: Target Heart Rates
- American Heart Association: Warm Up and Cool Down
- 2024 Adult Compendium: Stationary Bicycling MET Values
- Schwinn Fitness: Indoor Bike Resistance Specifications
- Spinning: Indoor Cycling Cadence Ranges
- Concept2: Managing Resistance and Intensity on the BikeErg
- PubMed: Loading of the Knee Joint During Ergometer Cycling
- PubMed: Instantaneous and Cumulative Knee Joint Loading in Cycling