
Yoga for upper back pain can help reduce stiffness and muscle tension by improving thoracic (upper-back) mobility, opening tight chest and shoulder tissues, and strengthening posture-support muscles. If your discomfort is linked to prolonged sitting, rounded shoulders, or a stiff mid-back, a short, gentle yoga routine done consistently is often a practical at-home option.
Upper back pain can come from many causes, so safety matters. If a pose increases pain or causes new symptoms, stop and reassess. General back-pain guidance emphasizes gentle movement and stopping if symptoms worsen, as outlined by the NHS.
What Causes Upper Back Pain?
Upper back pain often involves the thoracic spine, the part of your spine that connects to the ribcage and supports posture. The Cleveland Clinic explains that this region plays a key role in upper-body movement and alignment.
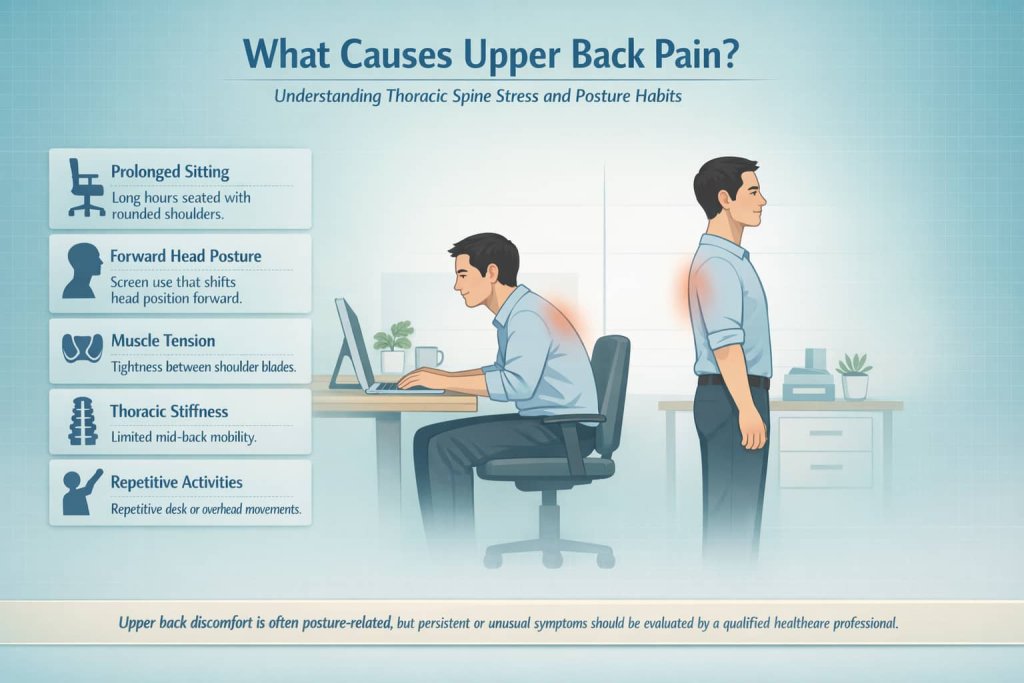
Common causes include:
- Prolonged sitting with rounded shoulders
- Forward head posture from screen use
- Muscle tension between the shoulder blades
- Thoracic stiffness
- Repetitive desk or overhead activities
Most upper back discomfort is posture- or muscle-related, but persistent or unusual pain should be evaluated.
Why yoga can help upper back pain
Your thoracic spine is the middle section of your spine (T1–T12) and connects to the ribcage, so stiffness here can affect how your shoulders, neck, and mid-back feel during daily life. The Cleveland Clinic explains how the thoracic spine supports posture and movement of the upper body.
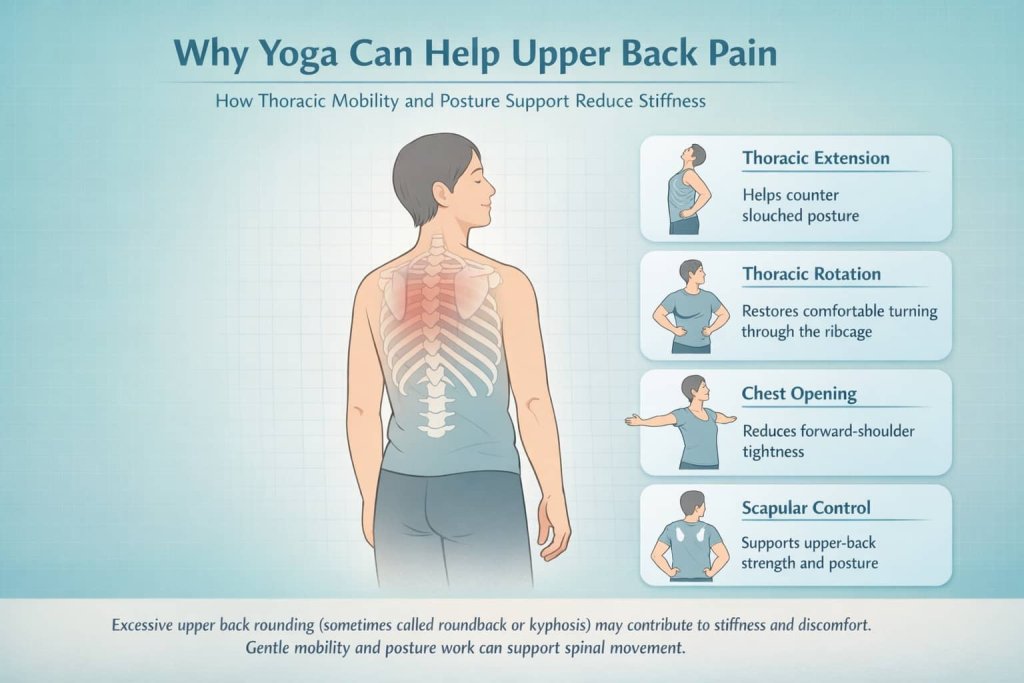
A smart upper-back yoga plan usually focuses on:
- Thoracic extension (gently countering slouching)
- Thoracic rotation (restoring comfortable turning)
- Chest opening (reducing forward-shoulder tightness)
- Scapular control and upper-back strength (supporting better posture)
If your upper back rounding is pronounced, it may reflect a posture pattern sometimes described as kyphosis or “roundback,” which can contribute to stiffness and discomfort, as described by AAOS OrthoInfo.
8 Best Yoga Poses for Upper Back Pain Relief at Home
Ease stiffness and shoulder tension with these 8 gentle yoga poses designed to support upper back mobility and posture.
This simple at-home routine helps improve thoracic movement and reduce everyday muscle tightness safely.
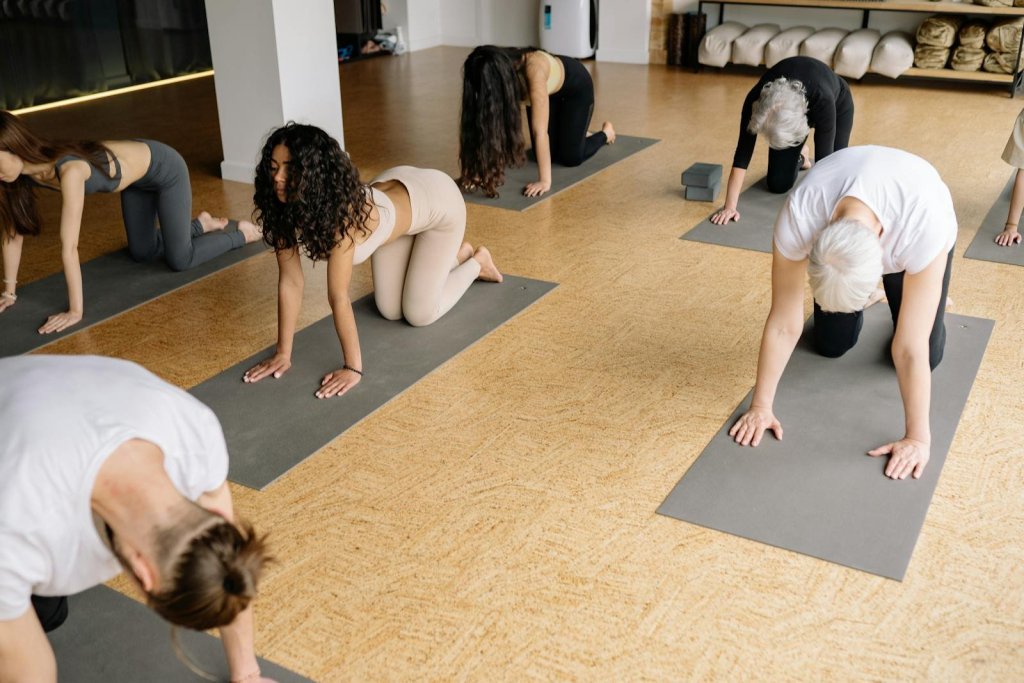
1) Cat-Cow Pose
How to do it:
- Start on hands and knees with wrists under shoulders and knees under hips.
- Inhale: lift your chest slightly, draw shoulder blades back gently, and allow mild upper-back extension.
- Exhale: round your upper back slightly and let your shoulder blades spread apart.
- Keep the movement smooth and pain-free for 6–10 slow cycles.
Why it works: Cat-Cow gently moves your spine through flexion and extension, warming up the thoracic area and helping you restore smoother movement between the shoulder blades. This controlled mobility can reduce stiffness often linked to prolonged sitting.
Muscles worked: Spinal extensors, deep trunk stabilizers, and scapular stabilizers work together to support controlled spinal motion.
Trainer Tip: Think “ribcage moves” more than “neck cranks.” Keep your neck long and let the thoracic spine lead the motion.
2) Thread the Needle Pose
How to do it:
- Start on hands and knees.
- Slide one arm under the other, rotating your chest toward the floor.
- Rest your shoulder and the side of your head lightly on the mat.
- Keep hips stacked over knees and breathe for 5–8 slow breaths.
Why it works: This controlled thoracic rotation can help reduce stiffness between the shoulder blades and improve rotational mobility through the ribcage rather than the lower back.
Muscles worked: Thoracic rotators, posterior shoulder muscles, and mid-back stabilizers assist in maintaining alignment.
Trainer Tip: If your shoulder feels uncomfortable, reduce the rotation depth or place a folded towel under the shoulder for support.
3) Puppy Pose (Extended Child’s Pose)
How to do it:
- Start on hands and knees.
- Walk your hands forward while keeping hips over knees.
- Let your chest move toward the floor comfortably.
- Keep ribs softly tucked to avoid excessive low-back arching.
- Hold for 5–8 breaths.
Why it works: Puppy Pose opens the upper back and shoulders while encouraging gentle thoracic extension without placing heavy load on the spine. It can be helpful for posture-related tightness.
Muscles worked: Lats, upper back muscles, and shoulder stabilizers are gently stretched and activated.
Trainer Tip: Place a pillow or yoga block under your chest if shoulder mobility is limited or if the stretch feels too intense.
4) Child’s Pose
How to do it:
- Kneel and sit back toward your heels.
- Reach arms forward or rest them by your sides.
- Let your forehead rest on the mat or a pillow.
- Breathe slowly for 6–10 breaths.
Why it works: Child’s Pose reduces muscle guarding and offers a supported stretch for the mid-back while encouraging calm, diaphragmatic breathing.
Muscles worked: Mid-back tissues and lats are gently stretched while breathing muscles engage to promote relaxation.
Trainer Tip: Use a folded blanket behind the knees or under the hips if needed for comfort.
5) Sphinx Pose
How to do it:
- Lie on your stomach and prop up on forearms.
- Keep elbows under shoulders and forearms parallel.
- Gently lift your chest and lengthen through the crown of your head.
- Keep the low back comfortable and avoid forcing range.
- Hold 20–40 seconds with steady breathing.
Why it works: Sphinx creates mild, supported extension that can help counter rounded posture patterns and improve thoracic mobility without aggressive backbending.
Muscles worked: Spinal extensors and upper-back postural muscles engage lightly to support the lifted position.
Trainer Tip: If you feel compression in the low back, move elbows slightly forward and focus on lifting the chest rather than bending deeply.
6) Low Cobra Pose
How to do it:
- Lie on your stomach with hands under shoulders.
- Press lightly to lift your chest slightly off the floor.
- Keep elbows close to your body and shoulders relaxed.
- Hold 10–20 seconds and repeat 2–4 times.
Why it works: Low Cobra strengthens upper-back extensors and supports improved posture without requiring deep spinal extension.
Muscles worked: Thoracic extensors, lower trapezius, and rhomboids help stabilize the shoulder blades.
Trainer Tip: Keep the movement small and controlled. Height is less important than proper muscle engagement.
7) Supported Fish Pose
How to do it:
- Place a pillow or yoga block lengthwise under your upper back.
- Slowly lie back so your chest opens comfortably.
- Let arms rest out to the sides with palms up.
- Breathe slowly for 30–60 seconds.
Why it works: Supported Fish opens the chest and front shoulders, which may help reduce posture-related upper back tightness from prolonged sitting.
Muscles worked: Chest and anterior shoulder muscles are stretched while upper-back stabilizers gently engage.
Trainer Tip: Support your head with a towel if your neck feels strained, and keep the position comfortable.
8) Eagle Arms (Seated or Standing)
How to do it:
- Sit or stand tall and reach arms forward.
- Cross one arm over the other and bring palms together or hold opposite shoulders.
- Lift elbows slightly and draw hands away from your face.
- Hold 20–40 seconds per side.
Why it works: Eagle Arms targets tight posterior shoulder and upper-back tissues often associated with desk posture and rounded shoulders.
Muscles worked: Posterior shoulders, upper back muscles, and scapular stabilizers assist in maintaining alignment.
Trainer Tip: Keep ribs stacked over hips and avoid arching the lower back to maintain proper spinal alignment.
How to use this “8 best poses” routine at home
A simple structure that works for most people:
- Do 4–6 poses per session (you don’t need all 8 every time)
- Hold each pose 20–45 seconds (or 5–8 slow breaths)
- Repeat the routine 3–5 days per week
- Aim for “better movement” today, not “maximum stretch”
Safety rules before you start
Use these simple rules to keep yoga for upper back pain safe at home:
- Keep the intensity mild to moderate. You should feel stretching or effort, not sharp pain.
- Move slowly into positions and breathe normally (no breath-holding).
- Stop if pain gets worse or you feel new symptoms.
- Avoid forcing end range in deep backbends or aggressive twists.
- If your pain is severe, persistent, follows a fall or accident, or comes with concerning symptoms, seek medical care.
Common mistakes to avoid
- Forcing stretches into pain
- Over-twisting from the lower back
- Shrugging shoulders during poses
- Only stretching without including light strengthening
When to See a Healthcare Professional
Seek medical advice if:
- Pain is severe or worsening
- Symptoms don’t improve with self-care
- Pain follows an injury
- You notice numbness, tingling, or weakness
The NHS recommends stopping activities that worsen pain and getting medical guidance when symptoms are concerning.
FAQ: Yoga for Upper Back Pain
How often should I do yoga for upper back pain?
10–20 minutes, 3–5 days per week is a reasonable starting point.
What if a pose increases my pain?
Stop that pose and modify range or intensity. If pain persists, seek medical advice.
Can yoga help posture-related upper back pain?
It may support thoracic mobility and chest opening, which can help improve posture patterns over time.
Is twisting safe?
Gentle, controlled thoracic rotation is usually tolerated, but avoid forcing range.
What’s the quickest pose for relief?
Cat-Cow followed by Child’s Pose is a simple and effective combination.
Should I combine yoga with other treatments?
Depending on the cause, combining yoga with ergonomic adjustments and strength training may be helpful.
Conclusion
Start with Cat-Cow, Child’s Pose, and Thread the Needle as your foundation, then add Sphinx or Supported Fish when you feel stiff. Consistency, gentle progression, and symptom awareness matter more than intensity.