
Piriformis strengthening exercises may help improve hip stability, support glute function, and reduce piriformis-related discomfort, especially when the problem is linked to deep gluteal irritation and poor hip control rather than a medical emergency.
This matters because piriformis-related pain can feel like stubborn buttock tightness or sciatica-like symptoms, and the right exercise plan often works better when it strengthens the whole hip, not just one small muscle. The best approach is usually a mix of gentle strengthening, smart progression, and attention to symptoms, which aligns with guidance from the NHS, piriformis overviews in NCBI Bookshelf, and a 2024 review in PubMed Central.
What are piriformis strengthening exercises?
Piriformis strengthening exercises are movements that train the deep hip muscles and nearby glutes to better control the femur and pelvis during walking, stairs, squatting, and single-leg tasks.
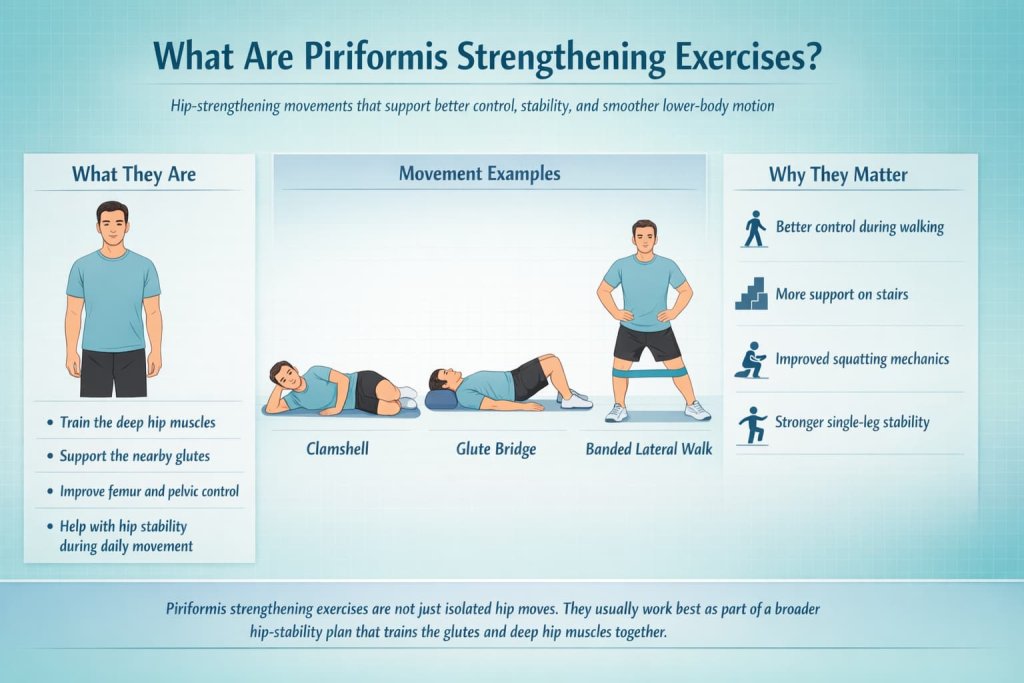
The piriformis helps externally rotate the hip, and when the hip is flexed it also contributes to abduction mechanics, which is one reason rehab often includes clamshells, bridges, lateral band work, and other hip-stability drills instead of isolated stretching alone.
11 best piriformis strengthening exercises
Build stronger hips and improve stability with these 11 piriformis strengthening exercises designed to support better movement control. These simple moves may also help reduce piriformis-related discomfort when used as part of a gradual, well-structured routine.
1. Clamshell
How to do it
- Lie on your side with knees bent and feet together.
- Keep your hips stacked and your feet touching.
- Lift the top knee without rolling your pelvis backward.
- Pause, then lower with control.
- Repeat on both sides.
Why it works:
The clamshell trains the hip external rotators and glute-focused stabilizers in a simple side-lying position. It is often one of the easiest starting points when hip rotation control is poor.
Muscles worked:
Piriformis, gluteus medius, gluteus maximus, deep hip external rotators.
Trainer Tip:
Do not chase height. A small, clean range usually works better than opening the knee too far.
2. Side-Lying Hip Abduction
How to do it
- Lie on your side with the bottom knee bent and top leg straight.
- Keep the top foot neutral or slightly turned down.
- Lift the top leg slowly without leaning your trunk back.
- Pause briefly at the top.
- Lower under control.
Why it works:
This exercise builds the lateral hip muscles that help keep the pelvis stable. That matters because poor hip abductor strength can increase stress around the deep gluteal region during walking and single-leg tasks.
Muscles worked:
Gluteus medius, gluteus minimus, upper gluteus maximus, hip stabilizers.
Trainer Tip:
Keep the leg slightly behind your body instead of drifting forward.
3. Glute Bridge
How to do it
- Lie on your back with knees bent and feet flat.
- Tighten your glutes and lift your hips until your body forms a straight line from shoulders to knees.
- Pause at the top.
- Lower slowly.
- Repeat with steady breathing.
Why it works:
The glute bridge improves hip extension strength and helps reduce over-reliance on smaller deep hip muscles. It also teaches the hips to produce force without excessive pelvic motion.
Muscles worked:
Gluteus maximus, hamstrings, posterior hip stabilizers, core.
Trainer Tip:
Push through your heels and avoid arching your lower back at the top.
4. Single-Leg Bridge
How to do it
- Set up in a normal bridge position.
- Extend one leg while keeping thighs aligned.
- Press through the planted foot to raise your hips.
- Hold briefly, then lower.
- Finish reps and switch sides.
Why it works:
This adds a stronger stability demand than the standard bridge. It challenges pelvic control and can reveal side-to-side weakness that matters in piriformis-related rehab.
Muscles worked:
Gluteus maximus, hamstrings, gluteus medius, deep hip stabilizers.
Trainer Tip:
Keep your pelvis level. If it twists, go back to a two-leg bridge first.
5. Banded Lateral Walk
How to do it
- Place a loop band around your ankles or just above your knees.
- Stand with soft knees and hips slightly back.
- Step sideways with control while keeping band tension.
- Bring the other foot in without letting it snap inward.
- Continue for several steps, then return.
Why it works:
Lateral band walking targets the hip abductors and teaches better lower-body alignment. This can help improve control during standing, stair climbing, and gait.
Muscles worked:
Gluteus medius, gluteus minimus, gluteus maximus, hip stabilizers.
Trainer Tip:
Stay low, keep your toes mostly forward, and do not let the knees cave in.
6. Fire Hydrant
How to do it
- Start on hands and knees with a neutral spine.
- Keep one knee bent to 90 degrees.
- Lift that knee out to the side without rotating your trunk.
- Pause briefly.
- Lower slowly and repeat.
Why it works:
The fire hydrant combines hip abduction and external rotation control. That makes it a good fit for a program targeting piriformis support and general hip stability.
Muscles worked:
Piriformis, gluteus medius, gluteus maximus, deep hip rotators.
Trainer Tip:
Think about keeping your ribs and pelvis quiet while only the hip moves.
7. Quadruped Hip Extension
How to do it
- Begin on hands and knees.
- Brace your trunk lightly.
- Extend one leg back without arching your lower back.
- Pause when the glute contracts.
- Return and repeat.
Why it works:
This reinforces hip extension while reducing compensation from the lower back. It is a useful bridge between basic floor work and standing exercises.
Muscles worked:
Gluteus maximus, hamstrings, posterior chain, core stabilizers.
Trainer Tip:
Reach long through the heel instead of kicking high.
8. Prone Hip Extension
How to do it
- Lie face down with legs straight.
- Tighten the glute on one side.
- Lift the leg slightly off the floor without twisting the pelvis.
- Lower slowly.
- Switch sides after finishing reps.
Why it works:
Prone hip extension can improve glute recruitment in a simple setup. It is especially useful when someone struggles to feel the glutes working during more complex drills.
Muscles worked:
Gluteus maximus, hamstrings, deep hip stabilizers.
Trainer Tip:
A small lift is enough. Bigger is not better if your low back starts taking over.
9. Step-Up
How to do it
- Stand facing a low step or box.
- Place one foot fully on the step.
- Drive through that foot to stand up.
- Lower back down slowly.
- Complete reps, then switch sides.
Why it works:
Step-ups train hip and pelvic control in a real-life pattern. They also fit the movement re-education approach described in the JOSPT case report, where faulty single-leg mechanics mattered.
Muscles worked:
Gluteus maximus, gluteus medius, quadriceps, hamstrings.
Trainer Tip:
Keep the knee tracking over the middle of the foot and avoid pushing off too much with the trailing leg.
10. Split Squat
How to do it
- Stand in a staggered stance.
- Lower straight down until both knees bend comfortably.
- Keep your torso tall and pelvis controlled.
- Push through the front foot to rise.
- Repeat, then switch sides.
Why it works:
The split squat builds hip and leg strength while challenging balance and alignment. It can help improve control during daily tasks that load one leg more than the other.
Muscles worked:
Gluteus maximus, gluteus medius, quadriceps, hamstrings, core.
Trainer Tip:
Use a short range at first if deep hip loading feels too aggressive.
11. Single-Leg Balance With Band Press-Out
How to do it
- Stand on one leg with a light resistance band anchored in front of you.
- Hold the band at chest height.
- Press the band forward while keeping your pelvis level.
- Hold briefly, then bring it back.
- Repeat and switch sides.
Why it works:
This ties together hip stability, trunk control, and balance. Those qualities matter because piriformis-related discomfort often shows up when the pelvis and femur are not well controlled in single-leg stance.
Muscles worked:
Gluteus medius, gluteus maximus, deep hip stabilizers, core.
Trainer Tip:
Start near a wall or support if balance is limited.
Who may benefit most from piriformis strengthening exercises
These exercises may help people who have:
- buttock pain linked to prolonged sitting
- hip weakness or poor single-leg control
- discomfort during stairs, walking, or running
- piriformis-related tightness that keeps coming back
- mild sciatica-like symptoms that have already been medically screened
They are usually most useful when symptoms are mechanical and activity-related. They are not a substitute for medical evaluation when symptoms are severe, progressive, or linked to red flags. The NHS sciatica guidance advises urgent assessment for symptoms such as bowel or bladder changes, numbness around the genitals or anus, or severe weakness in both legs.
Before you start
Start with low pain and good control. Mild muscle effort is fine, but sharp pain, increasing leg symptoms, or growing numbness is a sign to stop and get evaluated. The NHS exercise page notes that exercise content is for people in good general health with a reasonable level of fitness, which is a reminder to scale movements to your current ability.
A practical way to begin is:
- train 3 to 4 times per week
- start with 1 to 2 sets of 8 to 12 reps
- move slowly and keep the pelvis steady
- stop any exercise that clearly worsens radiating pain
- progress only when the movement feels controlled
A simple piriformis strengthening routine
Here is an easy starting template:
Beginner option
- Clamshell: 2 sets of 10 to 12 reps
- Glute bridge: 2 sets of 10 to 12 reps
- Side-lying hip abduction: 2 sets of 8 to 10 reps
- Fire hydrant: 2 sets of 8 to 10 reps
- Banded lateral walk: 2 rounds of 8 to 10 steps each way
Progression option
- Single-leg bridge: 2 to 3 sets of 8 reps
- Step-up: 2 to 3 sets of 8 to 10 reps
- Split squat: 2 to 3 sets of 8 reps
- Single-leg balance with band press-out: 2 sets of 6 to 8 reps per side
Train every other day at first. Progress by adding reps, then resistance, then exercise difficulty.
Common mistakes to avoid
Doing only stretches
Stretching may feel good, but piriformis-related problems are not always solved by stretching alone. Many rehab programs also emphasize strengthening and movement control.
Letting the low back do the work
If the lower back twists, arches, or lifts the leg instead of the hip, the target muscles are not doing enough.
Progressing too fast
More load is not always better early on. Fast progression can irritate the area instead of calming it down.
Ignoring worsening nerve symptoms
Exercises should not create steadily increasing radiating pain, growing numbness, or clear weakness.
Who Should Avoid Piriformis Strengthening Exercises
Piriformis strengthening exercises are not the right starting point for everyone. Get medical advice before trying them if you have:
- severe or worsening weakness
- increasing numbness
- symptoms in both legs
- bowel or bladder changes
- numbness around the groin or saddle area
- recent trauma
- fever or unexplained weight loss
- pain that keeps getting worse
You should also avoid self-directed exercise if basic movement sharply increases radiating leg pain or if you are not sure the pain is really coming from the piriformis area. In those cases, proper assessment comes first.
When to stop and seek medical advice
Get medical care promptly if you have:
- new bowel or bladder problems
- numbness around the groin, genitals, or anus
- severe weakness
- symptoms in both legs
- major trauma
- fever, unexplained weight loss, or symptoms that keep worsening
Those signs need medical attention rather than self-directed exercise.
Do piriformis strengthening exercises actually help?
They can help, especially when the issue is related to hip weakness, poor pelvic control, or deep gluteal irritation that responds to conservative care. Current sources support exercise as part of non-surgical management, and the strongest practical takeaway is that programs often work best when they strengthen the glutes, hip abductors, and external rotators together instead of chasing the piriformis alone.
FAQs
1. What is the best exercise for piriformis strengthening?
There is no single best choice for everyone, but clamshells, bridges, side-lying hip abduction, and banded lateral walks are common starting points because they build hip stability without requiring heavy loading.
2. Can piriformis strengthening exercises help sciatica?
They may help when sciatica-like symptoms are related to deep gluteal irritation or piriformis-related compression, but not every case of sciatica comes from the piriformis. Persistent or severe symptoms need proper evaluation.
3. Should I stretch or strengthen the piriformis?
Many people benefit from both, but strengthening is often important because weak hip stabilizers can contribute to poor movement mechanics. Rehab plans commonly include both mobility and strengthening work.
4. How often should I do piriformis strengthening exercises?
A common starting point is 3 to 4 sessions per week with rest days between harder sessions. The ideal amount depends on symptom response, exercise difficulty, and overall fitness.
5. How long does it take to notice improvement?
Some people notice better control and less irritation within a few weeks, while others need longer. Improvement depends on the true cause of symptoms, how consistently you train, and whether the exercises match your movement problem.
6. Can walking help piriformis-related pain?
Gentle walking often helps many people stay mobile, and the NHS generally advises keeping active with sciatica instead of prolonged rest, unless symptoms suggest an emergency problem.
7. When should I avoid these exercises?
Avoid self-managing with exercise alone if you have red-flag symptoms, recent trauma, rapidly worsening weakness, or unexplained neurological changes.
Conclusion
Piriformis strengthening exercises can be a practical way to build stronger hips, improve movement control, and reduce recurring buttock or piriformis-related discomfort. The best results usually come from strengthening the whole hip system, progressing gradually, and stopping early if symptoms shift in the wrong direction. For many people, simple exercises like clamshells, bridges, lateral walks, and step-ups are a smart place to start.
References
- Chang C, Varacallo M. Anatomy, Bony Pelvis and Lower Limb: Piriformis Muscle. In: StatPearls. Treasure Island, FL: StatPearls Publishing; 2023.
- Martin HD, Reddy M. Deep Gluteal Syndrome. Journal of Hip Preservation Surgery. 2015;2(2):99-107.
- Exercises for Sciatica Problems. NHS.
- Sciatica. NHS inform.