
A 28 day calisthenics challenge is a simple bodyweight training plan that helps you build strength, control, and workout consistency without needing a gym. The goal is not a dramatic one-month “transformation.” The goal is to practice smart progressions, improve basic movement quality, and get stronger with exercises like squats, push-ups, lunges, planks, glute bridges, and core drills.
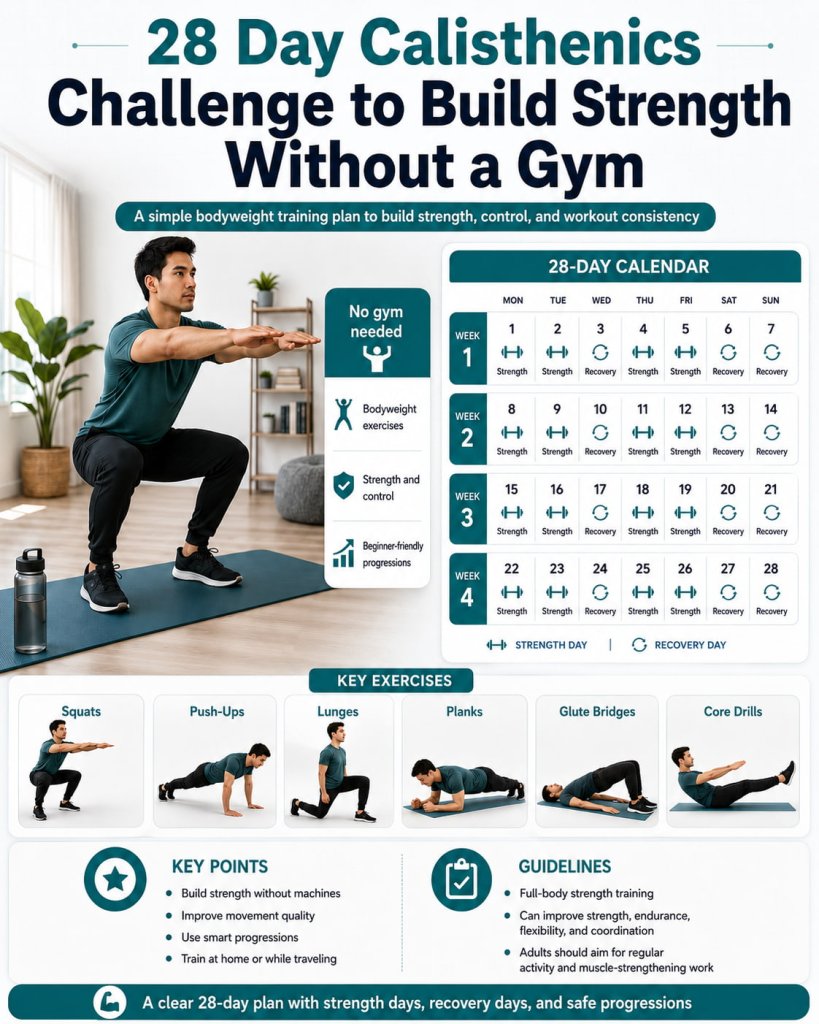
Calisthenics uses your body weight as resistance. Harvard Health describes calisthenics as full-body strength training that can improve strength, endurance, flexibility, and coordination, and it can be modified from easy to hard based on your fitness level. For general health, the CDC recommends adults get at least 150 minutes of moderate-intensity activity per week and muscle-strengthening activity on 2 or more days per week.
This challenge gives you a clear 28-day plan with strength days, recovery days, beginner-friendly options, and safe ways to progress.
What Is a 28 Day Calisthenics Challenge?
A 28 day calisthenics challenge is a four-week workout plan built around bodyweight exercises.
Instead of using machines or heavy weights, you use movements such as:
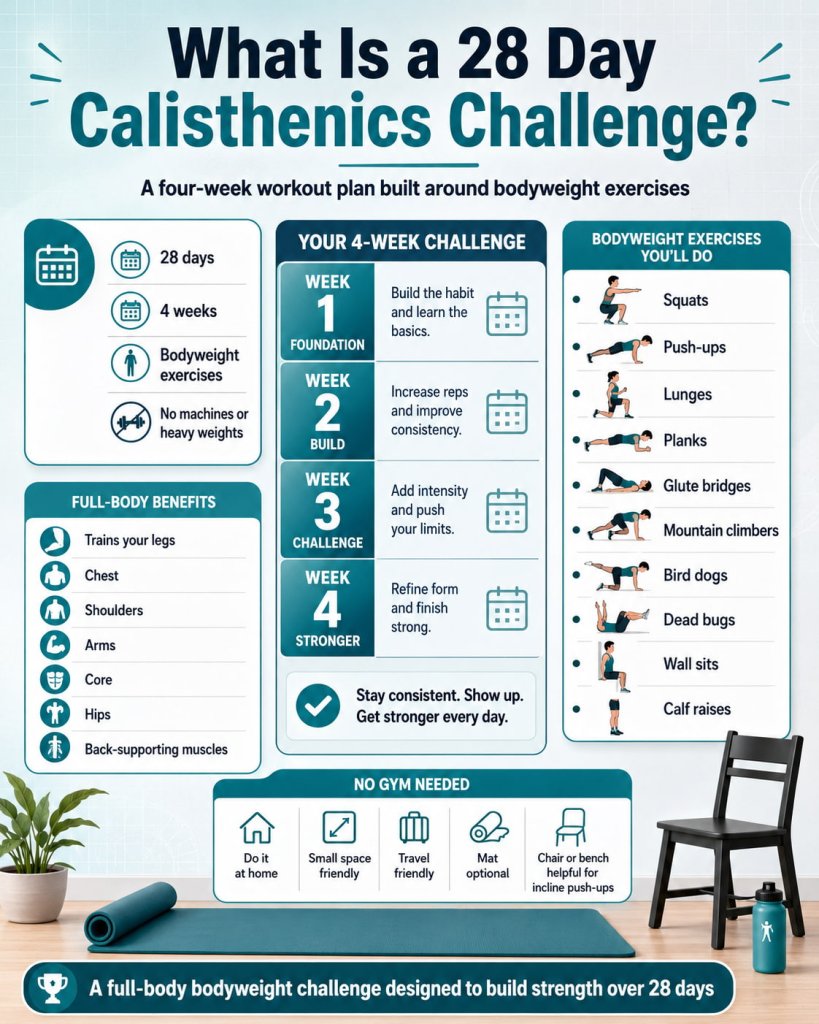
- Squats
- Push-ups
- Lunges
- Planks
- Glute bridges
- Mountain climbers
- Bird dogs
- Dead bugs
- Wall sits
- Calf raises
The challenge is designed to train your full body over 28 days. You will work your legs, chest, shoulders, arms, core, hips, and back-supporting muscles.
The best part is that you can do it at home, in a small space, or while traveling. You do not need a gym membership. A mat is optional, and a sturdy chair or bench can help with incline push-ups.
What Results Can You Expect From a 28 Day Calisthenics Challenge?
A 28 day calisthenics challenge can help you feel stronger, move better, and build a consistent workout habit.
Realistic results may include:
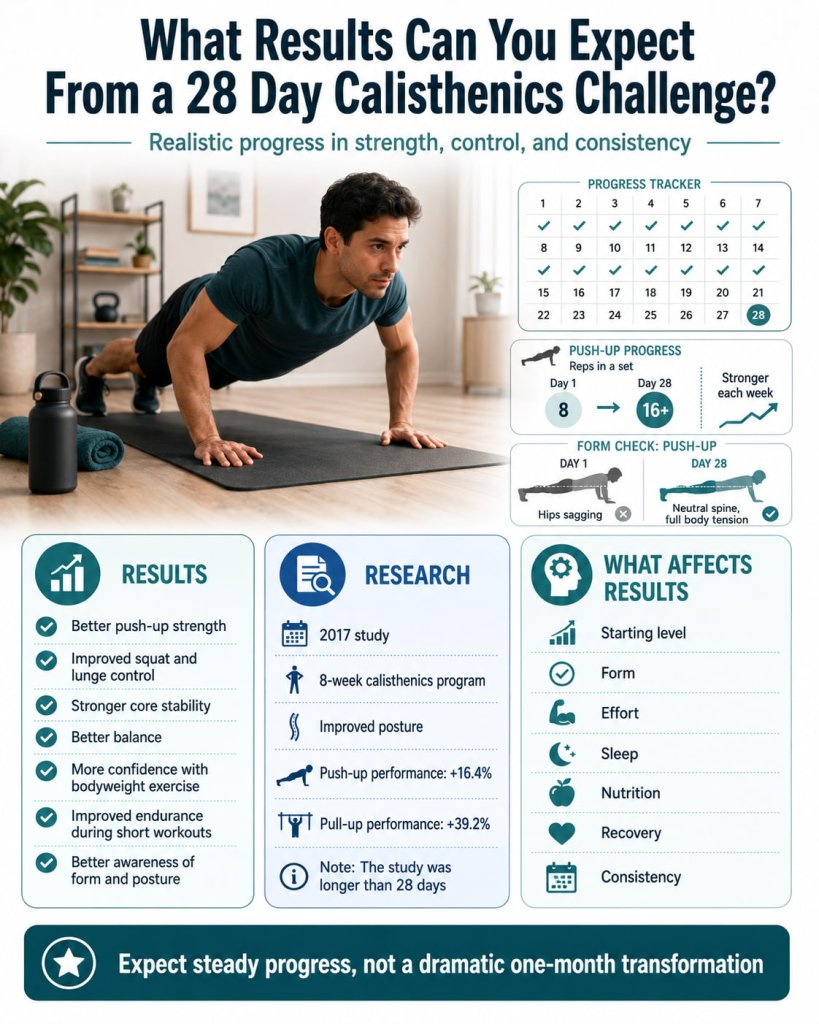
- Better push-up strength
- Improved squat and lunge control
- Stronger core stability
- Better balance
- More confidence with bodyweight exercise
- Improved endurance during short workouts
- Better awareness of form and posture
A 2017 study published in Isokinetics and Exercise Science found that an 8-week calisthenics program in untrained men improved posture, push-up performance by 16.4%, pull-up performance by 39.2%, and some body composition measures. This study was longer than 28 days, so it should not be used to promise dramatic results in one month. It does support the idea that structured calisthenics can be useful when performed consistently.
Your results will depend on your starting level, form, effort, sleep, nutrition, recovery, and consistency.
Before You Start the 28 Day Calisthenics Challenge
Before starting the challenge, set yourself up for safe, consistent training.
Mayo Clinic recommends warming up for 5 to 10 minutes before strength training, moving with control instead of rushing, resting muscles instead of training the same muscles hard on back-to-back days, and stopping if an exercise causes pain.
Use these simple safety rules:
- Warm up for 5 to 10 minutes before every workout.
- Start with easier exercise variations if needed.
- Keep reps controlled instead of fast and sloppy.
- Stop or modify if you feel sharp, worsening, or unusual pain.
- Take recovery days seriously.
- Do not chase soreness as a sign of success.
- If you are younger than 18, new to exercise, injured, or managing a health condition, get guidance from a qualified professional or trusted adult.
Equipment Needed
You can do this 28 day calisthenics challenge with no gym equipment.
Helpful but optional items:
- Exercise mat
- Sturdy chair or bench for incline push-ups
- Timer or phone stopwatch
- Water bottle
- Comfortable shoes
- Notebook or app for tracking reps
A pull-up bar or resistance band can be useful later, but they are not required for this beginner-friendly plan. Use any added equipment only if it is secure and safe.
How This 28 Day Calisthenics Challenge Works
This plan uses four training days, two lighter recovery days, and one full rest day each week.
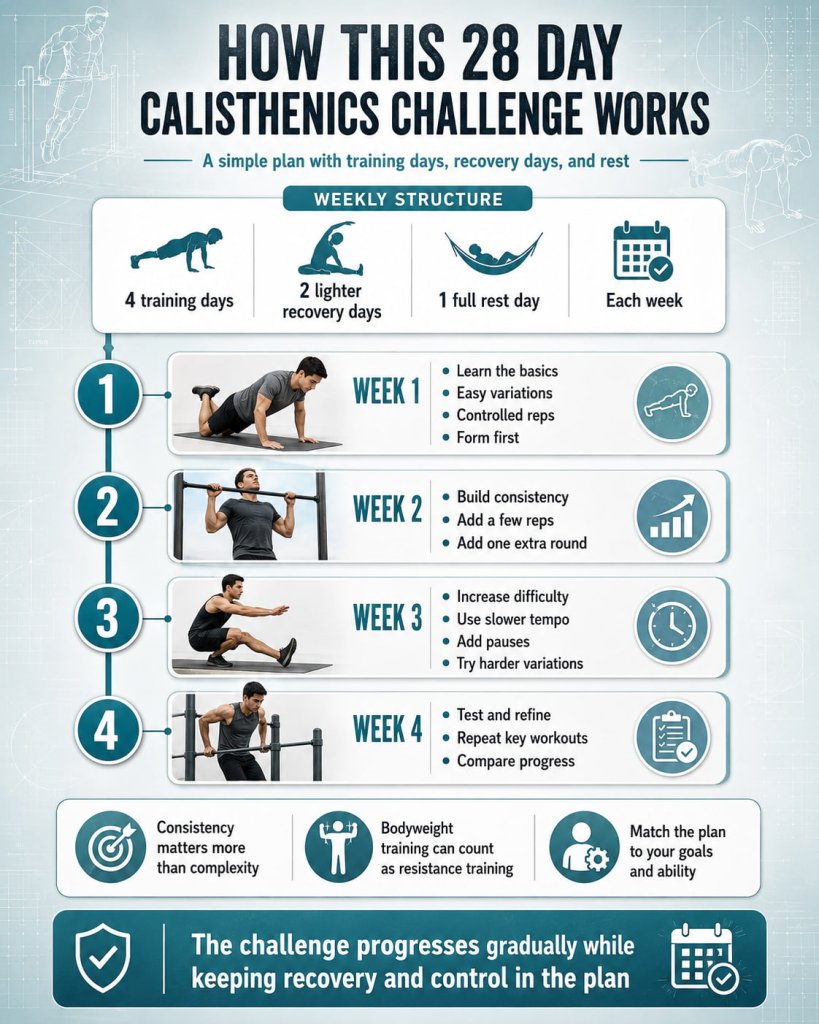
Each week has a purpose:
| Week | Main Focus | What Changes |
|---|---|---|
| Week 1 | Learn the basics | Easy variations, controlled reps, form first |
| Week 2 | Build consistency | Add a few reps or one extra round |
| Week 3 | Increase difficulty | Use slower tempo, pauses, or harder variations |
| Week 4 | Test and refine | Repeat key workouts and compare progress |
The 2026 ACSM resistance training guideline update emphasizes that consistency matters more than overly complicated programs, and resistance training can include bodyweight training when it is performed regularly and matched to the person’s goals and ability.
How Hard Should Each Workout Feel?
Use a simple effort scale from 1 to 10.
For this challenge, most sets should feel like a 6 to 8 out of 10.
That means:
- You are working hard.
- Your breathing increases.
- Your muscles feel challenged.
- You could still do 1 to 3 more good reps if needed.
- Your form does not fall apart.
Avoid going to failure every day. You should finish most workouts feeling challenged, not crushed.
Warm-Up for Every Workout
Do this before each strength workout.
Complete 1 to 2 rounds:
- March in place for 60 seconds
- Arm circles for 30 seconds
- Hip circles for 30 seconds
- Bodyweight good mornings for 10 reps
- Easy squats for 10 reps
- Shoulder taps from a wall or elevated surface for 10 reps
- Glute bridges for 10 reps
The warm-up should make your body feel ready, not tired.
28 Day Calisthenics Challenge Workout Calendar
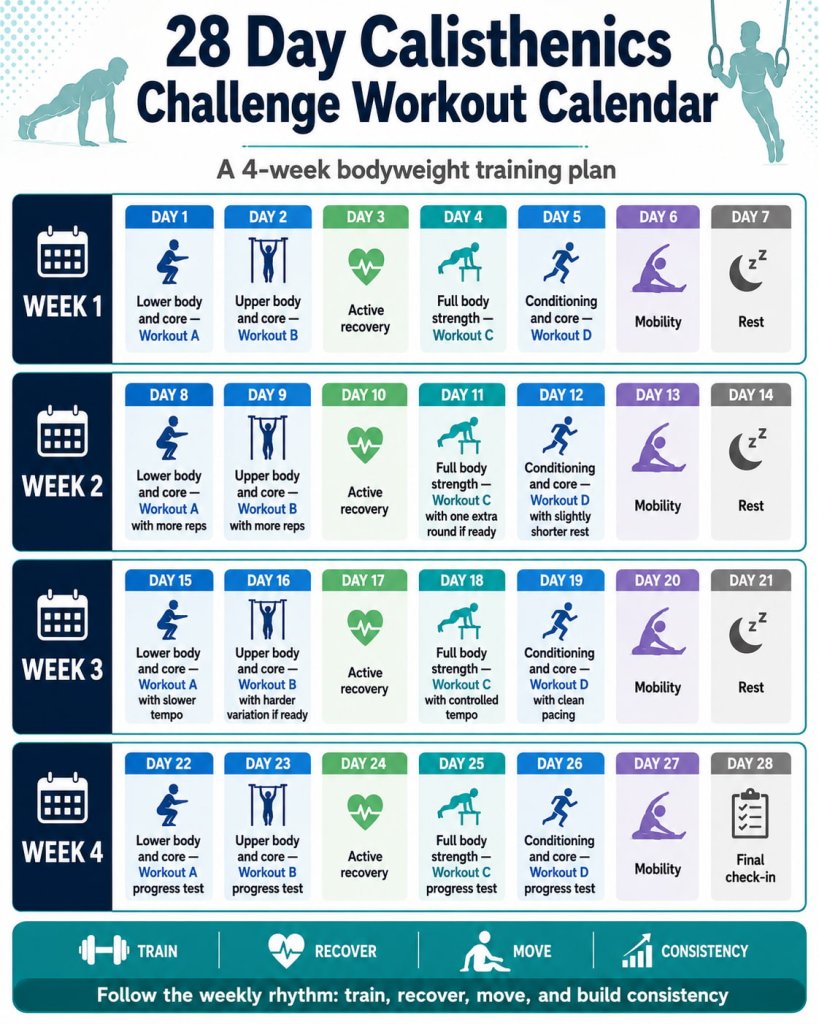
Use this calendar as your main plan. Adjust reps if needed so your form stays clean.
| Day | Focus | Workout |
|---|---|---|
| Day 1 | Lower body and core | Workout A |
| Day 2 | Upper body and core | Workout B |
| Day 3 | Active recovery | Walk, mobility, or light stretching |
| Day 4 | Full body strength | Workout C |
| Day 5 | Conditioning and core | Workout D |
| Day 6 | Mobility | Easy movement and stretching |
| Day 7 | Rest | Full rest or gentle walk |
| Day 8 | Lower body and core | Workout A with more reps |
| Day 9 | Upper body and core | Workout B with more reps |
| Day 10 | Active recovery | Walk, mobility, or light stretching |
| Day 11 | Full body strength | Workout C with one extra round if ready |
| Day 12 | Conditioning and core | Workout D with slightly shorter rest |
| Day 13 | Mobility | Easy movement and stretching |
| Day 14 | Rest | Full rest or gentle walk |
| Day 15 | Lower body and core | Workout A with slower tempo |
| Day 16 | Upper body and core | Workout B with harder variation if ready |
| Day 17 | Active recovery | Walk, mobility, or light stretching |
| Day 18 | Full body strength | Workout C with controlled tempo |
| Day 19 | Conditioning and core | Workout D with clean pacing |
| Day 20 | Mobility | Easy movement and stretching |
| Day 21 | Rest | Full rest or gentle walk |
| Day 22 | Lower body and core | Workout A progress test |
| Day 23 | Upper body and core | Workout B progress test |
| Day 24 | Active recovery | Walk, mobility, or light stretching |
| Day 25 | Full body strength | Workout C progress test |
| Day 26 | Conditioning and core | Workout D progress test |
| Day 27 | Mobility | Gentle movement and recovery |
| Day 28 | Final check-in | Repeat your Day 1, Day 2, or favorite workout |
Workout A: Lower Body and Core
Do 2 to 4 rounds depending on your level.
| Exercise | Beginner | Intermediate |
|---|---|---|
| Bodyweight squat | 8 to 10 reps | 12 to 15 reps |
| Reverse lunge | 6 reps per side | 8 to 10 reps per side |
| Glute bridge | 10 to 12 reps | 15 reps |
| Calf raise | 12 reps | 15 to 20 reps |
| Dead bug | 6 reps per side | 8 to 10 reps per side |
Rest 45 to 90 seconds between rounds.
Workout B: Upper Body and Core
Do 2 to 4 rounds.
| Exercise | Beginner | Intermediate |
|---|---|---|
| Incline push-up or knee push-up | 6 to 10 reps | 10 to 15 reps |
| Superman hold | 10 to 20 seconds | 20 to 30 seconds |
| Shoulder taps | 6 reps per side | 10 reps per side |
| Plank | 15 to 25 seconds | 30 to 45 seconds |
| Side plank | 10 to 20 seconds per side | 20 to 35 seconds per side |
Rest 45 to 90 seconds between rounds.
Workout C: Full Body Strength
Do this as a controlled circuit. Do not rush.
Complete 2 to 4 rounds:
- Squat: 10 to 15 reps
- Push-up variation: 6 to 12 reps
- Split squat: 6 to 10 reps per side
- Bird dog: 6 to 10 reps per side
- Glute bridge march: 6 to 10 reps per side
- Wall sit: 20 to 45 seconds
Rest 60 to 90 seconds between rounds.
Workout D: Conditioning and Core
This workout should raise your heart rate while still protecting your form.
Complete 3 to 5 rounds:
| Exercise | Time or Reps |
|---|---|
| Marching high knees | 30 seconds |
| Mountain climbers | 20 to 30 seconds |
| Bodyweight squat | 10 reps |
| Plank | 20 to 40 seconds |
| Reverse lunge | 6 to 8 reps per side |
| Rest | 60 seconds |
To make it lower impact, do slow mountain climbers and marching high knees instead of running high knees.
Weekly Progression Guide
Progress slowly. Do not add everything at once.
| Week | How to Progress |
|---|---|
| Week 1 | Learn each movement and stay in control |
| Week 2 | Add 1 to 3 reps per exercise or one extra round |
| Week 3 | Add a 2 to 3 second lowering tempo or short pauses |
| Week 4 | Repeat key workouts and compare reps, control, and confidence |
Good progress does not always mean doing more. Better depth, smoother reps, stronger balance, and less wobbling also count.
Main Exercises in the 28 Day Calisthenics Challenge
The ACE Exercise Library includes beginner-friendly exercise instructions across body parts, equipment levels, and difficulty levels, making it a helpful resource for checking movement options and proper form.
1. Bodyweight Squat
Why it works: The bodyweight squat trains your thighs, glutes, hips, and core. It also builds a basic movement pattern you use when sitting, standing, climbing stairs, and picking things up.
Muscles worked: Bodyweight squats mainly work the quadriceps, glutes, hamstrings, calves, and core stabilizers.
How to do it:
- Stand with your feet about shoulder-width apart.
- Keep your chest tall and ribs stacked over your pelvis.
- Push your hips back slightly.
- Bend your knees and lower into a squat.
- Keep your knees tracking in line with your toes.
- Go only as low as you can control.
- Push through your feet to stand tall again.
Trainer Tip: Think “sit down with control, stand up strong.” Do not bounce at the bottom.
2. Incline Push-Up
Why it works: The incline push-up builds upper-body strength while making the push-up easier than doing it from the floor. It is one of the best starting options for beginners.
Muscles worked: Incline push-ups mainly work the chest, shoulders, triceps, core, and serratus anterior.
How to do it:
- Place your hands on a sturdy chair, bench, countertop, or wall.
- Step your feet back until your body forms a straight line.
- Brace your core.
- Bend your elbows and lower your chest toward the surface.
- Keep your elbows angled slightly back, not flared straight out.
- Press through your hands to return to the start.
Trainer Tip: The higher your hands are, the easier the movement becomes. Lower the surface as you get stronger.
3. Reverse Lunge
Why it works: The reverse lunge trains one leg at a time and often feels more controlled than a forward lunge. It helps build leg strength, balance, and hip stability.
Muscles worked: Reverse lunges work the quadriceps, glutes, hamstrings, calves, and core.
How to do it:
- Stand tall with your feet hip-width apart.
- Step one foot back.
- Lower until both knees bend comfortably.
- Keep your front foot flat.
- Keep your front knee tracking in line with your toes.
- Push through the front foot to return to standing.
- Repeat on the other side.
Trainer Tip: If balance is hard, hold a wall or chair lightly. Support is fine when it helps you learn better form.
4. Glute Bridge
Why it works: The glute bridge strengthens the glutes and helps you practice hip extension without needing weights.
Muscles worked: Glute bridges mainly work the glutes, hamstrings, and core.
How to do it:
- Lie on your back with knees bent and feet flat.
- Place your arms by your sides.
- Brace your core gently.
- Press through your heels.
- Lift your hips until your body forms a straight line from shoulders to knees.
- Pause briefly at the top.
- Lower with control.
Trainer Tip: Do not arch your lower back to lift higher. Squeeze your glutes and keep the movement smooth.
5. Plank
Why it works: The plank builds core stability by teaching your trunk to resist sagging, twisting, and excessive movement.
Muscles worked: Planks work the abs, deep core muscles, shoulders, glutes, and back-supporting muscles.
How to do it:
- Start on your forearms and knees or toes.
- Keep elbows under shoulders.
- Brace your core.
- Keep your body in a straight line.
- Avoid letting your hips sag.
- Breathe steadily while holding the position.
Trainer Tip: A perfect 20-second plank is better than a sloppy 60-second plank.
6. Dead Bug
Why it works: The dead bug is a beginner-friendly core exercise that trains control while your arms and legs move.
Muscles worked: Dead bugs mainly work the abs, deep core muscles, hip flexors, and trunk stabilizers.
How to do it:
- Lie on your back.
- Lift your knees over your hips.
- Reach your arms toward the ceiling.
- Brace your core gently.
- Slowly lower one arm and the opposite leg.
- Return to the start.
- Repeat on the other side.
Trainer Tip: Keep your lower back from arching off the floor. Shorten the range if needed.
7. Bird Dog
Why it works: The bird dog trains core control, balance, and back-side stability without heavy spinal loading.
Muscles worked: Bird dogs work the core, glutes, shoulders, and back stabilizers.
How to do it:
- Start on your hands and knees.
- Keep your hands under shoulders and knees under hips.
- Brace your core.
- Reach one arm forward and the opposite leg back.
- Keep your hips level.
- Pause briefly.
- Return with control.
- Switch sides.
Trainer Tip: Move slowly. If your hips twist, reduce the range of motion.
8. Mountain Climber
Why it works: Mountain climbers combine core stability with conditioning. They can be done slowly for control or faster for cardio.
Muscles worked: Mountain climbers work the core, shoulders, hip flexors, glutes, and legs.
How to do it:
- Start in a high plank position.
- Keep your hands under shoulders.
- Brace your core.
- Drive one knee toward your chest.
- Return that foot back.
- Alternate sides.
- Keep your hips controlled.
Trainer Tip: Slow mountain climbers are better for beginners. Speed only helps if your form stays solid.
How to Make the Challenge Easier
Use these modifications if the plan feels too hard.
- Do 1 to 2 rounds instead of 3 to 4.
- Use incline push-ups instead of floor push-ups.
- Use partial squats instead of deep squats.
- Hold a wall or chair during lunges.
- Do planks from your knees.
- Take longer rest periods.
- Skip conditioning intensity and focus on slow control.
- Repeat Week 1 before moving to Week 2.
Making the challenge easier is not failure. It is smart training.
How to Make the Challenge Harder
Use these progressions only when your form is consistent.
- Add one extra round.
- Add 2 to 5 reps per exercise.
- Slow down the lowering phase.
- Add a 1 to 2 second pause.
- Use harder push-up variations.
- Try split squats instead of reverse lunges.
- Reduce rest slightly.
- Add a backpack only if it sits securely and does not change your form.
Progress one variable at a time. Do not add reps, sets, tempo, and load all in the same workout.
How to Track Your Progress
Tracking makes the 28 day calisthenics challenge more useful.
Write down:
- Which workout you completed
- How many rounds you did
- Push-up variation used
- Squat reps
- Plank hold time
- How the workout felt from 1 to 10
- Any discomfort or form issues
- Sleep and energy level
On Day 28, compare your notes from Day 1.
Look for signs like:
- More controlled reps
- Better balance
- Less rest needed
- Longer plank hold
- Lower push-up surface
- Smoother squats and lunges
- More confidence starting workouts
These are real progress markers.
Common Mistakes During a 28 Day Calisthenics Challenge
Avoid these mistakes so the plan stays safe and useful.
| Mistake | Why It Matters | Simple Fix |
|---|---|---|
| Doing too much too soon | Increases soreness and burnout | Start with fewer rounds |
| Skipping warm-ups | Makes movement feel stiff | Warm up 5 to 10 minutes |
| Rushing reps | Reduces muscle control | Use slow, clean reps |
| Training through pain | Can make issues worse | Stop, modify, or get guidance |
| Ignoring recovery days | Limits progress | Respect rest and mobility days |
| Comparing yourself to others | Hurts consistency | Track your own baseline |
| Only chasing sweat | Misses strength and skill | Focus on form and progression |
Who Should Be Careful Before Starting?
Calisthenics is flexible, but not every version is right for every person.
Get guidance first if you have:
- Recent surgery
- Current injury
- Chest pain, dizziness, or fainting during exercise
- Significant balance problems
- Joint pain that worsens with movement
- A medical condition that affects exercise safety
- Pregnancy or postpartum concerns
- No exercise experience and uncertainty about form
Also, modify the plan if you feel sharp pain, unusual shortness of breath, numbness, or symptoms that do not feel normal for you.
Sample Beginner Version
If the full plan feels too much, use this simplified version for the first week.
Do 2 rounds:
- Squat: 8 reps
- Incline push-up: 6 reps
- Glute bridge: 10 reps
- Bird dog: 6 reps per side
- Plank from knees: 15 seconds
Do this 3 days per week with a rest day between sessions.
After that, move into the main 28-day plan.
Sample Intermediate Version
If you already exercise, use this version.
Do 3 to 4 rounds:
- Squat: 15 reps
- Push-up: 10 to 15 reps
- Reverse lunge: 10 reps per side
- Glute bridge march: 10 reps per side
- Plank: 45 seconds
- Mountain climber: 30 seconds
Rest 60 to 90 seconds between rounds.
Best Recovery Tips for the 28 Days
Recovery is part of the challenge.
Use these tips:
- Sleep enough for your age and schedule.
- Eat regular meals with protein, carbohydrates, healthy fats, fruits, and vegetables.
- Drink water throughout the day.
- Walk or stretch lightly on recovery days.
- Do not add extra hard workouts just because you feel motivated.
- Take an extra rest day if soreness affects normal movement.
Consistency works best when it is sustainable.
FAQs About the 28 Day Calisthenics Challenge
Can beginners do a 28 day calisthenics challenge?
Yes. Beginners can do a 28 day calisthenics challenge if they use easier variations, rest when needed, and focus on form. Start with incline push-ups, partial squats, supported lunges, and shorter plank holds.
Can you build strength with calisthenics only?
Yes, calisthenics can build strength because your body weight provides resistance. To keep progressing, you need harder variations, more reps, more sets, slower tempo, pauses, or shorter rest periods.
Do I need a pull-up bar for this challenge?
No. This plan does not require a pull-up bar. However, pulling exercises are useful for a balanced upper body. If you later add a properly installed pull-up bar or resistance band, you can include rows or assisted pull-up progressions.
Is 28 days enough to see results?
Twenty-eight days is enough to build consistency and notice improvements in control, endurance, and basic strength. Bigger muscle and strength changes usually need more time, progressive training, enough food, and recovery.
Should I do calisthenics every day?
You can move every day, but you should not train the same muscles hard every day. This challenge includes strength days, mobility days, active recovery days, and rest days so your body has time to adapt.
What should I do after the 28 days?
After 28 days, repeat the challenge with harder variations or move to a 6 to 8 week calisthenics program. You can also add pulling movements, resistance bands, or weighted bodyweight exercises if your form is solid.
Can this challenge help with weight loss?
This challenge can support an active lifestyle, but weight loss depends on overall habits such as nutrition, total activity, sleep, and consistency. Avoid extreme dieting or excessive exercise. Focus on strength, health, and sustainable routines.
Conclusion
A 28 day calisthenics challenge is a practical way to build strength without a gym. You can train your legs, upper body, core, balance, and conditioning with simple bodyweight exercises at home.
Start with the version that matches your current level. Keep your reps controlled, take recovery seriously, and track your progress from Day 1 to Day 28. The real win is not just finishing the challenge. It is building a stronger routine you can keep using after the 28 days are over.
References
- Harvard Health
Calisthenics basics, bodyweight training benefits, and no-equipment strength support. - CDC
Adult weekly activity guidelines, including aerobic activity and muscle-strengthening recommendations. - Mayo Clinic
Warm-up, proper strength-training form, controlled reps, rest, and pain safety guidance. - ACSM
Updated resistance training guidance, including individualized progression and bodyweight exercise use. - ACE Exercise Library
Exercise instructions and beginner-friendly bodyweight movement variations. - World Health Organization
Global physical activity guidance, including muscle-strengthening recommendations. - Isokinetics and Exercise Science
Research on an 8-week calisthenics training intervention and improvements in strength performance. - Harvard Health
Bodyweight exercise advantages, functional movement, and multi-muscle training benefits.